
The Chrysler 4-wire manifold absolute pressure (MAP) sensor can be tested without using a scan tool and in this tutorial, I'll show you a very accurate way of testing it with only a multimeter (and a vacuum pump).
So, if the check engine light (CEL) is on and you've got diagnostic trouble codes (DTC) P0108, P0109 and you need to check the MAP sensor, this is the tutorial you need.
The MAP sensor diagnostic test is divided into three parts and everything is explained in a step-by-step manner.
Contents of this tutorial:
Also, this tutorial covers several Chrysler 2.0L, 3.2L, and 3.5L vehicles from Chrysler, Dodge, Plymouth. To see if this tutorial applies to your specific vehicle take a look at the 'Applies To' box on the column on the left (or if you're on a mobile device, at the bottom of the page).
If you need to test the 3 wire MAP sensor go to: 3-Wire Chrysler MAP Sensor.
The following OBD II code tutorials will also help you diagnose your MAP sensor:
- P0107 MAP Sensor OBD II Trouble Code (at: troubleshootmyvehicle.com).
- P0108 MAP Sensor OBD II Trouble Code (at: troubleshootmyvehicle.com).
You'll find several Chrysler 'how to test' tutorials by checking out the: Chrysler Index Of Articles.
![]() You can find this tutorial in Spanish here: Cómo Probar El Sensor MAP (De 4 Cables De Chrysler) (at: autotecnico-online.com).
You can find this tutorial in Spanish here: Cómo Probar El Sensor MAP (De 4 Cables De Chrysler) (at: autotecnico-online.com).
Symptoms Of A Bad MAP Sensor
You'll have the check engine light on, for sure, on your instrument cluster and one of several of the following symptoms:
- MAP Sensor diagnostic trouble code (DTC) P0108, P0109 stored in the vehicle's computer's memory.
- P0107: MAP Sensor Voltage Too Low. To learn more about DTC P0107, check out the following tutorial: P0107 MAP Sensor OBD II Trouble Code (at: troubleshootmyvehicle.com).
- P0108: MAP Sensor Voltage Too High. To learn more about DTC P0108, check out the following tutorial: P0108 MAP Sensor OBD II Trouble Code (at: troubleshootmyvehicle.com).
- Really bad gas mileage. You know that it's not the price of gasoline that has you thinking that your car or mini-van is costing you more at the pump.
- Clouds of black smoke coming out of the tail-pipe, especially when you accelerate you car or mini-van.
- No power and/or hesitation as you accelerate the vehicle. It feels like all of a sudden someone cut the power out momentarily as you step on the gas to get the vehicle moving.
How The MAP Sensor Works
The manifold absolute pressure (MAP) sensor's job is to measure the amount of vacuum that is created by the downward stroke of the engine pistons and is one of the most important Inputs the PCM needs to make you car or mini-van run optimally. So here, in a nutshell, is how the MAP sensor works when you crank and start your Chrysler 2.0L, 3.2L, or 3.5L vehicle:
- The fuel injection computer supplies 5 Volts and Ground to the MAP sensor.
- Now, since the throttle is closed, the MAP (with power and Ground supplied) sends the PCM (Powertrain Control Module = Fuel Injection Computer) a DC voltage signal of about 1.1 to 1.8 Volts at idle.
- Once you accelerate the car, the throttle opens and the vacuum immediately decreases as more air rushes into the intake manifold. This causes intake manifold vacuum to decrease with results in the MAP voltage signal to the PCM to increase.
- With this increasing voltage signal, the PCM knows it's time to inject more fuel, advance ignition timing, and a host of other things it has to do to keep your Chrysler 2.0L, 3.2L, or 3.5L vehicle running optimally.
- As you let go off the accelerator pedal to slow down, the throttle plate closes and of course the MAP sensor sends the info to the PCM as it returns to its idle voltage signal, till the whole cycle begins again.
Pretty easy stuff? The cool thing is that the tests to check out the MAP sensor's performance are as easy too. OK, enough of my yakking, let's get this show on the road, go to: TEST 1: Checking The MAP Signal With A Multimeter.
Where To Buy The MAP Sensor And Save
If you find, after testing the manifold absolute pressure (MAP), that it's fried, take a look at the links below. I think they'll save you some bucks:


NOTE: If you're not sure if the above MAP sensor fit your particular Chrysler don't worry, once you get to the site, they'll make sure the sensor is the right one, if not, they'll find you the right one.
TEST 1: Checking The MAP Signal With A Multimeter
The MAP sensor's job is to measure the amount of vacuum the engine is creating and then to convert this into a voltage signal that is sent directly to the Powertrain Control Module (PCM).
When the MAP sensor goes bad, it'll stop producing a MAP signal or will produce and erratic one. So, the very first thing that you'll do, is to check the condition of this MAP signal with a multimeter.
This is a pretty easy test and will take you about 15 minutes or less to do. If you don't own a vacuum pump, you can rent one from your local AutoZone (or O'Reilly Auto Parts). Or you can use your mouth to apply vacuum to the MAP sensor.
NOTE: You'll need a multimeter to test your vehicle's MAP sensor. If you don't have one and need to buy one or upgrade yours, the following recommendation will help: Abe's Digital Multimeter Recommendation.
OK, let's start:
PART 1:
- 1
Remove the MAP sensor from the intake manifold.
Reconnect the MAP sensor to its electrical connector once you have removed it. - 2
Place your multimeter in Volts DC mode.
- 3
Turn the key on but don't crank or start the engine.
- 4
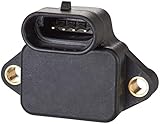
With the red multimeter test lead, probe the wire identified by the number 1 in the image above.
The color of the wires may not be the same on your Chrysler car as the ones in the photo. This is nothing to worry about since the circuits are all the same. - 5
Ground the black multimeter test lead on the battery negative (-) terminal.
- 6
The multimeter should record 4.5L Volts (or somewhere in the 4 Volt neighborhood).
If it doesn't -don't worry about it yet, just continue with the rest of the test steps.
PART 2:
- 7
Connect your vacuum pump to the MAP sensor using a large diameter hose.
Whatever hose you use, it's important that it makes a tight seal on both the MAP sensor's vacuum inlet nipple and the vacuum hose. - 8
Apply vacuum to the MAP sensor. You should the corresponding voltage at the indicated vacuum readings:
1.) 0 in. Hg ...... 4.7 Volts.
2.) 5 in. Hg ...... 3.9 Volts.
3.) 10 in. Hg .... 3.0 Volts.
4.) 15 in. Hg .... 1.1 Volts.
NOTE: On your specific Chrysler vehicle, the actual readings will be a little different (but not by much). The key here is that as you increase vacuum, the voltage reading will decrease in a smooth and linear fashion (without any gaps or crazy readings). Once you release the vacuum you've applied, the voltage reading should go back up to the value you registered in step 4.
Let's take a look at what your test results mean:
CASE 1: As you applied vacuum, the voltage decreased in a smooth linear way with no gaps. This is the correct test result. You can conclude that the manifold absolute pressure (MAP) sensor is OK. No further MAP sensor tests are needed.
Now if the MAP sensor code won't go away, take a look at the info found at: MAP Code Will Not Go Away for a few more suggestions as to what could be causing the MAP sensor diagnostic trouble code (DTC).
CASE 2: As you applied vacuum, the voltage DID NOT decrease. This test result usually tells you that the MAP sensor is fried and needs to be replaced.
But to be sure, the next step is to make sure it's getting power. For this test go to: TEST 2: Verifying The 5 Volt Reference Signal.
CASE 3: The multimeter DID NOT register any voltage. This isn't good, but doesn't condemn the manifold absolute pressure (MAP) sensor as bad yet.
The MAP sensor may not be getting a supply of either power or Ground. For the next test go to: TEST 2: Verifying The 5 Volt Reference Signal.