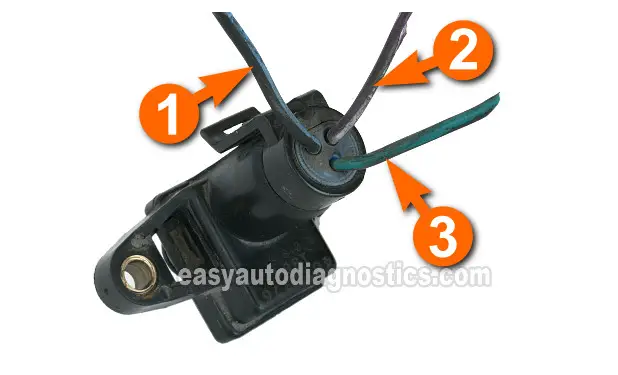
MAP SENSOR TEST 2: Making Sure The MAP Sensor Is Getting 5 Volts

The manifold absolute pressure (MAP) sensor on your Chrysler (Dodge, Eagle, Plymouth) car or mini-van needs power to work. This power comes in the form of 5 Volts DC from the fuel injection computer.
This test will help you to confirm if these 5 Volts are present (or not) by checking for the presence of these 5 Volts with a multimeter.
This is what you'll need to do:
- 1
Place your multimeter in Volts DC mode.
You're gonna' test the number 2 wire, this is the one that supplies power to the MAP sensor. - 2
Probe the wire labeled with the number 2 in the photo above with the red multimeter test lead and an appropriate tool (like a wire piercing probe).
Avoid probing the front of the connector or you run the risk of damaging the female terminal. - 3
Connect the black multimeter test lead to a good and clean Ground point on the engine or directly on the negative (-) battery terminal.
- 4
Have a helper rotate the key to its ON position but don't start the engine.
- 5
The multimeter should display 4.5 to 5 Volts on its screen.
Let's take a look at what your test results mean:
CASE 1: The multimeter registered 4.5 to 5 Volts. This is the correct test result and confirms that the fuel injection computer and the circuit (wire) is supplying the MAP sensor with power.
The next step is to test the Ground circuit of the manifold absolute pressure (MAP) sensor, go to: TEST 3: Making Sure The MAP Sensor Is Getting Ground.
CASE 2: The multimeter DID NOT register 4.5 to 5 Volts. Then the computer or the circuit are NOT providing the voltage that the MAP sensor needs to operate.
The two most likely reasons for this are: 1) an open-circuit problem in the wire or 2) the PCM may be fried.
Altho' it's beyond the scope of this tutorial to test these two conditions, you have now eliminated the manifold absolute pressure (MAP) sensor on your Chrysler (Dodge, Eagle, Plymouth) car or mini-van as being the cause of the problem and/or the MAP sensor diagnostic trouble code (DTC) lighting up the check engine light (CEL).
MAP SENSOR TEST 3: Making Sure The MAP Sensor Is Getting Ground

So far you have verified that:
- The MAP sensor is not creating a MAP signal (MAP SENSOR TEST 1) when you apply vacuum to it.
- The MAP sensor is getting power (MAP SENSOR TEST 2).
The second step, before condemning the manifold absolute pressure (MAP) sensor as bad, is to verify that it also has a good Ground.
NOTE: The PCM is the one that provides this Ground internally, so be careful and don't accidentally or intentionally apply power (12 Volts) to this circuit or you'll fry the PCM.
OK, here are the test steps:
- 1
Place your multimeter in Volts DC mode.
- 2
Probe the wire labeled with the number 1 in the photo above, with the black multimeter test lead.
Avoid probing the front of the connector or you run the risk of damaging the female terminal. - 3
Connect the red multimeter test lead to the battery positive (+) terminal.
- 4
Have your helper turn the key to its ON position but don't start the engine.
- 5
Your multimeter should display 10 to 12 Volts if this circuit is OK and the PCM is providing a good path to Ground.
Let's take a look at what your test results mean:
CASE 1: The multimeter showed 10 to 12 Volts. This is the correct test result and tells you that the PCM and the wire/circuit (that supply this Ground) are OK.
This multimeter test result also confirms that the MAP sensor is bad and needs to be replaced if you have verified:
- That the MAP sensor is not producing a signal when you apply vacuum to it (TEST 1).
- That it is getting 5 Volts DC (TEST 2).
- That it is getting Ground.
Check out my MAP sensor recommendations: Where To Buy The MAP Sensor And Save.
CASE 2: The multimeter DID NOT show 10 to 12 Volts. This test result indicates a problem with either the PCM (internal fault/problem) or an open in the wire between the MAP sensor and the PCM itself.
Altho' testing these two conditions are beyond the scope of this tutorial, you have now eliminated the MAP sensor on your Chrysler (Dodge, Eagle, Plymouth) car or mini-van as being the cause of the problem and/or the MAP sensor diagnostic trouble code (DTC) lighting up the check engine light (CEL).
