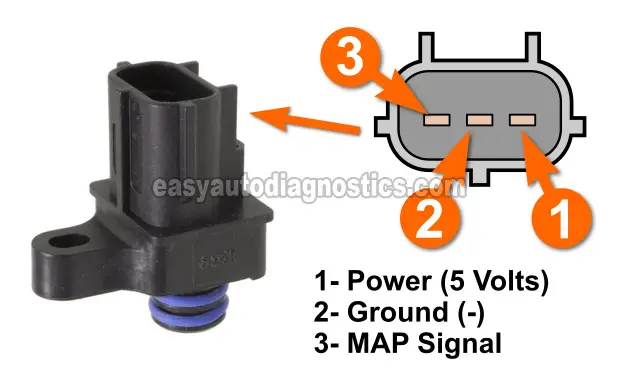
The manifold absolute pressure (MAP) sensor can be accurately tested with a simple multimeter and a vacuum pump.
In this tutorial, I'll show you the 3 basic tests you need to perform to find out if the MAP sensor is fried or not. The best part is that you don't need any fancy or expensive testing equipment to test the MAP sensor.
Contents of this tutorial:
![]() You can find this tutorial in Spanish here: Cómo Probar El Sensor MAP (2000-2004 2.7L Intrepid, Concorde, Stratus) (at: autotecnico-online.com).
You can find this tutorial in Spanish here: Cómo Probar El Sensor MAP (2000-2004 2.7L Intrepid, Concorde, Stratus) (at: autotecnico-online.com).
NOTE: Chrysler/Dodge vehicles use a wide range of different styles of MAP sensors. This tutorial applies only to the following vehicles:
- 2000-2001 2.7L Chrysler Concorde.
- 2000, 2001, 2002, 2003, 2004 2.7L Chrysler Sebring.
- 2000-2001 2.7L Dodge Intrepid.
- 2000, 2001, 2002, 2003, 2004 2.7L Dodge Stratus.
Symptoms Of A Bad MAP Sensor
The fuel injection system on your vehicle is a 'speed density' type system. This means that the fuel injection computer relies on engine RPM, intake air temperature, and manifold vacuum input to calculate the amount of air that's entering the engine.
The PCM can then, among several things, calculate the correct amount of fuel to inject into the engine.
So, when the MAP sensor fails, your vehicle's engine performance is gonna' take a hit. Here's a list of the symptoms you'll see with a failed MAP sensor:
- Diagnostic trouble codes (DTCs):
- P0107: MAP Sensor Voltage Too Low.
- P0108: MAP Sensor Voltage Too High.
- Hard start (in other words: the engine cranks for a long while before it finally starts).
- Black smoke coming out of the tail-pipe when the engine is running.
- Doesn't pass the smog check.
- Engine cranks but does not start.
Let's jump into the first test in the next subheading.
TEST 1: Checking The MAP Sensor Signal

To get the most accurate test result, we need to remove the MAP sensor from its place on the intake manifold plenum and manually apply vacuum to it.
That's right, we're not gonna' rely on the engine's vacuum (while it's running) to test the MAP sensor.
If you don't have a vacuum pump, you can use the 'good ole' lungs' to apply vacuum to the sensor.
NOTE: The ignition key must be in the ON position and the MAP sensor must remain connected to its connector during this test.
Alright, this is what you need to do:
- 1
Remove the MAP sensor from its place on the intake manifold.
- 2
Connect your vacuum pump to the MAP sensor's vacuum port using a vacuum hose. Before you proceed to the next step, make sure the MAP sensor is connected to its connector.
- 3
Place your multimeter in Volts DC mode.
- 4
Connect the red multimeter test lead to the DK GRN/RED wire of the MAP sensor connector.
The DK GRN/RED wire connects to the MAP sensor terminal labeled with the number 3 (in the illustration above).
You'll need to use a tool like a wire piercing probe to access the signal inside the wire. To see what a wire piercing probe looks like, go here: Wire Piercing Probe. - 5
Connect the black multimeter test lead directly to the battery negative (-) terminal.
- 6
Turn the key the ON position but don't start the engine. At this point your multimeter should register about 3.8 to 4.0 Volts DC.
- 7
Now, pump the vacuum pump to apply vacuum to the MAP sensor. The voltage should drop down to 1.1 Volts.
- 8
Apply and release vacuum to the MAP sensor several times. Each time, you should see the MAP signal voltage decrease/increase.
OK, let's take a look at what your vacuum pump test results mean:
CASE 1: Your multimeter registered the indicated voltages, on the DK GRN/RED wire, as you applied vacuum. This tells you that the manifold absolute pressure sensor is OK (not defective).
Now, if your vehicle still has the MAP sensor code lighting up the check engine light on your instrument cluster, take a look at the section: MAP Code Won't Go Away for more info.
CASE 2: Your multimeter registered voltage, but it did not increase or decrease as you applied vacuum. This confirms that the manifold absolute pressure (MAP) sensor is bad. Replacing the MAP sensor will solve the MAP sensor trouble code lighting up the check engine light.
CASE 3: Your multimeter registered 0 Volts, on the DK GRN/RED wire, as you applied/released vacuum. This usually means that the MAP sensor is fried.
To be absolutely sure, we need to make sure that the MAP sensor is being fed both power and Ground. If both are present, then we can conclude that the MAP sensor is bad.
To test for power, go to: TEST 2: Verifying The MAP Sensor Is Getting Power.

