When the crankshaft position (CKP) sensor fails on your 5.2L V8 equipped Dakota or Durango, it'll cause a 'no-start' condition.
In this tutorial, I'll explain how to test the crankshaft position sensor on your 1997, 1998, 1999 5.2L V8 Dodge Dakota and 1998, 1999 5.2L V8 Dodge Durango.
The test can be done with a simple multimeter and since this is an on-car test, you don't have to remove it from your Dakota (Durango) to test it.
Contents of this tutorial:
![]() You can find this tutorial in Spanish here: Cómo Probar El Sensor Del Cigüeñal (1997-1999 Dodge Dakota Y Durango) (at: autotecnico-online.com).
You can find this tutorial in Spanish here: Cómo Probar El Sensor Del Cigüeñal (1997-1999 Dodge Dakota Y Durango) (at: autotecnico-online.com).
WIRING DIAGRAM: You can find the ignition system wiring diagram here: Ignition System Circuit Diagram (1997-1999 5.2L Dodge Dakota And Durango).
Symptoms Of A Bad Crankshaft Position Sensor
When the crankshaft position sensor fails, it'll fail in one of two ways. It'll fail completely and the engine won't start.
Or it'll fail intermittently and cause the engine to run but not start or stall intermittently.
The most common type of failure of the CKP sensor will cause a no-start condition. And this type of complete failure is the focus of this tutorial.
Although the fuel injection computer is designed to set a trouble code P0320: No Crank Reference Signal At PCM when the crankshaft position sensor fails, it doesn't always do so.
Circuit Descriptions Of The Crankshaft Position Sensor

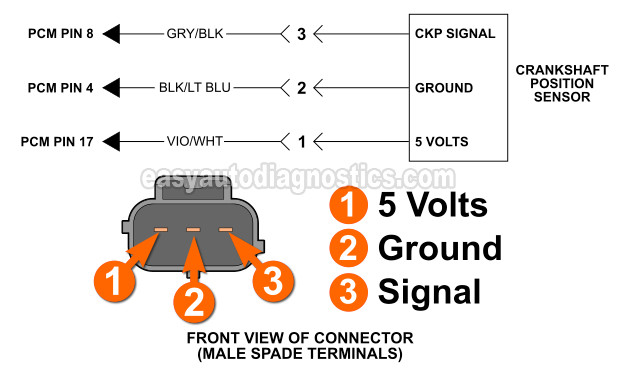
The crank sensor is a 3-wire Hall Effect sensor. This means that one wire feeds it with power, one wire feeds it Ground, and the other takes the CKP signal to the computer.
All three wires connect directly to your Dodge Dakota or Durango's fuel injection computer.
The connector on the sensor itself has male spade terminals. The connector on the engine wiring harness has female terminals.
Below is a brief description of the three wires that connect to the crankshaft position sensor:
| Crankshaft Position Sensor Connector | ||
|---|---|---|
| Pin | Wire Color | Description |
| 1 | Violet with white stripe (VIO/WHT) | Power (5 Volts DC) |
| 2 | Black with light blue stripe (BLK/LT BLU) | Sensor Ground |
| 3 | Gray with black stripe (GRY/BLK) | CKP Signal |
WIRING DIAGRAM: You can find the ignition system wiring diagram here: Ignition System Circuit Diagram (1997-1999 5.2L Dodge Dakota And Durango).
TEST 1: Testing The Crankshaft Position Signal

When the crankshaft position sensor fails, it'll stay stuck producing a fixed voltage instead of creating an ON/OFF signal.
To be a bit more specific: The CKP sensor should create an ON/OFF signal of 5 and 0 Volts DC as the engine turns.
You and I can easily verify this ON/OFF signal with a multimeter connected to the CKP signal wire of the crankshaft position sensor.
Since we're using a multimeter, we need to manually turn the engine and NOT use the starter motor! Using the starter motor will turn the engine too fast and we won't be able to see the ON/OFF pulses.
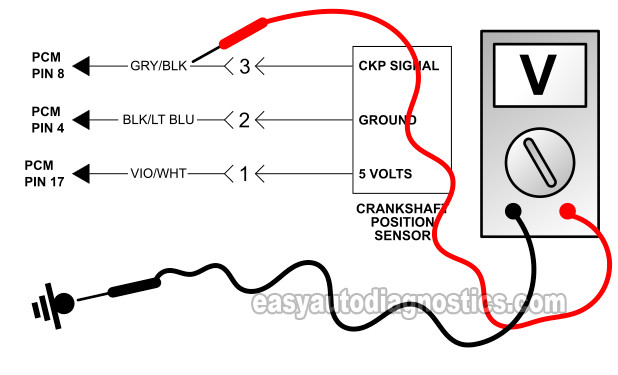
IMPORTANT: The crankshaft position sensor must be connected to its engine harness connector for this test to work. You'll need to connect your multimeter test lead to a back probe or a wire piercing probe to read the crank signal. You can see an example of a wire piercing probe here: Wire Piercing Probe Review (Power Probe PWPPPPP01).
NOTE: Don't have a multimeter or need to upgrade yours? Check out my recommendation: Buying A Digital Multimeter For Automotive Diagnostic Testing.
These are the test steps:
- 1
Place your multimeter in Volts DC mode and re-connect the distributor to its electrical connector.
- 2
Disconnect the ignition coil from its electrical connector. This is an important safety precaution!
- 3
With the red multimeter test lead, probe the gray with black stripe (GRY/BLK) wire of the crank sensor connector.
- 4
Connect the black multimeter test lead directly on the battery negative (-) terminal.
- 5
Turn the ignition key to the ON position and turn the engine by hand using the 1/2" ratchet wrench and appropriate socket on the crankshaft pulley. For the accuracy of the test, do not use the starter motor.
- 6
Your multimeter will read an ON/OFF voltage of 5 Volts and 0 Volts (if the crankshaft position sensor is functioning correctly).
ON is when the multimeter reads 4-5 Volts DC and OFF is when it reads 0 Volts DC.
Let's examine your CKP signal test result:
CASE 1: The multimeter read the indicated ON/OFF DC voltage. This is the correct and expected test result and tells you that the crankshaft position sensor is functioning correctly.
Since the crankshaft position sensor IS NOT defective, something else is causing your Dakota or Durango to not start.
CASE 2: The multimeter DID NOT read the indicated ON/OFF DC voltage. This test result tells you that the crank sensor is defective. Before you replace it, make sure it's getting power and Ground. For this test go to: TEST 2: Making Sure The Crank Sensor Has Power And Ground.
