Testing the EGR system on your Ford, Mercury, or Lincoln car or truck is a pretty easy affair. You don't need expensive testing equipment to do it and more importantly, with this article you'll be able to find out exactly what part (of the entire system) is bad and needs to be replaced and in the process saving time and money.
You'll find step by step instructions on how to test:
- EGR Valve
- DPFE Sensor
- (Delta Pressure Feedback Egr)
- EGR Valve Vacuum Regulator Solenoid
- Power Circuits
This ‘How To Test’ article covers three different types of Ford EGR DPFE Sensors and below you'll find important info that'll help you to successfully troubleshoot/diagnose the EGR valve code that is lighting up your check engine light. Once you start testing, I recommend you start from TEST 1 and go from there.
Contents of this tutorial:
- Common Symptoms Of A Bad EGR Valve.
- What Tools Do I Need?
- Ford EGR Valve DPFE Circuit Descriptions.
- Ford EGR Valve Vacuum Solenoid Circuit Descriptions.
- Safety Precautions When Testing.
- TEST 1: EGR Valve Vacuum Pump Test.
- TEST 2: Testing The DPFE EGR Flow Signal.
- TEST 3: Bench Testing The EGR Valve.
- TEST 4: Testing The EGR Vacuum Regulator Solenoid (Part 1).
- TEST 5: Testing The EGR Vacuum Regulator Solenoid (Part 2).
- TEST 6: Testing The EGR Vacuum Regulator Solenoid (Part 3).
- TEST 7: Testing The DPFE 5 V REFERENCE SIGNAL.
- Some Tips And Suggestions.
- TEST 8: DPFE Sensor Ground Return.
- Some Tips And Suggestions.
- Real Life Case Studies From easyautodiagnostics.com Readers.
- Real Life Case Study 1.
![]() You can find this tutorial in Spanish here: Cómo Probar La Válvula EGR, el Sensor DPFE, y el Solenoide de Vacío de Ford (at: autotecnico-online.com).
You can find this tutorial in Spanish here: Cómo Probar La Válvula EGR, el Sensor DPFE, y el Solenoide de Vacío de Ford (at: autotecnico-online.com).
Common Symptoms Of A Bad EGR Valve
The following are the most common symptoms that a Ford (or Mercury or Lincoln) car or truck will usually experience when there's a fault in the EGR system:
- Car or truck runs fine, but the check engine light (CEL) is on with an EGR Valve Fault Code:
- P0401 EGR System Flow Insufficient.
- P01406 EGR Valve Pintle Position.
- Rough Idle.
- Really bad gas mileage.
- Lack of power as you accelerate the vehicle down the road.
- Car (or truck or mini-van) seems to run OK above 30 miles and hour but once you come to an idle, the engine barely stays running and/or idles rough. Once you take off again, it runs OK.
What Tools Do I Need?
Below is a list of must-have tools that you'll need to successfully use the testing information in this article to solve the EGR valve system malfunction on your Ford, Mercury, or Lincoln car or truck.
- A multimeter (don't have a digital multimeter? Need to buy one? Click here to see my recommendations: Buying A Digital Multimeter For Automotive Diagnostic Testing).
- Vacuum pump.
- Vacuum gauge.
- About two feet of vacuum hose.
- A repair manual.
- For whatever remove and replace info you'll need that isn't covered by this article.
- A wire-piercing probe
- This tool, which you can attach to your multimeter, is a time-saver. Most of the tests that you're about to perform have to be done with the connector connected to its component and this tool will come in very handy! If you want to see what one looks like, click here: Wire Piercing Probe.
Ford EGR Valve DPFE Circuit Descriptions
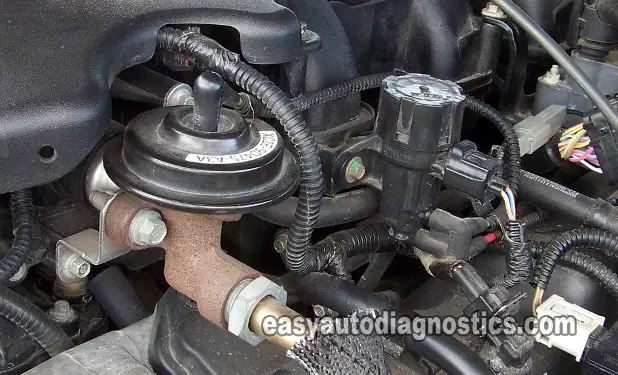
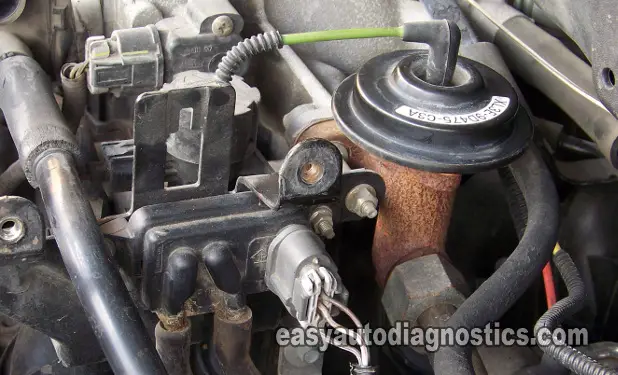
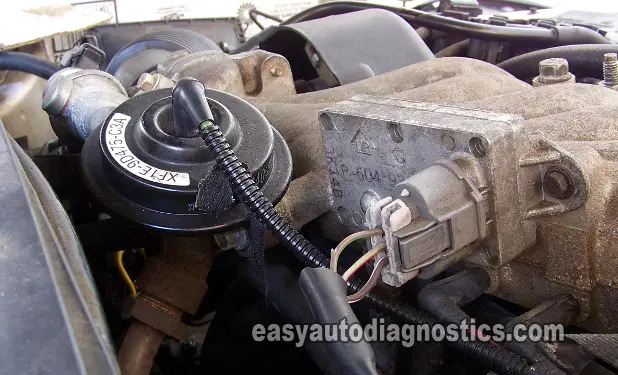
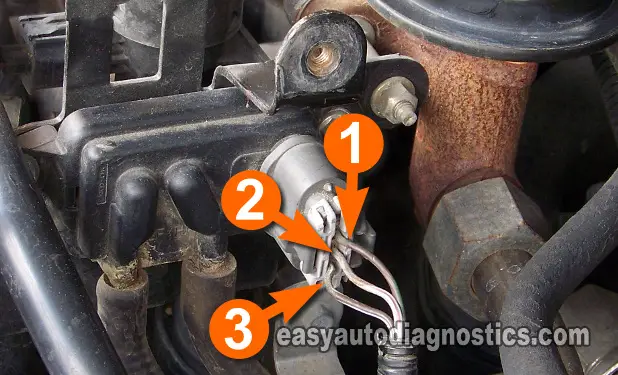
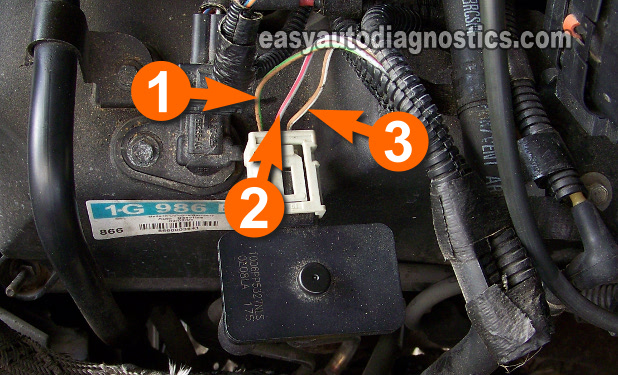
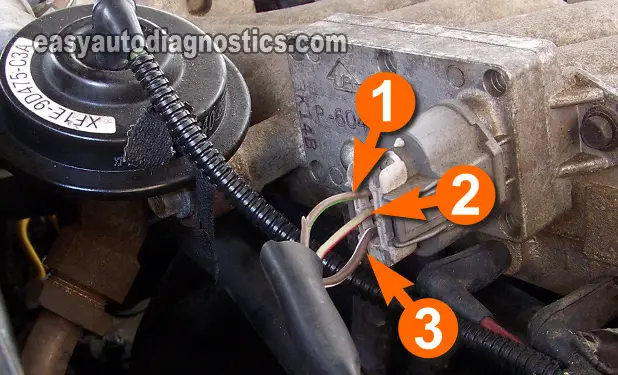
As already mentioned, this article covers three different styles DPFE sensors. Two are bolted onto the engine (one is plastic and the other is metal), and the other is suspended in place just by the two hoses that are attached to it. They all function in the exact same manner. The following circuit descriptions apply to all three DPFE sensors in the image viewer.
- Circuit labeled 1:
- DPFE Flow Signal
- Circuit labeled 2:
- Sensor Ground.
- Circuit labeled 3:
- 5 Volt Reference Voltage.
To make it easy for you to test the particular DPFE sensor on your Ford (or Mercury or Lincoln) car or truck, I have included images of all three types of DPFE sensors with the specific circuit (you need to test) highlighted.
Also, the color of the wires of the DPFE sensor or EGR Vacuum Regulator Solenoid, on your Ford or Lincoln or Mercury vehicle, will not match the ones in the photos in the image viewer, this is no cause for concern. The circuit descriptions are the same no matter what the individual color of the wires on your Ford (Lincoln, Mercury) car or truck.
Ford EGR Valve Vacuum Solenoid Circuit Descriptions
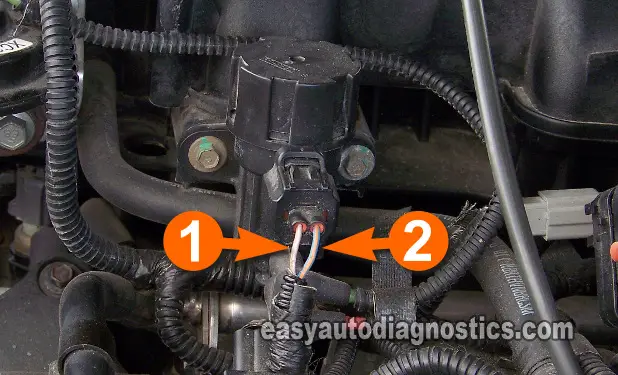
The EGR Vacuum Regulator Solenoid is the second electrical component of the EGR system of your Ford (or Mercury or Lincoln) car or truck that you'll be diagnosing with the help of this article.
The EGR Vacuum Regulator Solenoid is the same no matter what type of DPFE sensor your Ford vehicle is using.
- Circuit labeled 1:
- Power (12 Volts) Circuit.
- Circuit labeled 2:
- Solenoid Control Signal from PCM (Powertrain Control Module=Fuel Injection Computer).
The color of the wires on your Ford vehicle will not match the ones in the photo above, this is no cause for concern. The circuit descriptions are the same no matter what the individual color of the wires on your Ford (Lincoln, Mercury) car or truck.
Safety Precautions When Testing
Most of the tests that you're about to do are done with your vehicle's engine running (idling). Therefore, it's important that you stay alert, use common sense and take all necessary safety precautions to keep yourself safe.
Also, the EGR valve can get very hot and so you must take care not to burn your hands or fingers.
TEST 1: EGR Valve Vacuum Pump Test
IMPORTANT: To success-fully use this info and correctly diagnose the EGR valve system on your Ford (or Lincoln or Mercury) car or truck do not skip from test to test on your own. Follow the indicated flow of test steps that each test recommends.
The very first thing that we'll do is to verify that the EGR valve itself is working. You'll need a vacuum pump for this test.
This test is done with the engine running, so take all safety precautions.
- Remove the vacuum hose from the EGR valve.
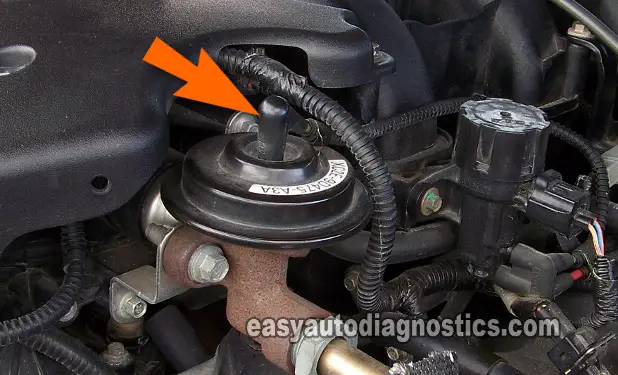
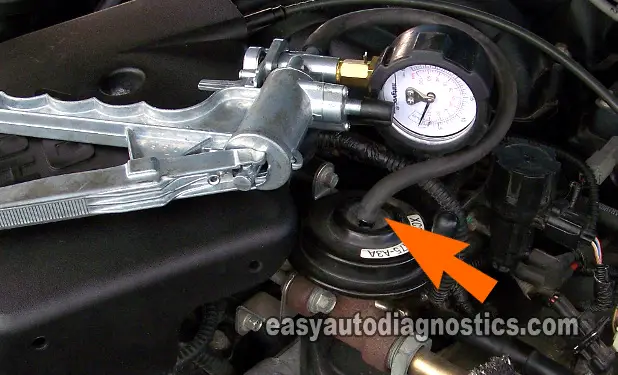
- Connect a vacuum pump, using a vacuum hose, to the EGR vacuum hose nipple on the EGR valve (see photos in image viewer).
- Have an assistant crank up the car (or truck).
- Once the engine has started and is idling, apply vacuum with the vacuum pump.
- As you apply vacuum, the engine should start to immediately idle very rough and possibly stall.
- Now, apply vacuum again with the vacuum pump and hold the vacuum for about a 20 second count.
- The vacuum pump gauge's needle should stay steady at whatever number of in.Hg (or kpa) vacuum you have pumped it up to.
- If the vacuum pump gauge's needle does not hold steady, but starts to go down to 0 (zero) in.HG, check that the vacuum hose that is connecting the vacuum pump to the EGR valve is making a tight connection on both the EGR valve and the vacuum pump.
- When you are sure of your result, turn off the engine.
Let's find out what your test results mean:
CASE 1: The engine idle grew worse as you applied vacuum with the vacuum pump and the vacuum pump's gauge needle stayed steady. This test result indicates that the EGR valve is working correctly and that the EGR passages in the intake manifold (and in the EGR valve itself) are not blocked with carbon.
The next step is to verify that the DPFE sensor is working correctly. Leave the vacuum pump connected to the EGR valve and go to: TEST 2: Testing The DPFE EGR Flow Signal.
CASE 2: The engine idle grew worse as you applied vacuum with the vacuum pump and the vacuum pump's gauge needle DID NOT stay steady. Verify that the vacuum hose you have connected to both the vacuum pump and the EGR valve is not leaking vacuum and re-do the test.
If after verifying that the vacuum hose is making a tight seal and the vacuum needle on the gauge still drops (after applying vacuum to EGR valve with the engine idling), then this result indicates that the EGR valve's inner rubber diaphragm is torn and leaking vacuum, although the EGR valve is working correctly. Replace the EGR valve and road-test the car or truck.
CASE 3: The engine idle DID NOT CHANGE as you applied vacuum with the vacuum pump. This test result indicates one of two things either that 1) the EGR valve is bad because its rubber diaphragm is torn, or 2) that the EGR exhaust gas passages are blocked in the EGR valve itself, or 3) the inlet EGR orifice on the intake manifold is blocked with carbon.
The next step is to remove the EGR valve and bench test it, go to: TEST 3: Bench Testing The EGR Valve.

