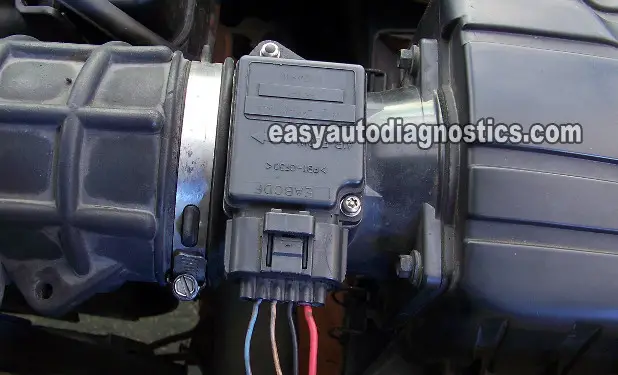
Testing the Ford Mass Air Flow (MAF) sensor on all Ford, Lincoln and Mercury cars and trucks is a very simple test that can be performed without a scan tool. All you need is a multimeter. I recommend using a digital multimeter, but an analog multimeter can also be used.
Ford has used a hot wire mass air flow sensor for many years, which comes either with or without an internal air temperature sensor. If the MAF sensor has 6 wires, that's a sure sign that the air temperature sensor is built into it.
If the Ford MAF sensor on your car has 4 wires, there is no built-in air temp sensor (the air temp sensor is somewhere on the air duct that connects the MAF sensor to the throttle body, or somewhere on the intake manifold).
NOTE: There are different types of Ford MAF sensors. These are available in either a black or light gray body and with 6 or 4 wires in the connector. No matter what body color the MAF sensor is or how many wires the connector has, they are all tested the same way!
Contents of this tutorial:
- Common Symptoms Of A Bad Ford MAF Sensor.
- Is The MAF Sensor Just Dirty?
- Air Leaks.
- MAF Sensor Circuit Descriptions.
- Summary Of The MAF Sensor Tests.
- MAF TEST 1: Testing The MAF Signal.
- MAF TEST 2: Testing The Power Circuit.
- MAF TEST 3: Testing The Chassis Ground Circuit.
- MAF TEST 4: Testing The 2nd Ground Circuit.
![]() You can find this tutorial in Spanish here: Cómo Probar El Sensor De Flujo De Aire (Sensor MAF) de Ford (at: autotecnico-online.com).
You can find this tutorial in Spanish here: Cómo Probar El Sensor De Flujo De Aire (Sensor MAF) de Ford (at: autotecnico-online.com).
If your Ford or Mercury vehicle uses the MAF sensor in the round Canister Air Filter assembly, go here: Ford MAF In Round Canister Air Filter Assembly.
Common Symptoms Of A Bad Ford MAF Sensor
This is not the most definitive list on the subject, but it does cover the majority of symptoms I've seen with these types of Ford mass air flow sensors:
- MAF Codes that light up the check engine light (CEL) on your instrument cluster.
- P0102: MAF Signal Low Input to PCM.
- P0103: MAF Signal High Input to PCM.
- P1100: MAF Circuit Intermittent Voltage Input.
- P1101: MAF Sensor Circuit Output Voltage low During KOEO Self Test.
- MAF sensor malfunction that DOES NOT light up the check engine light (CEL).
- Lean and/or Rich code(s).
- Fuel Trim code(s).
- A tremendous lack of power upon acceleration.
- Black smoke coming from the tail-pipe.
- Bad gas mileage.
- Vehicle may idle rough and stall.
Is The MAF Sensor Just Dirty?
The most common fix I've performed on the majority of MAF sensor problems on Fords have been cleaning it. Now, the symptoms that accompany a dirty (contaminated) Ford MAF sensor are not that harsh or noticeable on engine performance (of course this is not an absolute truth).
What I mean is that a dirty MAF sensor doesn't wreak a lot of havoc on the car or truck. Usually the biggest complaints are bad gas mileage and/or a slight lack of power. So how do I diagnose a dirty/contaminated Ford MAF sensor? Well:
- I'll remove it (before I start any testing) and eye-ball the two 'hot-wires' to see if they are covered in fuzz or other material (you can see an example of this here: Dirty MAF Sensor Example).
- Or, I'll test it first following the guidelines set in this article, to see if it's producing a MAF signal.
- If it is producing a signal, but the signal's response is too slow to changes in throttle position, then I know to look into cleaning it.
- If you need to clean it, here's the article: How To Clean The Ford Mass Airflow Sensor (at troubleshootmyvehicle.com).
Why does it get dirty/contaminated? Well, this MAF sensor easily becomes contaminated with dirt and stuff from the air filter not performing its job or the box that holds the air filter is broken or not sealing correctly. The Ford MAF sensors are some of the easiest MAF sensor to clean. All it takes is to remove the two torx head screws that hold it in place and spray-clean the two hot-wires with a MAF sensor Cleaner.
Air Leaks
The second most common problem I have encountered on most Fords (Mercury and Lincoln) over the years is air leaks between the MAF sensor and the throttle body.
It is crucial, yes very critical that you first check that there are no air leaks between these two. Air entering after the mass air flow sensor into the engine will negatively impact fuel injection. And will skew the results of your tests which could result in the replacement of a good MAF (and in the process throwing money away).
How do you check for air leaks? With your eyes and hands. That's right, no special tools required. Just eyeball and physically shake/move the ducting to see if it's loose or disconnected.
MAF Sensor Circuit Descriptions
Whether your Ford, Mercury or Lincoln vehicle has a MAF sensor with 4 or 6 wires (coming out of the connector), their circuits share the same circuit descriptions.
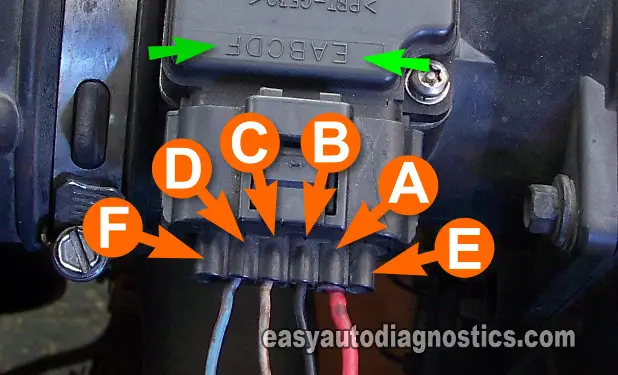
Photo 1 of 2 in the image viewer is that of a 4-wire MAF sensor. This is a MAF sensor without an intake air temperature (IAT) sensor.
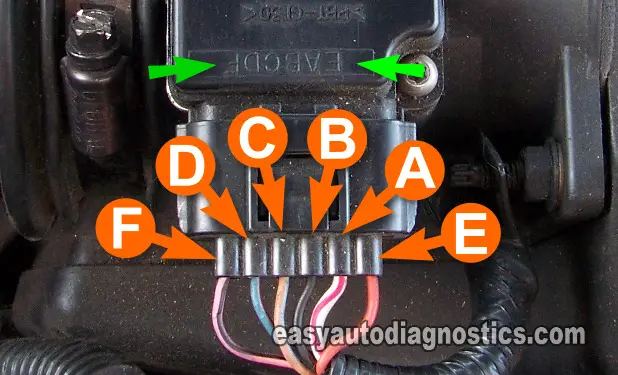
Photo 2 of 2 shows a 6-wire MAF since the IAT sensor is integrated into the assembly.
You'll notice that in the photos (in the image viewer) the MAF connectors are lettered A through F (if you look closely at the MAF sensor body, you'll see those letters on it too). I'll be using these letters for the circuit descriptions.
Here's the description of each circuit below:
- Letter F:
- Intake air temperature (IAT) sensor circuit (not applicable if you have a 4 wire MAF sensor).
- Letter D:
- MAF Signal.
- Letter C:
- Ground that the ECM provides.
- Letter B:
- Ground.
- Letter A:
- 12 Volts.
- Letter E:
- Air Temp. sensor circuit (not applicable if you have a 4 wire MAF sensor).
Using a wire-piercing probe is the most effective and easy way of getting to the MAF signal, since you don't risk damaging the female terminals of the connector by probing them directly. If you need to see what this tool looks like, click here: Wire-Piercing Probe. Independent of the method you use, be careful not to damage the wire or the female terminal. Take all safety precautions.
Another important thing to note is that the color of the wires (coming out of your Ford, Lincoln or Mercury car or truck) does not matter. In other words, the circuit description/job of the wire is the same regardless of Make/Model and color of the wire.
IMPORTANT: All of the tests are ON CAR TESTS, do not remove the mass air flow sensor from the vehicle or from its plumbing.
Summary Of The MAF Sensor Tests
OK, you'll start by checking that the MAF sensor is producing a voltage signal that increases/decreases as you accelerate/decelerate the engine.
Next, you'll check that the MAF sensor is getting 12 volts and chassis Ground. Finally, you'll check that the fuel injection computer is providing a sensor Ground to the MAF sensor.
To successfully diagnose the MAF sensor as good or bad, you need to know that it generates an DC voltage signal as the engine runs.
The DC voltage of this MAF signal is directly related to the amount of air the engine is breathing. So if the engine inhales more air at 2500 RPM than when idling at 900 RPM, the output voltage at 2500 RPM will be greater than at idle.
Now when testing this voltage signal, the important thing is not to know an actual Volts value at a given RPM, but rather to see if the voltage value is stuck in one number as you increase/decrease the engine RPMs.
MAF TEST 1: Testing The MAF Signal

The first thing we're gonna do is check that the MAF sensor's voltage signal increases/decreases as we accelerate/decelerate the engine.
It's important that the engine be at its normal operating temperature. So, start the engine and let it reach it's normal operating temperature.
IMPORTANT: I know I'm stating the obvious, but the MAF sensor must be connected to its connector in order to perform this test. You'll need to use a back probe on the connector or a wire-piercing probe on the wire. You can see an example of this tool and where to buy it here: Wire-Piercing Probe.
OK, let's start:
- 1
Place your multimeter in Volts DC mode.
- 2
Reconnect the MAF sensor to its electrical connector.
- 3
With a suitable tool connected to the red multimeter test lead, probe the wire labeled with the letter D in the photo above.
- 4
Connect the black multimeter test lead to the battery negative (-) terminal.
- 5
Crank and start the engine and let her idle.
Once the idle stabilizes, take a look at the voltage number or numbers your multimeter is throwing at you. This voltage may fluctuate a little or a lot, and this is OK. Whatever they're doing, this is your base MAF signal voltage. - 6
Now, open the throttle (manually) to rev up the engine.
As the engine revs up, keep your eyes on the multimeter's voltage numbers.
The voltage value should increase as the engine RPM increases. - 7
Let go off of the throttle and let the idle come down.
The voltage reading should decrease and should hover around the numbers you noticed at the beginning of this test. - 8
Rev up/rev down the engine several times. Each time, the voltage numbers on your multimeter should increase/decrease smoothly.
- 9
If the MAF sensor is good, the voltage numbers on the multimeter should rise and fall smoothly and without gaps.
If the MAF sensor is bad, the voltage will stay stuck in one value as your rev up/rev down the engine.
Let's take a look at what your test results mean:
CASE 1: The voltage reading increased/decreased as you accelerated/decelerated the engine. This tells you that the MAF sensor is good and is not the cause of the MAF problem or diagnostic trouble code.
CASE 2: The voltage value got stuck as you accelerated/decelerated the engine. Double check all your multimeter connections and test again.
If the displayed voltage is still not rising and falling smoothly, your next step is to make sure that the MAF sensor is getting power. Go to: MAF TEST 2: Testing The Power Circuit.


