TEST 2: No Spark From Only One Boot

If one spark plug boot did not fire off spark (in TEST 1), then this is a clear indication that one of the two ignition coils inside the ignition coil cover is bad.
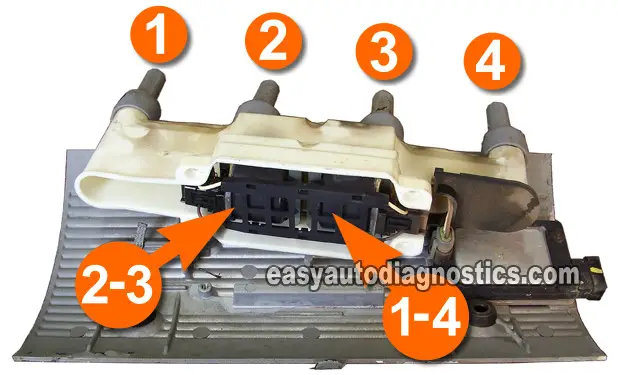
But which of the two ignition coils is it? Well, it's the one that feeds the spark plug boot that did not fire off spark in TEST 1. We can identify this ignition coil using the info in the photo above.
- If spark plug boot #1 did not fire off spark, then the ignition coil identified with the numbers 1-4 (in the photo above) is the one that is defective.
Ignition coil 1-4 is on the driver side of the engine compartment. - If spark plug boot #2 did not fire off spark, then the ignition coil identified with the numbers 2-3 (in the photo above) is the one that is defective.
Ignition coil 2-3 is on the passenger side of the engine compartment. - If spark plug boot #3 did not fire off spark, then the ignition coil identified with the numbers 2-3 (in the photo above) is the one that is defective.
Ignition coil 2-3 is on the passenger side of the engine compartment. - If spark plug boot #4 did not fire off spark, then the ignition coil identified with the numbers 1-4 (in the photo above) is the one that is defective.
Ignition coil 1-4 is on the driver side of the engine compartment.
As a side note: Replacing just that ignition coil should solve the problem but not always. The bad news is that 8 times out 10, you're also gonna' need to replace the ignition coil cover too (see the photo above to see what the ignition coil cover is). So my recommendation is to replace the coil cover and the boots along with the ignition coil that you have identified as bad.
In case you're wondering why it's best to replace the coil cover along with the ignition coil, here are the two main reasons:
- The coil cover over time starts to crack (since as you already know, it's made out of plastic) and depending where these cracks appear, the spark will be channeled to Ground instead of to the spark plug. Over time, this ruins the ignition coil. What really sucks is that these cracks are not always visible.
- The ignition coil cover starts to develop carbon tracks that route the spark to Ground instead of to the spark plug. This condition will also damage the ignition coil. What sucks about this too, is that these carbon tracks may not be visible.
To see what this looks like, see the photo in section: TEST 5: You Got Spark From All Boots.
So, in view of this, I recommend that you replace both the ignition coil that is defective, the ignition coil cover, and the four ignition boots.
TEST 3: No Spark From Two Boots That Feed Paired Cylinders

You've reached this point because you got a no spark result from the ignition coil cover boots that feed either paired cylinders 1 and 4 or paired cylinders 2 and 3 in TEST 1.
This result usually indicates that the ignition coil that feeds spark to those cylinders is bad and in some rare occasions, that the ignition module has fried. Thankfully, with the following test you'll be able to find out.
To further test this, you'll need to identify which ignition coil is the one that feeds the two cylinders (that are not getting spark) using the photo in test section TEST 2.
Let's start:
- Remove the four bolts that attach the plastic ignition coil cover to the aluminum cover.
Expose the ignition coils (as shown in the photo in test section TEST 2). - Identify the ignition coil that is not feeding spark to the boots that did not fire spark in TEST 1 with the help of the photo in TEST 2.
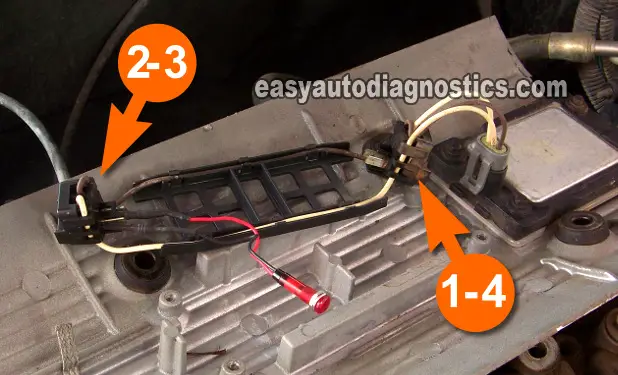
In the photo (of TEST 2), the spark plug boots are identified with their cylinder numbers. The ignition coil identified as 1-4 feeds spark to cylinders #1 and #4. The ignition coil identified as 2-3 feeds spark to cylinders #2 and #3. - Disconnect BOTH ignition coils from their connectors and set them and ignition coil cover to the side. You should leave the ignition module bolted to the aluminum cover. Your set up should look like what I have in the photo above.
- Leave the wire harness (that connects to the ignition coils that you have just removed) connected to the ignition control module (see photo above).
- Using the photo above as a reference, connect the red lead of the LED light to the ignition connector terminal that attaches to the BROWN wire. The connector your testing should be of the ignition coil that you have identified as the one that feeds spark to the spark plug boots that DID NOT fire off spark in TEST 1.
This terminal (that connects to the brown wire) is the one that feeds 12 Volts to the ignition coil. - Connect the black lead of the LED to the remaining terminal (on the ignition coil connector). A white wire connects to this connector terminal.
This is the terminal that feeds the 'Switching signal' to the ignition coil. - Have your assistant crank the engine while you observe the LED light. the LED light should flash ON and OFF the whole time the engine was cranking.
Let's find out what your test results mean:
CASE 1: The LED flashed ON and OFF. This test result tells you that the ICM is creating and providing an activation signal for the coil you're testing.
You can conclude that the ignition coil is bad (and needs to be replaced) only if you have made sure that you got a no spark test result from the 2 spark plug boots it feeds spark to (in TEST 1).
My recommendation to you is to replace the ignition coil along with the ignition coil cover and the spark plug boots. Here are the main reasons why:
- The coil cover over time starts to crack (since as you already know, it's made out of plastic) and depending where these cracks appear, the spark will be channeled to Ground instead of to the spark plug. Over time, this ruins the ignition coil. What really sucks is that these cracks are not always visible.
- The ignition coil cover starts to develop carbon tracks that route the spark to Ground instead of to the spark plug. This condition will also damage the ignition coil. What sucks about this too, is that these carbon tracks may not be visible.
To see what this looks like, see the photo in section: TEST 5: You Got Spark From All Boots.
So, in view of this, I recommend that you replace both the ignition coil that is defective, the ignition coil cover, and the four ignition boots.
CASE 2: The LED DID NOT flash ON and OFF. This test result tells you that the ignition module IS NOT creating and providing an activation signal for the coil you're testing.
This test result also tells you that the ignition module is bad. We can eliminate the ignition coil as the source of the no-spark condition on the boots that did not fire off spark. Replace the ignition control module.
TEST 4: No Spark From Two Boots That Are NOT Paired Cylinders

It's rare to get a no spark test result from 2 spark plug boots that don't belong to the same ignition coil, but it does happen. This usually indicates one of two things: 1) that the plastic ignition coil cover is bad and needs to be replaced or 2) both ignition coils are bad. Unfortunately, the only way to test the plastic coil cover and the ignition coils is to replace the ignition coil cover first with a known good used one or a new one.
Then, after replacing it, you'll have to re-test for spark again to see if this solved the problem. If it did not, then the ignition coils have to be replaced.
Now, in any other 'normal' GM ignition system, we would be able to isolate every component and test them individually to find out exactly what needs to be replaced, but the way the Quad 4 ignition system has been designed, this is not possible.
So, again, my recommendation to you is to replace the coil cover and the four boots (that connect to it) first and re-test before proceeding to replace the ignition coils.
Here's some info that might help as you visually inspect the coil cover:
- The coil cover over time starts to crack (since as you already know, it's made out of plastic) and depending where these cracks appear, the spark will be channeled to Ground instead of to the spark plug. Over time, this ruins the ignition coil. What really sucks is that these cracks are not always visible.
- The ignition coil cover starts to develop carbon tracks that route the spark to Ground instead of to the spark plug. This condition will also damage the ignition coil. What sucks about this too, is that these carbon tracks may not be visible.
To see what this looks like, see the photo in section: TEST 5: You Got Spark From All Boots.
In closing, I want to emphasize one very, very important thing: this advice only applies if you have used an HEI spark tester for all of the spark tests in TEST 1 and have followed all of the test steps to the letter.
