
This article will show you how to test and diagnose a bad GM mass air flow (MAF) sensor on all of the early 90 thru' mid 90's Buick, Olds, Pontiac 3.1L, 3.3L and 3.8L V6 equipped cars (to be more specific: 89-96).
If you need to just clean the MAF sensor, you can find this article here: Cleaning The MAF Sensor (at: troubleshootmyvehicle.com).
This is an ON CAR Test that's accomplished in three (3) easy test steps. This section includes important information that will help you make this MAF Test a breeze.
Contents of this tutorial:
 You can find this tutorial in Spanish here: Cómo Probar El Sensor MAF GM 3.1L, 3.3L, 3.8L (1988-1996) (at: autotecnico-online.com).
NOTE: In case this is not the article you're looking for, there are also 3 other GM MAF sensor test articles:
- How To Test The GM Mass Air Flow Sensor (Early Type): Buick, Chevy, Olds, Pontiac 3.1L, 3.4L, 4.3L, 5.0L, 5.7L V6 Engines (1996-2005)
- How To Test The GM MAF Sensor: Buick, Chevy, Olds, Pontiac 3.8L V6 Engines (1996-2005)
- How To Test The GM Mass Air Flow (MAF) Sensor: 4.8L, 5.3L, 6.0L, and 8.1L V8 Engines (1999-2010)
- How To Test The GM Mass Air Flow Sensor: GMC Savana Van and Chevy Express Van 4.3L, 5.3L, 6.0L Engines (2003-2008)
Common Symptoms Of A Bad GM MAF Sensor
This list covers the majority of symptoms I've seen on these types of GM mass air flow sensors:
- MAF Codes that light up the check engine light (CEL) on your instrument cluster.
- MAF sensor malfunction that DOES NOT light up the check engine light (CEL).
- Lean and/or Rich code(s).
- Fuel Trim code(s).
- A tremendous lack of power upon acceleration.
- Black smoke coming from the tail-pipe.
- Bad gas mileage.
- Vehicle may idle rough and stall.
What Tools Do I Need?
The most important tool that you're gonna' need is a Digital Multimeter that can read high Hertz (Hz) Frequency (don't have a digital multimeter that can read Hertz frequency? Click here to see my recommendations: Tekpower TP8268 AC/DC Auto/Manual Range Digital Multimeter (Amazon affiliate link)). A scan tool (Automotive Diagnostic Scanner) is not needed. I would also recommend using a wire-piercing probe to to test the signal of each wire (to see what this tool looks like, click here: Goupchn 4mm Banana to Banana Plug Test Leads Kit (Amazon affiliate link).
Circuit Descriptions Of The GM MAF Sensor Connector
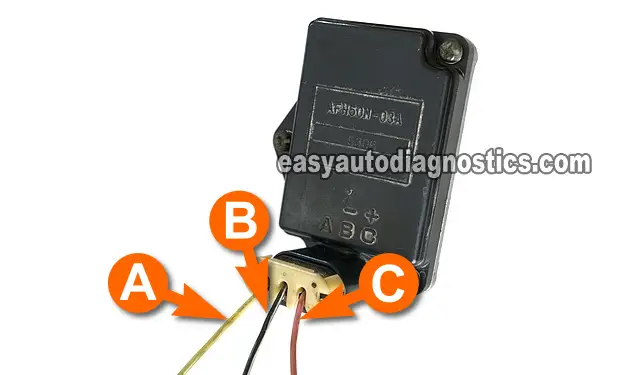
Whether you're driving a Buick, Olds, or Pontiac vehicle (with a 3.1L or 3.3L or 3.8L V6) the circuits descriptions of the wires coming out of the mass air flow (MAF) sensor are the same. You'll notice that the photos (in the image viewer) have the MAF connectors lettered A thru' C (if you look closely at the MAF sensor connector, you'll see these letters on it too). I'll be using these letters for the circuit descriptions. Here's the description of each circuit below:
- Letter A:
- MAF Signal.
- Letter B:
- Ground.
- Letter C:
- Power (12 Volts)
To test these circuits I recommend using a wire-piercing probe since it'll be the most effective and easiest way of getting to the signal. If you need to see what this tool looks like, click here: Goupchn 4mm Banana to Banana Plug Test Leads Kit (Amazon affiliate link). Independent of the method you use, be careful not to damage the wire(s). Take all safety precautions.
IMPORTANT: All of the tests are ON CAR TESTS, do not remove the mass air flow sensor from the vehicle or from its plumbing.
How Does The MAF Sensor Work?
The MAF sensor's job is to measure the amount of air that the engine is breathing. As the air passes the two hot wires, it converts its measurement of this airflow into a High Frequency Digital Signal and this signal can be measured with a digital multimeter that can read Hertz Frequency or with an Oscilloscope.
So, keeping this in mind, it's a given that the engine will breathe in more air at, let's say, 2,500 RPMs than when it's sitting at an idle of 900 RPMs and of course the Hertz reading will be higher at 2,500 RPMs than at 900 RPMs
When testing this Hz frequency signal, the important thing to know is not an actual Hz frequency number at a specific RPM, but to look for crazy and extreme fluctuations in the Hz frequency signal that do not correspond to the actual air intake (RPMs) of the engine or NO SIGNAL AT ALL. In the TEST 3 section of this article, I'll show how you'll use a base Hz reading at idle from the MAF sensor that will help you to confirm that the MAF sensor is bad or not.
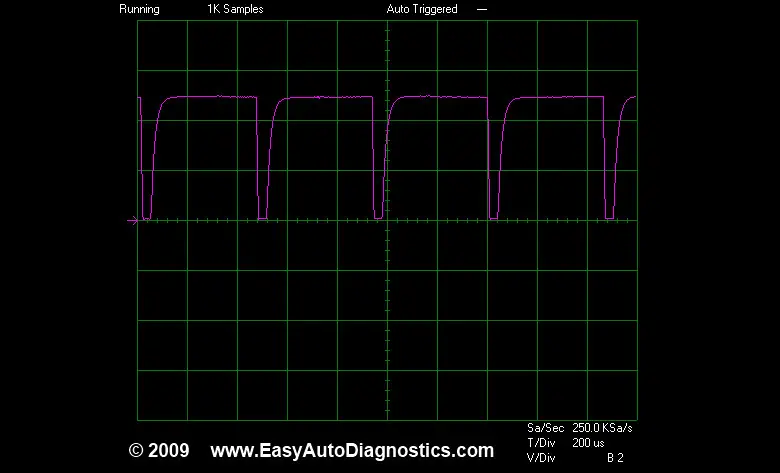
If you have access to an oscilloscope, I have included a scope waveform of what this MAF signal should look like (in TEST 1). Whether you use a multimeter or an oscilloscope, you'll be able to successfully diagnose this mass air flow sensor.
TEST 1: Testing The MAF Signal
In this first test section, we'll check the MAF signal coming out of the sensor and going to the fuel injection computer.
Start the engine and let it reach it's normal operating temperature. You'll be using the Hertz reading you'll obtain at idle as a base to diagnose the MAF sensor.
IMPORTANT: The MAF sensor must be connected to its connector to perform this test. You'll need to use a back probe on the connector or a wire-piercing probe on the wire (to access the signal within). You can see an example of this tool and where to buy it here: Goupchn 4mm Banana to Banana Plug Test Leads Kit (Amazon affiliate link).
These are the test steps:
- 1
Place your multimeter in frequency (Hz) mode.
- 2
With a suitable tool connected to the red multimeter test lead, probe the A circuit as shown in the photo.
- 3
Connect the black multimeter test lead to the battery negative (-) terminal.
- 4
Start the already warmed up engine.
- 5
Note the Hertz reading on your multimeter at idle. This reading may be stable (with only small fluctuations) or unstable with very extreme fluctuations. No matter what the instability in the reading, this will be your base reading.
- 6
Manually accelerate the engine from the engine compartment as you watch the multimeter's frequency readings. The Hertz frequency readings should increase as you rev up the engine.
- 7
Let go off of the throttle and let the engine returns to idle. The Hertz reading should come down to the base Hertz reading you observed in step 5 of this test.
- 8
Rev up/down the engine several times. Each time the multimeter should register an increase/decrease in the MAF signal voltage.
Let's interpret your test result:
CASE 1: The multimeter registered the indicated Hertz values. The MAF sensor is OK and functioning correctly.
CASE 2: The multimeter DID NOT register the indicated Hertz values. This usually means that the MAF sensor is bad.
To make sure the MAF sensor is bad, we need to make sure it's getting power and Ground. For the first of these two tests, go to: TEST 2: Testing The Power (12 V) Circuit.
TEST 2: Testing The Power (12 V) Circuit
In this test section, we're gonna check if the MAF sensor is receiving 12 Volts.
The wire that provides this voltage to the MAF sensor is the wire labeled with the letter C in the photo above.
We'll perform a simple multimeter voltage test to see if the wire is delivering 10 to 12 Volts to the MAF sensor.
IMPORTANT: When probing the front of the connector's female terminals, be careful not to damage the terminal with the multimeter's test lead.
- 1
Disconnect the MAF sensor from its connector.
- 2
Put the multimeter in Volts DC mode.
- 3
Connect the black multimeter test lead on the battery negative (-) terminal.
- 4
Turn key ON with the engine OFF.
- 5
With the red multimeter test lead and an appropriate tool, probe the female terminal of the connector that connects to the wire labeled with the letter C (see photo above).
- 6
The multimeter should register 10 to 12 Volts DC.
Let's interpret your test result:
CASE 1: The multimeter registered 10 to 12 Volts. All is good in the neighborhood as this result confirms the MAF sensor is getting power.
The next and final test is to make sure the MAF sensor is getting Ground, go to: TEST 3: Testing The Ground Circuit.
CASE 2: The multimeter DID NOT register 10 to 12 Volts. The MAF sensor is not the problem. Without this voltage the MAF sensor will not work.
TEST 3: Testing The Ground Circuit
In the previous test we checked that the sensor is receiving 10 to 12 Volts. Now we'll check that the MAF sensor is getting a good Ground.
As you can see in the photo, this is the middle wire of the MAF sensor's connector, which I've labeled with the letter B.
We'll do a simple multimeter voltage test to check for the presence of Ground in this wire.
IMPORTANT: When probing the front of the connector's female terminals, be careful not to damage the terminal with the multimeter's test lead.
These are the test steps:
- 1
Disconnect the MAF sensor from its connector.
- 2
Put the multimeter in Volts DC mode.
- 3
Connect the red multimeter test lead on the battery positive (+) terminal.
- 4
With the black multimeter test lead and an appropriate tool, probe the female terminal of the connector that connects to the wire labeled with the letter B (see photo above).
- 5
The multimeter should register 10 to 12 Volts DC.
Let's examine your test result:
CASE 1: The multimeter registered 10 to 12 Volts. This is the correct test result and it confirms the MAF sensor is getting Ground.
You can conclude the MAF sensor is bad and needs to be replaced if you have:
- Confirmed that the MAF signal does not increase/decrease as you accelerate/decelerate the engine (TEST 1).
- Confirmed that the MAF sensor is getting 10 to 12 Volts (TEST 2).
- Confirmed that the MAF sensor is getting Ground (this test section).
CASE 2: The multimeter DID NOT register 10 to 12 Volts. The MAF sensor is not the problem. Without this path to Ground, the MAF sensor will not work.

If this info saved the day, buy me a beer!


