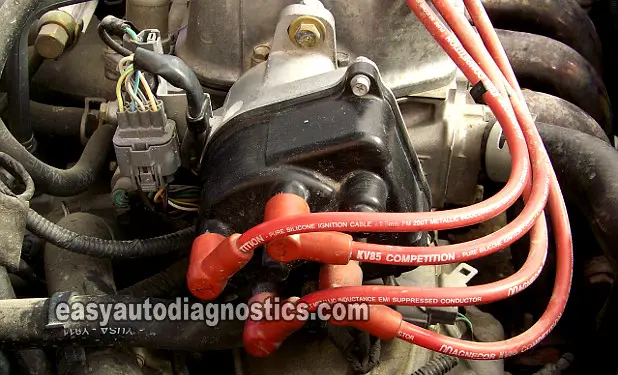
This tutorial will walk you thru' the entire testing and diagnostics/troubleshooting of the 90, 91, 92, 93, 94, 95, 96, 97, 98, 99, 00 Honda Accord, Civic, CRV, and Odyssey igniter (ignition control module-ICM), ignition coil, distributor cap/rotor and spark plug wires with photos and step by step instructions in plain English.
Learning how to test the Honda ignition system for a misfire condition or a 'no-spark no-start' condition has never been easier!
NOTE: This tutorial will help you test the Honda distributor type ignition system with the ignition coil inside of the distributor. If you need the tutorial for the Honda ignition system with the ignition coil outside of the distributor, go here: How To Test The Honda Distributor Type Ignition System (Ignition Coil Outside Distributor 1992-2001 2.2L). For the article to test the Honda Coil-On-Plug ignition coils, go here: How To Test The Coil-On-Plug Ignition Coil 3.0L Honda Accord - Odyssey.
Contents of this tutorial:
- Symptoms Of A Bad Honda Igniter And Ignition System Malfunction.
- What Tools Do I Need To Test The Honda Ignition System?
- How Does The Honda Igniter (Ignition Control Module) Work?
- Important Do's and Don'ts.
- Safety Precautions And Guidelines When Testing Your Honda.
- TEST 1: Testing For Spark At The Spark Plug Wires.
- TEST 2: Testing For Spark At The Distributor Cap.
- TEST 3: Testing For Spark At The Ignition Coil.
- TEST 4: Making Sure The Ignition Coil And Module Are Getting Power.
- TEST 5: Testing The Ignition Coil's Switching Signal.
- TEST 6: Testing The Igniter For The Triggering Signal.
- More Honda Tutorials.
![]() You can find this tutorial in Spanish here: Módulo y Bobina De Encendido Honda Accord, Civic, CRV, Odyssey (at: autotecnico-online.com).
You can find this tutorial in Spanish here: Módulo y Bobina De Encendido Honda Accord, Civic, CRV, Odyssey (at: autotecnico-online.com).
NOTE: You might also find the following articles I've written at troubleshootmyvehicle.com useful:
- How To Find A Bad Fuel Injector Case Study (Honda 2.2L, 2.3L) (at: troubleshootmyvehicle.com).
- How To Test For A Bad Fuel Injector (Honda 2.2L, 2.3L) (at: troubleshootmyvehicle.com).
- How To Test Engine Compression (Honda 2.2L, 2.3L) (at: troubleshootmyvehicle.com).
Symptoms Of A Bad Honda Igniter And Ignition System Malfunction
In a nutshell, when the igniter or ignition coil fails in your Honda (Accord, Civic, or Odyssey), it won't start. When the spark plug wires or the distributor cap fail, your Honda will start and run but with a misfire. The misfire may or may not light up your check engine light on your instrument cluster.
But where it gets complicated is trying to find out the exact component that failed. Depending on the type of failure you're trying to diagnose and resolve, you may be asking yourself: Is it because of a bad igniter (ignition control module) or a bad ignition coil? Or is it the distributor cap and rotor? Or maybe the spark plug wires? Or is it the crankshaft position sensors within the distributor that have gone bad? Or maybe it's a bad computer?
This tutorial will help you by showing you how to test each specific component in a step by step way. You'll be able to get to the bottom of the no-start or misfire condition your Honda is experiencing without having to waste time and money.
Before we move along let me tell you that the igniter can fail intermittently. These intermittent failures would cause your Honda Accord or Civic or Odyssey to stall every now and then. A very rare type of failure, but it does happen. If this is the condition that you're experiencing, you will have to wait till your Honda does not start to test the ignition system. This is the only way to test for an intermittent problem. So, if you're experiencing this condition, read this article anyway, you'll be better prepared for when the problem pops up.
What Tools Do I Need To Test The Honda Ignition System?
You don't need any expensive tools to test your Honda ignition system. Here's what you'll need:
- A digital multimeter.
- It doesn't have to be an expensive one, a cheapie one will do just fine (don't have a digital multimeter? Need to buy one? Click here to see my recommendations: Buying A Digital Multimeter For Automotive Diagnostic Testing).
- A test light.
- An LED light
- I buy mine from Radio Shack since most auto parts stores (AutoZone, O'Reilly Auto Parts, and the like) sell them for three times as much.
- I've included a link on what this LED light looks like and how to make it into a tool here: The LED Light Test Tool.
- A wire piercing probe.
- To see what this tool looks like, click here: Wire Piercing Probe.
- An HEI spark tester.
- This inexpensive spark tester is a MUST have tool to be able to correctly diagnose your Honda vehicle with the info/tests in this article (don't have an HEI spark tester? Need to buy one? You can buy it here: OTC 6589 Electronic Ignition Spark Tester).
- I trust and recommend only the HEI spark tester. If you want to learn how this spark tester works, click here: The HEI Spark Tester (The Best Spark Tester On The Market).
- A helper to crank the engine.
And lest I forget, a scan tool is not necessary to diagnose and test the Honda distributor type ignition system. All of the testing that you'll be doing will be done without an automotive diagnostic scanner.
How Does The Honda Igniter (Ignition Control Module) Work?
In a nutshell and when the Honda ignition system is working properly; when you turn the key to crank and start your Honda:
- 12 Volts flow into the distributor which are in turn distributed to the igniter (ignition control module) and the ignition coil.
- The distributor shaft starts to turn (as the engine cranks and starts) which induces the cam/crank position sensors to start producing and sending their cam/crank position signals to the ECM (Electronic Control Module=Fuel Injection Computer).
- Upon receiving these cam/crank position signals, the ECM sends a triggering signal to pulse the igniter.
- The igniter upon receiving this triggering signal in turn sends a switching signal to the ignition coil.
- The ignition coil, upon receiving this switching signal, starts to spark away!
- The ECM controls the igniter at start up and at all engine speeds after start up, unlike the majority of distributor-type ignition systems where the ignition control module freelances at start up.
Important Do's and Don'ts
Here are a few suggestions to help you to diagnose your Honda's ignition system free of headaches and/or complications:
- Do not use a regular spark plug instead of a spark tester to test for spark.
- Do not remove the spark plug wire from the spark plug while the engine is cranking to test for spark.
- Keep your hands and fingers away from the rotating distributor shaft when your helper is cranking the engine during the tests.
- You may have to remove the distributor rotor from the distributor. The rotor is secured to the distributor shaft by a screw, "which usually requires cranking the engine to get the screw to the topside for removal. Either:
- Remove the ignition fuse.
- Or disconnect the connector outside the distributor.
- Or remove both wires from the coil (if the dust cover is already missing).
Safety Precautions And Guidelines When Testing Your Honda
Since you'll be working around a cranking engine this section can be summed up with the following: use common sense and take all necessary safety precautions.
TEST 1: Testing For Spark At The Spark Plug Wires

The very first thing that you need to test for is spark. A very simple test, as you'll see, for which you'll need a spark tester. Not just any spark tester will do, I recommend the HEI spark tester.
NOTE: Whether your Honda does not start or starts but runs with a misfire, start with this test.
The purpose of this test is to find out if all of the spark plug wires are NOT firing spark or if just some (of all) are firing spark. From the results of this test, you'll be able to say if the spark plug wires are bad or if you need to dig a little deeper. Either way, I'll take you step by step thru' the whole process and you'll be able to pinpoint the problem to either a bad igniter (ignition control module), or a bad ignition coil, or bad distributor cap and/or rotor, or bad spark plug wires.You will also find out if the problem is due to a broken timing belt.
As a side note, you will NOT be testing the resistance of the spark plug wires, since this is the most useless, complete waste of life method to test for bad spark plug wires. The spark plug wire test you're about to do is a dynamic test done with the engine cranking. Read on.
Remember, you can not use a regular spark plug instead of a spark tester for the spark test and do not pull the spark plug wire off of the spark plug either while your helper is cranking the engine (to check for spark). OK, here's the test:
- 1
Remove the spark plug wire from its spark plug.
- 2
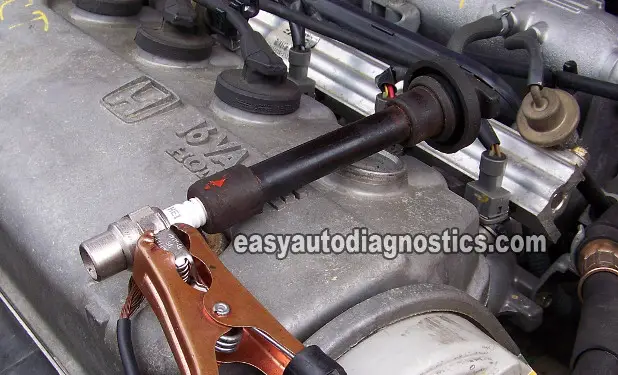
Attach the HEI spark tester to the spark plug wire.
- 3
Attach the HEI spark tester to a good Ground point, or use a battery jump start cable to attach it to Ground (my preferred method).
- 4
Have your helper crank the engine while you observe the spark tester.
- 5
Repeat the test for all of the remaining spark plug wires on your Honda Accord (Civic, CRX, or Odyssey).
Let's take a look at what your test results mean:
CASE 1: You got spark on all of the spark plug wires. This result indicates that the ignition coil and the igniter (ignition control module) on your Honda Accord, or Civic, or Odyssey are functioning correctly. The no-start condition's cause does not lie in the ignition system of your Honda.
What I recommend you do, is to do an engine compression test or a fuel injector test. You can find these step-by-step tests at troubleshootmyvehicle.com (the other site I write for) by clicking here:
- How To Test For A Bad Fuel Injector (Honda 2.2L, 2.3L) (at: troubleshootmyvehicle.com).
- How To Test Engine Compression (Honda 2.2L, 2.3L) (at: troubleshootmyvehicle.com).
CASE 2: You got NO spark from any of the spark plug wires. This result doesn't condemn the igniter (ignition control module) or the ignition coil yet.
The next step is to remove the distributor cap and test the ignition coil directly and thus eliminate the distributor cap as a possible source of the 'no spark' result. Go to: TEST 3: Testing For Spark At The Ignition Coil.
CASE 3: You got spark from some but not all of the spark plug wires. More than likely the spark plug wires are bad or the distributor cap is bad.
It's a common problem for one or two spark plug wires to go bad or for one or two distributor cap towers to go bad and not let spark thru'. 90% of the time replacing the distributor cap, the distributor rotor and the spark plug wires should solve your problem.
Thankfully you can test/verify this before you run out and buy these parts and in the next test section I'll show you how easy it is to do that. Go to: TEST 2: Testing For Spark At The Distributor Cap.
