TEST 2: Testing For Spark At The Distributor Cap

In this test, we're gonna' see if the spark plug wire or wires that did not spark in TEST 1 are bad (or not).
We'll accomplish this by bypassing the non-sparking spark plug wire and testing for spark directly on the spark plug wire's distributor cap tower.
IMPORTANT: This test is only for when one or several (but not all) of the spark plug wires did not spark!
- 1
Remove the spark plug wire that did not spark from its tower on the distributor cap.
- 2
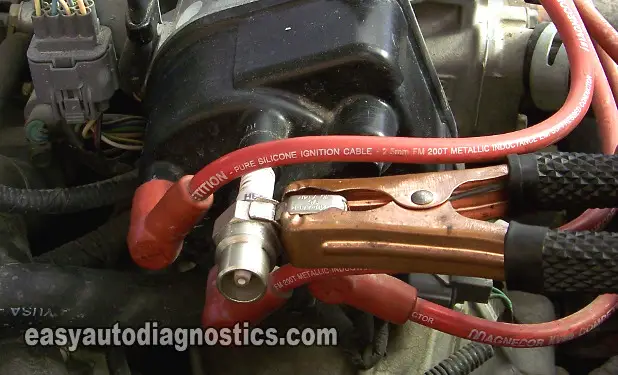
Place the spark tester directly on the tower.
- 3
Connect the spark tester to the battery negative (-) terminal with a battery jump start cable (see photo above).
- 4
Have your assistant crank the engine while you observe the spark tester.
- 5
You'll see one of two things: 1.) the spark tester will spark or 2.) the spark tester will not spark.
Let's analyze your test result below:
CASE 1: You got spark. This is the correct test result and it lets you know that that particular distributor cap tower is good.
You can conclude that the spark plug wire is bad (that connects to that tower) if you have:
- Confirmed that the spark plug wire that connects to that tower DID NOT spark in TEST 1.
Replace all of the spark plug wires with a new set.
Here's why: As the spark plug wire ages, its normal resistance to spark increases to the point that the wire can not and does not transmit the spark to the spark plug. This will either cause a misfire, or a lack of power, or a no-start condition. spark plug wires don't last forever, especially after-market ones (average life-span is 3 to 4 years).
CASE 2: You got NO spark. Then the distributor cap is bad. Replace the distributor cap and rotor with a new set.
Here's why: As the distributor cap ages, the terminals that transmit the spark to the spark plug wires corrode. This corrosion increases the resistance to spark and over time (as more corrosion is created) this same corrosion stops the spark from passing thru' to the spark plug wires.
TEST 3: Testing For Spark At The Ignition Coil

Honda distributor caps do go bad and when they do, they end up causing a rough idle condition or a no-start condition.
Thankfully, you don't need to replace the cap to see if it's bad (or not).
Depending on the result of this test step, we're gonna' find out if the distributor cap is bad (or not).
IMPORTANT: This test requires that the ignition coil be tested with the distributor cap off of the distributor. It's important that this test be done with a spark tester attached to the ignition coil. The car cannot/should not be cranked without the ignition coil being Grounded by a spark tester (thanks to Randy for the feedback).
 You can see this specific test step done here in this youtube video (although it involves a 2.0L Honda CR-V, the test steps are very similar): How To Test The Ignition Coil (1999-2001 2.0L Honda CR-V).
These are the test steps:
- 1
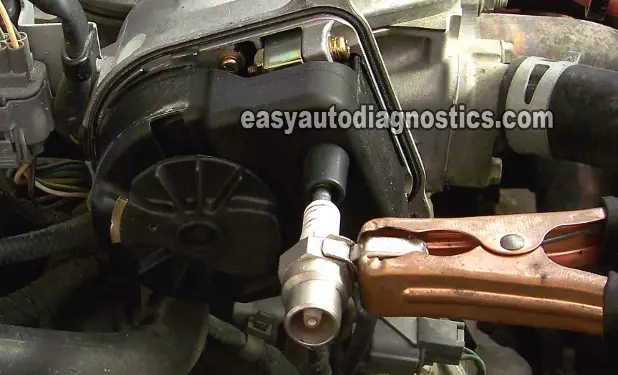
Remove the distributor cap and place the spark tester directly on the ignition coil's tower (as shown in the photo on the left).
- 2
Have your helper to crank the engine once again while (1) you watch for spark jumping across the air gap of the spark tester and (2) that the distributor rotor is turning.
- 3
You're gonna' get one of the 3 results: (1) spark and the distributor rotor turns or (2) no spark and the distributor rotor DOES NOT turn or (3) no spark and the distributor rotor DOES turn.
Let's analyze each result in more detail below:
CASE 1: You got spark & the distributor rotor turns. Then the distributor cap and/or distributor rotor is/are bad, replace them both.
Here's why: This test confirms that the ignition coil is producing spark and therefore is good. In a good working distributor cap, this spark is transmitted to the rotor by the cap itself. The distributor rotor in turn, transmits it to each terminal inside the distributor cap. Now, since in TEST 2, you've confirmed the cap is not transmitting this spark to the wires, so then this spark result (from the ignition coil) lets you know beyond a shadow of a doubt that the cap is bad. Do not proceed to TEST 4, or TEST 5, or TEST 6.
CASE 2: You got NO spark and the distributor rotor DOES NOT turn. This is the result of a timing belt that has broken.
Another cause, that I've seen quite a bit, is that the camshaft has broken in two, although this doesn't always results in a broken timing belt. Inspect the timing belt and/or remove the valve cover to see if the entire camshaft is rotating as one piece.
Here's why: The crankshaft rotates the distributor rotor via the timing belt. How? Well, the distributor is physically connected to the camshaft. The camshaft is rotated by the crankshaft via the timing belt. A broken timing belt won't rotate the camshaft and by extension, the distributor rotor. And if the distributor shaft does not rotate, the computer will not receive the crankshaft position sensor signals and the ignition system will not work to produce spark.
CASE 3: You got NO spark and the distributor rotor DOES turn. Then further testing is required to see if the problem is due to a bad igniter (ignition control module) or a bad ignition coil.
Your next step is to make sure that both the igniter and the ignition coil are getting power (12 Volts). Go to:TEST 4: Making Sure The Ignition Coil And Module Are Getting Power.
TEST 4: Making Sure The Ignition Coil And Module Are Getting Power
If you've reached this point, you have:
One: Checked that none of the four spark plug wires are delivering spark (TEST 1).
Two: Checked that the ignition coil is not sparking (TEST 3).
In this test step, you're gonna' verify that the igniter and the ignition coil are getting power (12 Volts).
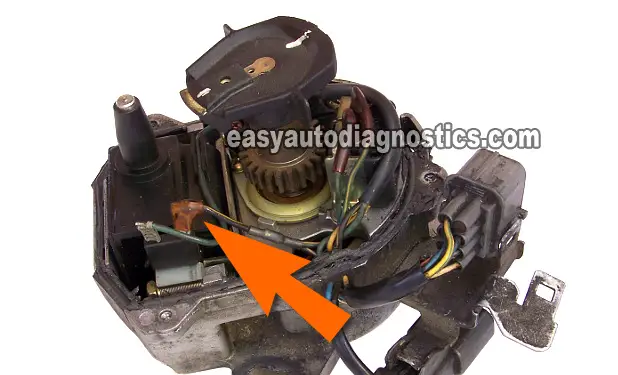
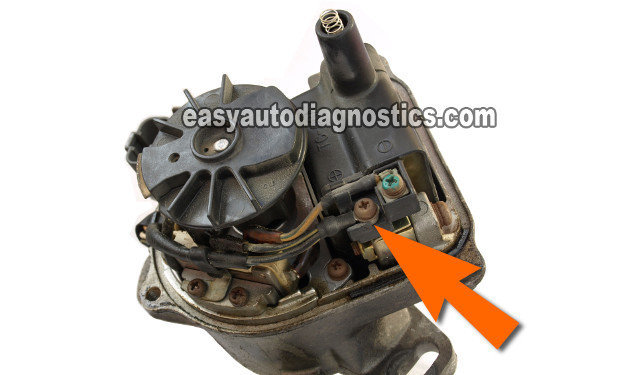
NOTE: If you haven't done so, remove the plastic dust cap that protects the igniter and ignition coil. This cap can only be removed by removing the distributor rotor (which is secured onto the distributor shaft with a small bolt on older models, newer models have it just pressed on). The photos above show the distributors with this dust cap already removed, thus making it possible to access the power and Ground terminals of the ignition coil.
You can use a multimeter or a test light to test the igniter (ignition control module) and the ignition coil. The following test assumes that you're using a test light.
- 1
Connect the alligator clip of the test light to the battery negative (-) terminal or a good Ground point on the engine itself.
- 2
With the probe end of the test light, touch the terminal pointed at by the orange arrow in the photos in the image viewer. This is the terminal that feeds 12 Volts to the Honda's ignition coil.
- 3
This terminal normally has a (+) sign in a circle over it, stamped on the ignition coil itself and the color of this wire is black with a yellow stripe.
- 4
Some models use female terminals and others use round terminals that are attached to the ignition coil with screws. Whether the wires are attached to the ignition coil with female terminals or round terminals, the circuits are the same for both types.
- 5
Have your assistant turn the key to ON and then have him (or her) crank the Civic (Accord, Odyssey, or CRV) while observe the test light.
- 6
If voltage (12 V) is present, the test light will light up and stay lit as long as the key is on or the engine is cranking.
Let's take a look at your test result:
CASE 1: The test light lit up. Then both the igniter (ignition control module) and the ignition coil are receiving 12 Volts.
The next test is to see if the ignition coil is getting an activation signal. For this test go to: TEST 5: Testing The Ignition Coil's Switching Signal.
Here's why: One wire (of the distributor's connector with 2 wires) delivers 12 Volts to the distributor from the Main Relay. Once this voltage is inside the Civic's distributor, it splits into two circuits that feed the igniter and ignition coil at the exact same time. So by testing the ignition coil for voltage, you're also testing the igniter for the same.
CASE 2: The test light DID NOT light up. Then you have now eliminated both the ignition coil and the igniter as the cause of your Honda's NO-START condition. You must find out if the Main Relay is bad or if a fuse is blown.
Here's why: Without this voltage (12 V) the igniter and the ignition coil will not work (not produce spark). Replacing either, if the above test result is true, will not solve the problem and would be a complete waste of money and time.


