TEST 2: Checking The MAP Sensor's Power Circuit

So far, in TEST 1, you have verified that the MAP sensor is not creating a voltage signal that decreases as you apply vacuum and that increases as you release vacuum.
So, in this section, you're gonna' verify that the MAP sensor is getting 5 Volts, since without this voltage it won't work.
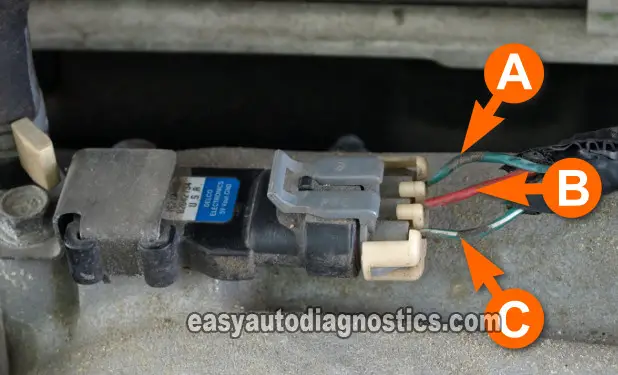
On the 1998-1999 3.2L Amigo, Rodeo, and Passport, the wire that provides these 5 Volts is the green with white stripe (GRN/WHT) wire of the connector.
On the 2000 3.2L Amigo, 2000-2004 3.2L Rodeo, and 2000-2002 3.2L Passport this wire is the black (BLK) wire of the connector.
Alright, this is what you'll need to do:
- 1
Place your multimeter in Volts DC mode.
- 2
Turn the key on but don't crank or start the engine.
- 3
Probe the wire labeled with the letter C, in the photo above, with the red multimeter test lead.
Depending on the year of your 3.2L Amigo, Rodeo, or Passport, this wire will be a GRN/WHT wire or a BLK wire. - 4
Connect the black multimeter test lead to the battery's negative (-) post.
- 5
Your multimeter should show 4.5 to 5 Volts DC.
OK, let's take a look at what your results mean:
CASE 1: The multimeter registered 5 Volts. This is the correct result and it's starting to look like the MAP sensor is bad but you still need to check that the MAP sensor is getting Ground. For the Ground test, go to: TEST 3: Checking The MAP Sensor's Ground Circuit.
CASE 2: The multimeter DID NOT register 5 Volts. This result lets you know that the MAP sensor is not bad, since without these 5 Volts DC, the MAP sensor can not function.
Although it's beyond the scope of this article to troubleshoot the cause of these missing 5 Volts, you have now eliminated the MAP sensor as bad. Resolving the issue that is keeping these 5 Volts from being supplied will solve the MAP sensor issue.
TEST 3: Checking The MAP Sensor's Ground Circuit

The next step (after verifying the MAP signal voltage and power circuit) is to make sure that the MAP sensor on your Isuzu 3.2L Rodeo, Amigo, or Honda Passport is receiving Ground.
For the last test, you're gonna' verify that the MAP sensor is getting Ground using your multimeter once again.
The wire that feeds the MAF sensor Ground is the one labeled with the letter A in the photo above.
On all of the vehicles covered by this tutorial, this wire is the green (GRN) wire of the MAP sensor's connector.
Alright, this is what you'll need to do:
- 1
Place your multimeter in Volts DC mode.
- 2
Turn the key on but don't crank or start the engine.
- 3
Probe the wire labeled with the letter A, in the photo above, with the black multimeter test lead.
- 4
Connect the red multimeter test lead to the battery's positive (+) post.
- 5
Your multimeter should show 10 to 12 Volts DC.
OK, let's take a look at what your results mean:
CASE 1: The multimeter registered 10 to 12 Volts. This is the correct test result.
You can conclude that the MAP sensor, on your Isuzu 3.2L Rodeo, Amigo, or Honda Passport is fried and needs to be replaced if you have:
- Verified that the MAP sensor is not producing the correct values (when you applied vacuum).
- Verified that the MAP sensor is being fed 5 Volts DC (TEST 2).
- In this test step, you have confirmed that the MAP sensor does have a solid path to Ground.
If you need to replace the MAP sensor, check out my recommendations here: Where To Buy The MAP Sensor And Save.
CASE 2: The multimeter DID NOT register 10 to 12 Volts. Re-check your multimeter connections and repeat the test, if your multimeter results still do not indicate 12 Volts, then the MAP sensor is not fried and not the cause of the MAP diagnostic trouble code (DTC) issue.
Here's why: Without a good path to Ground, that the PCM provides internally, the MAP sensor will not work. With this test result, you have eliminated the MAP sensor as bad.
The MAP Sensor Code Won't Go Away
If your MAP sensor test results indicate the MAP sensor is good or you replaced it already, but the MAP sensor code keeps coming back, then this section might help.
Here are a couple of suggestions that might inspire your next diagnostic move:
There's an internal engine mechanical problem.
- Specifically, the engine has too low compression in one or several cylinders. This will cause the engine to idle rough and make the PCM think it's a bad MAP sensor. I suggest doing an engine compression test to find out.
The fuel pump is failing.
- In some cases the fuel pump fails and dies a very slow death. In other words, it'll start to send less than the ideal volume of fuel. This will lean out the air/fuel mixture to the point that the computer will think the MAP sensor has failed (when it hasn't).
- I suggest doing a fuel pressure test (and comparing the results to a repair manual's fuel pressure specifications) to see if the fuel pump is failing.
The MAP sensor's connector is bad
- Usually the locking tab is broken and the connector has worked itself loose, causing an intermittent false connection.

If this info saved the day, buy me a beer!

