TEST 4: Voltage Drop Testing The Ground Circuit

You've reached this test because you have verified that there are 12 Volts (10 - 12) present at the S terminal of the solenoid when the key is turned to the START position and that there is no voltage drop on the battery circuit of the starter motor solenoid.
Here we're gonna' see if the starter motor is getting a complete and unobstructed path to Ground.
Or if corrosion or anything else is causing high resistance and impeding this flow of juice to engine Ground.
- 1
Raise and support the vehicle on jack stands (if applicable). The starter motor must be connected to all of its cables/wires.
- 2
Place your multimeter in Volts DC mode.
- 3
Attach one lead (either one, the polarity doesn't matter) to the center of the negative (-) battery post. Not on the battery cable terminal itself.
- 4
Attach or touch the other lead to an unpainted spot on the starter motor body.
A suggested spot is labeled by the number 3 on the photo. - 5
Have your assistant turn the key to the START position and have him or her keep it there (for the entire test) while you observe the multimeter.
Let's interpret your voltage drop multimeter test:
CASE 1: Your multimeter registered 0.9 Volts or less. This is good and a clear indication that the starter motor's Ground does not have any issues.
Your next test step is to go: TEST 5: Turning The Engine By Hand.
CASE 1: Your multimeter registered 1 to 7 Volts. This is a bad test result. This indicates that the starter motor's Ground has corrosion issues or the like.
These corrosion issue will cause one of two things:
- A no-crank condition.
- Starter motor cranks the engine very slowly.
The most likely cause is a corroded battery negative terminal and or battery negative (-) post. Or the round terminal that attaches the battery negative cable to the engine block is corroded or loose.
Inspect and clean and retest. More than likely the vehicle will now start.
TEST 5: Turning The Engine By Hand

Another common cause of a 'does not crank' condition is a locked-up engine due to a thrown rod or a locked-up AC compressor. These two conditions can easily lead us to believe that the starter motor is defective.
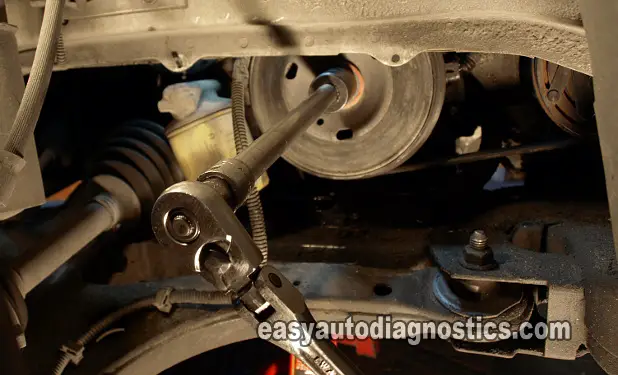
To find out if the engine is locked-up or not, we need to manually turn the engine by hand using a socket and ratchet (as shown in the photo)
- 1
Raise and support the vehicle on jack stands (if applicable).
- 2
Place the key in the OFF position or completely removed from the ignition switch.
- 3
Turn the crankshaft pulley by hand using the appropriate tools.
Let's interpret your test result:
CASE 1: The crankshaft pulley turned. Then the engine is not locked-up and we now can eliminate the engine as the cause of this 'does not crank' condition. It's starting to look like the starter motor is bad. Go to: TEST 6: Bench-Testing The Starter Motor.
CASE 2: The crankshaft pulley DID NOT turn. There's a good possibility that the engine is indeed locked-up but we need to perform one more test to make sure. This is to verify that the AC compressor is not seized. Go to: Verifying That The AC Compressor Is Not Seized.
Verifying That The AC Compressor Is Not Seized
Since the crankshaft pulley drives the AC compressor, a seized AC compressor will keep the crankshaft from turning. So then, the next step (after ascertaining that the engine can't be hand cranked) is to remove the drive belt or serpentine belt that turns the AC compressor.
These are the test steps:
- 1
Raise and support the vehicle on jack stands (if applicable).
- 2
Place the key in the OFF position or completely removed from the ignition switch.
- 3
Remove the AC compressor drive belt or the serpentine belt.
- 4
Turn the crankshaft pulley by hand using the appropriate tools.
Let's interpret your test result:
CASE 1: The crankshaft pulley turned. Then the AC compressor is seized and is the cause of this ‘does not crank’ condition. The starter motor itself is not the cause of the 'does not crank' problem.
CASE 1: The crankshaft pulley DID NOT turn. The engine is locked-up. This is usually an indication that the engine has thrown a rod. The starter motor is not the cause of the 'does not crank' condition.
