TEST 2: Testing For Spark At The Distributor Cap

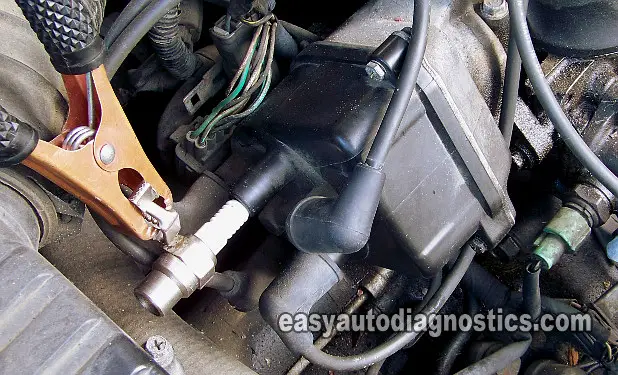
In this test step, we're gonna' test for spark directly on the distributor cap tower of the spark plug wire that did not spark in TEST 1.
As you can see in the photo above, we're gonna' place the spark tester directly in the distributor cap tower.
IMPORTANT: Perform this test only if one or several (but not all) of the spark plug wires did not spark in TEST 1.
These are the test steps:
- 1
Remove the spark plug wire that did not spark from its tower on the distributor cap.
- 2
Place the spark tester directly in the tower.
- 3
Connect the spark tester to the battery negative (-) terminal with a battery jump start cable.
- 4
Have your assistant crank the engine while you observe the spark tester.
- 5
You'll see one of two results: spark or no spark.
Let's analyze each of these results below:
CASE 1: You got spark. This is the correct and expected test result.
This test result tells you that the spark plug wire is bad, replace them all with a new set.
Here's why: As the spark plug wire ages, its normal resistance to spark increases to the point that the wire can not and does not transmit the spark to the spark plug. This will either cause a misfire, or a lack of power, or a no-start condition. spark plug wires don't last forever, especially after-market ones (average life-span is 3 to 4 years).
CASE 2: You got NO spark. Then the distributor cap is bad. You need to replace the distributor cap and rotor.
Here's why: As the distributor cap ages, the terminals that transmit the spark to the spark plug wires corrode. This corrosion increases the resistance to spark and over time (as more corrosion is created) this same corrosion stops the spark from passing thru' to the spark plug wires.
TEST 3: Testing For Spark At The Ignition Coil's High Tension Wire

In this test step, we're gonna' check two things: that the distributor cap is getting spark and that the timing belt isn't busted.
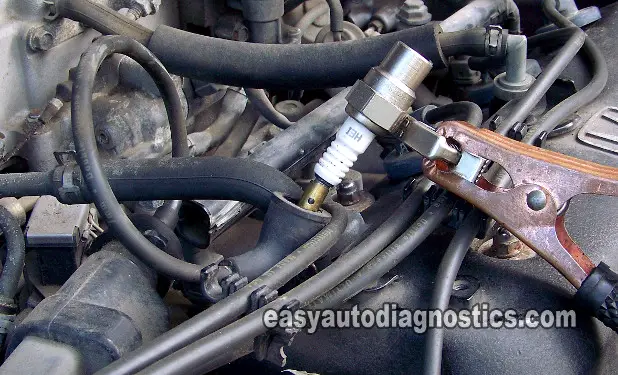
To make sure that the distributor cap is getting spark, all we have to do is attach the spark tester to the ignition coil's high tension wire (as you can see in the photo above).
To test for a busted timing belt, we'll remove the distributor cap from the distributor and check the rotation of the distributor rotor as the engine is being cranked.
IMPORTANT: This test requires that the ignition coil be tested with the high tension wire (spark plug wire) that connects it to the distributor cap to be off of the distributor cap. It's important that this test be done with a spark tester attached to this high tension wire. The car cannot/should not be cranked without the ignition coil's high tension wire being Grounded by a spark tester (thanks to Randy for the feedback).
- 1
Disconnect the ignition coil's high tension wire from the distributor cap only.
- 2
Place the spark tester directly on the end of the wire that plugs into the distributor cap (as shown in the photo above).
- 3
Remove the distributor cap from the distributor, if you haven' done so already.
- 4
Ask your helper to crank the engine while: (1) you watch for spark jumping across the air gap of the spark tester and (2) that the distributor rotor is turning.
- 5
You'll see one of two results: spark or no spark.
Let's analyze your test result below:
CASE 1: You got spark and the distributor rotor turns. This is the correct and expected test result.
You can conclude that the distributor cap and distributor rotor are bad and need to be replace if you have:
- Confirmed that none of the 4 spark plugs are sparking (TEST 1).
- Confirmed, in this test section, that the ignition coil's high tension wire is delivering spark to the distributor cap.
Here's why: This test confirms that the ignition coil is producing spark and that its high tension wire is transmitting said spark and therefore both are good. After the spark is received from the ignition coil, in a good working distributor cap, it's transmitted to the rotor by the cap itself. The distributor rotor in turn, transmits it to each terminal inside the distributor cap. Now, since in TEST 2, you've confirmed the cap is not transmitting this spark to the wires, so then this spark result (from the ignition coil) lets you know beyond a shadow of a doubt that the cap is bad. Do not proceed to TEST 4, or TEST 5, or TEST 6.
CASE 2: You got NO spark and the distributor rotor DOES NOT turn. This is the result of a timing belt that has broken.
Another cause, that I've seen quite a bit, is that the camshaft has broken in two, although this doesn't always results in a broken timing belt. Inspect the timing belt and/or remove the valve cover to see if the entire camshaft is rotating as one piece.
Here's why: The crankshaft rotates the distributor rotor via the timing belt. How? Well, the distributor is physically connected to the camshaft. The camshaft is rotated by the crankshaft via the timing belt. A broken timing belt won't rotate the camshaft and by extension, the distributor rotor. And if the distributor shaft does not rotate, the computer will not receive the position sensor signals and the ignition system will not work to produce spark.
CASE 3: You got NO spark and the distributor rotor DOES turn. This test result tells you that the distributor cap is not getting spark. There's a good chance that the ignition coil's high tension wire is bad.
The next step is to check for spark directly on the ignition coil tower. For this test go to:TEST 4: Testing The Ignition Coil For Spark.
TEST 4: Testing The Ignition Coil For Spark

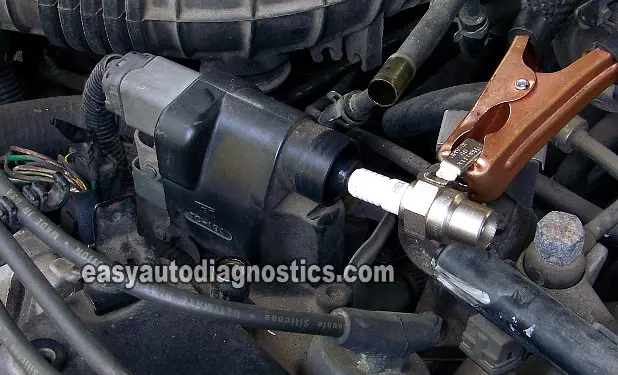
In this test section, we're gonna' test for spark directly on the ignition coil's tower (as shown in the photo above).
If spark is present, while cranking the engine, then we can conclude that the reason the ignition coil's high tension wire did no spark (in TEST 3) is because it's bad.
If no spark is present, then we'll move on to the next test.
IMPORTANT: This test requires that you crank the engine with the ignition coil's high tension wire disconnected from the distributor cap! The ignition coil has to be connected to a spark tester for this test. Do not crank the engine without a spark tester or the high tension wire connected to the ignition coil, or you run the risk of damaging the ignition coil.
OK, on with this lie with call life:
- 1
Disconnect the high tension wire from the ignition coil.
- 2
Place the HEI spark tester in the ignition coil's tower.
NOTE: You have to hold the spark tester in place with a battery jump start cable (as shown in the photo above). - 3
Have your helper crank the engine while you hold and observe the spark tester.
- 4
You'll see one of two results: spark or no spark.
Let's take a look at what your spark test result means:
CASE 1: You got spark. This is the correct test result and it indicates that the ignition coil is good.
You can correctly conclude that the ignition coil's high tension wire is bad if you have:
- Confirmed that none of the 4 spark plugs are sparking (TEST 1).
- Confirmed that the ignition coil's high tension wire is NOT delivering spark to the distributor cap (TEST 3).
- Confirmed, in this test section, that the ignition coil is not sparking.
Replace all of the spark plug wires with a new set.
Here's why: Over time the spark plug wires age and stop transmitting spark. So if in this test result your spark tester sparked (when testing for spark directly at the ignition coil tower) than you can correctly conclude that the ignition coil's high tension wire is defective and not able to transmit spark to the distributor cap anymore.
CASE 2: You got NO spark. Then we have to dig a little deeper to find out what the problem is.
The next step is to see if the ignition coil and igniter are getting power. For this test go to: TEST 5: Testing The Ignition Coil & Igniter For Power.
