TEST 5: Testing The Ignition Coil & Igniter For Power

In this test section, we're gonna' make sure that the ignition coil and igniter are getting 10 to 12 Volts DC.
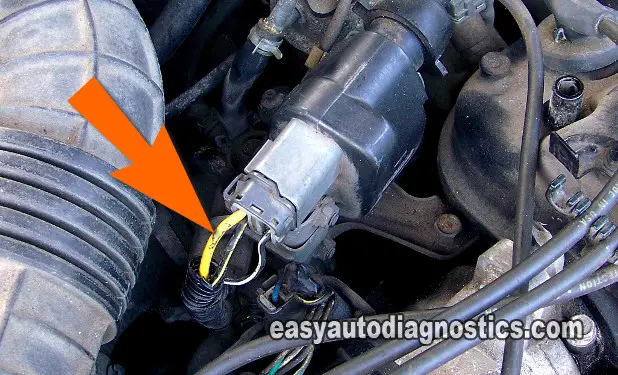
We're going to test the yellow wire of the ignition coil connector (see photo above). This same circuit supplies power to both the ignition coil and the igniter (which is inside the distributor), so by testing one you're actually verifying that both are getting 12 Volts.
You can use a multimeter or a test light to test the igniter (ignition control module) and the ignition coil. The following test assumes that you're using a test light.
These are the test steps:
- 1
Connect the alligator clip of the test light to the battery negative (-) terminal.
- 2
Probe the yellow (YEL) wire of the ignition coil connector with the probe end of the test light.
- 3
Have your assistant turn the key to ON and then have him (or her) crank the engine while observe the test light.
- 4
The 12 Volt test light should light up and stay lit as long as the key is on or the engine is cranking.
If you're using a multimeter, it should register 10 to 12 Volts DC.
Let's find out what your test result means:
CASE 1: The test light lit up. This is the correct test result and it tells you that both the igniter (ignition control module) and the ignition coil are receiving 12 Volts.
The next step is now to make sure that the igniter is activating the ignition coil to spark. For this test go to: TEST 6: Testing The Ignition Coil's Switching Signal.
Here's why: One wire (of the ignition coil's connector with 3 wires) delivers 12 Volts to the ignition coil first and from inside the ignition coil, this voltage is now fed to the igniter (ignition control module). So by testing for 12 Volts at this specific circuit (of the 2-wire connector), you're also testing the igniter for the same.
CASE 2: The test light DID NOT light up. Without power the ignition coil and the igniter will not function.
This test result eliminates both the ignition coil and the igniter as the cause of your Honda Accord or Prelude's NO-START condition.
Your next step is to find out if the Main Relay is bad or if a fuse is blown.
Here's why: Without this voltage (12 V) the igniter and the ignition coil will not work (not produce spark). Replacing either, if the above test result is true, will not solve the problem and would be a complete waste of money and time.
TEST 6: Testing The Ignition Coil's Switching Signal

In this test step, we're gonna' make sure that the igniter (ignition control module) is activating the ignition coil to spark.
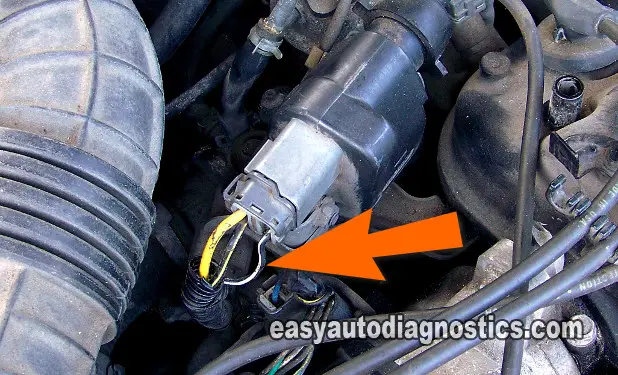
We'll do this by checking for the presence of the Switching signal on the black with white stripe wire (indicated by the arrow in the photo above).
The presence of the Switching signal is verified using a regular 12 Volt test light and while your Honda Accord or Prelude is being cranked. In a nutshell, if the igniter is activating the ignition coil, when you crank your Honda's engine, the test light will flash ON and OFF.
Whatever the test light does with the key ON or OFF does not matter, the results you need to worry about is when the engine is cranking.
NOTE: If in TEST 3 you got spark from the ignition coil's high tension wire, you don't have to perform this test step. This test step checks for the Switching signal which is responsible for making the ignition coil spark, so a spark result in TEST 3 confirms that the Switching signal exists.
IMPORTANT: The distributor and the ignition coil must be connected to their electrical connectors for this test to work.
These are the test steps:
- 1
Connect the alligator clip of the test light to the battery positive (+) terminal.
- 2
With the probe end of the test light, probe the black with white stripe (BLK/WHT) wire of the ignition coil's 3-wire connector.
NOTE: The ignition coil and the distributor have to be connected to their electrical connectors for this test to work. Re-connect the ignition coil's high tension wire back onto the distributor, if you haven't done so already. - 3
Have your assistant crank the engine while you observe the test light.
- 4
The test light should flash ON and OFF continuously as long as your assistant is cranking the engine and if the Switching signal is present.
Lets interpret the results of this test to see what the next step is:
CASE 1: The test light flashed ON and OFF while the engine was cranking. This is the correct test result and it tells you that the ignition coil is getting its activation signal (Switching signal).
With this test result you can conclude that the ignition coil is bad, and needs to be replaced, if you have:
- Confirmed that NONE of the 4 spark plugs are sparking (TEST 1).
- Confirmed that the ignition coil's high tension wire is NOT delivering spark to the distributor cap (TEST 3).
- Confirmed that the ignition coil is NOT sparking (TEST 4).
- Confirmed that the ignition coil and the igniter are getting power (TEST 5).
- Confirmed, in this test section, that the ignition coil is getting its activation signal.
CASE 2: The test light DID NOT flash ON and OFF while the engine was cranking. This test result confirms that the ignition coil is not getting an activation signal from the igniter.
The next step is to see if the igniter is getting its own activation signal from the fuel injection computer. For this test go to: TEST 7: Testing The Igniter For The Triggering Signal.
Here's why: The igniter (ignition control module) is the one that creates and provides the Switching signal to the ignition coil. It could be bad or maybe it's not receiving the Triggering signal it needs to generate the Switching signal, therefore, we need TEST 7 to further investigate this.
TEST 7: Testing The Igniter For The Triggering Signal

For the igniter (ignition control module) to start activating the ignition coil, it needs to receive a Triggering signal from your Accord or Prelude's fuel injection computer.
So in this test, you're gonna' check to see if the ECM (Electronic Control Module = Fuel Injection Computer) is generating and sending the Triggering signal to the igniter.
The test you're about to do is accomplished with an LED light. You can not use a 12 Volt test light to verify the presence of the Triggering signal.
You can use a multimeter that is able to read Hertz (Hz) frequency since the signal has to be measured in Hertz. The following test assumes that you're using an LED light.
If you need to buy an LED light, see this page: The LED Light Test Tool And How To Make One.
 You can see this specific test step done here in this YouTube video (although it involves a 2.0L Honda CR-V, the test steps are very similar): How To Test The Ignition Coil (1999-2001 2.0L Honda CR-V).
IMPORTANT: The distributor and the ignition coil must be connected to their electrical connectors for this test to work.
Let's get started:
- 1
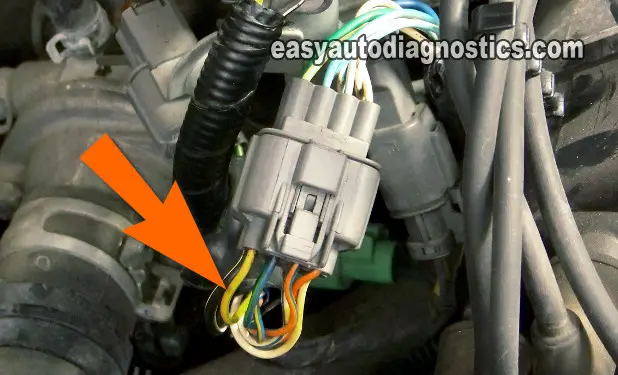
With an appropriate tool (like a wire-piercing probe) pierce the yellow with green stripe (YEL/GRN) wire of the 7 wire distributor connector.
NOTE: This test is done with both connectors connected. - 2
Connect the red lead of the LED to the battery positive (+) terminal.
- 3
Connect the black lead of the LED to the yellow with green stripe (YEL/GRN) wire.
- 4
Have your assistant crank the engine while you observe the LED light.
- 5
The LED light should flash ON and OFF continuously as long as your assistant is cranking the engine.
Let's analyze analyze your test result below:
CASE 1: The LED light flashed ON and OFF while the engine was cranking. This is the correct test result and it lets you know that the igniter (ignition control module) is getting its activation signal.
You can conclude that the igniter is bad and needs to be replaced only if you have:
- Confirmed that NONE of the 4 spark plugs are sparking (TEST 1).
- Confirmed that the ignition coil's high tension wire is NOT delivering spark to the distributor cap (TEST 3).
- Confirmed that the ignition coil is NOT sparking (TEST 4).
- Confirmed that the ignition coil and the igniter are getting power (TEST 5).
- Confirmed that the ignition coil IS NOT getting its activation signal (TEST 6).
- Confirmed, in this test section, that the igniter IS NOT getting its activation signal.
CASE 2: The LED light DID NOT flash ON and OFF while the engine was cranking. This test result tells you that the igniter is not receiving an activation signal from the fuel injection computer.
The most likely causes are either one or several of the crankshaft position sensors within the distributor have gone bad or there's an open-circuit problem in the YEL/GRN wire.
Although testing the two above mentioned causes are beyond the scope of this article, you have now eliminated the following as the causes of your Honda Accord's or Prelude's no-start problem:
- Igniter (ignition control module).
- Ignition coil.
- Distributor cap and rotor.
- Spark plug wires.
- Main relay.
Summary
OK- all of the tests and their explanations/results, in the previous five pages of this article, can be summarized in the following steps:
- Step 1 -Test for spark:
- The spark plug cable.
- The distributor cap tower.
- Directly on the ignition coil's tower.
- Step 2 -Test for 12 Volts:
- Verifying that the igniter (ignition control module) and the ignition coil are receiving 12 Volts.
- Both get this voltage from the same circuit.
- This voltage can be verified with a test light or a multimeter.
- Step 3 -Test for the Switching signal:
- Verifying that the igniter is generating the Switching signal.
- This is the signal that makes the ignition coil spark.
- This Switching signal can be tested with a test light or an LED light.
- Step 4 -Test for the Triggering signal:
- Verifying that the fuel injection computer is generating the Triggering signal.
- This is the signal that makes the igniter produce the Switching signal.
- The Yellow with Green stripe wire is the one that feeds the igniter (withing the distributor) this signal.
- It can be tested with an LED light or a digital multimeter capable of reading Hertz frequency ONLY.
Well, it's my heartfelt desire that this info was helpful and that you got to solve the problem on your Honda Accord or Prelude's ignition system (with the ignition coil outside of the distributor). If indeed this info helped, well please tell a friend it's here and free!!

If this info saved the day, buy me a beer!

