How To Find The Bad Or Clogged Fuel Injector
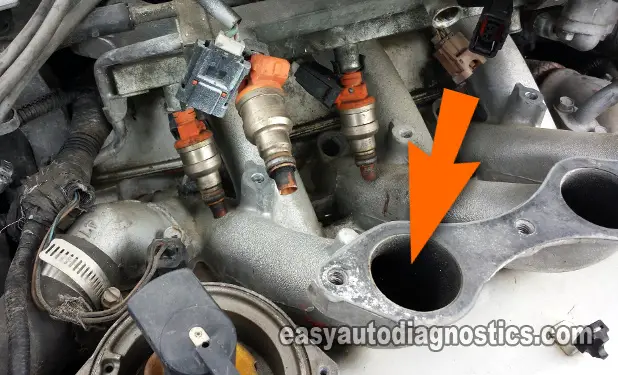
The only thing that slightly complicates testing the fuel injector on your vehicle's 3.0L V6 engine is the fact that you have to remove the intake manifold plenum. Don't get me wrong, removing the intake manifold plenum IS NOT hard but you do have to take certain precautions.
With this in mind I'm gonna' recommend to you a specific diagnostic strategy (one that I've used with a lot of success).
The main idea of this diagnostic strategy is to first eliminate the components that most commonly cause a misfire problem/condition. This means testing the ignition system first and then making sure that all 6 cylinders have good compression.
This specific troubleshooting method/process will save you time, money and frustration as it'll help you avoid unnecessary repairs:
- Find the 'dead' cylinder first.
- If your vehicle is OBD II equipped, you need to check for specific misfire codes (P0301, P0302, P0303, P0304, P0305, P0306) with a scan tool or code reader.
- If not OBD II equipped, then you need to do a cylinder balance test.
- Once the 'dead' cylinder has been identified, the next step is to make sure it's getting spark.
- You must use a dedicated spark tester to check for spark.
- It's important that you check that the spark plug boot and spark plug wire are not damaged, cut, or burned.
- You should also remove the spark plug and check it for cracks or carbon tracks (this is SO important).
- Here's a real life case study on carbon tracks and how they can cause a misfire: Carbon Tracks Are A Common Cause Of Ignition Misfires.
- The key here is to eliminate the distributor cap, the spark plug wire and the spark plug as the cause of the cylinder's misfire. The following tutorial will help you test the ignition system:
- If spark is present, then the next step is checking that that cylinder has good compression.
- This is one of the most overlooked tests when diagnosing a misfire or rough idle condition. You can find the test here:
- How To Test Engine Compression (1987-2000 3.0L Chrysler) (at: troubleshootmyvehicle.com).
- This is one of the most overlooked tests when diagnosing a misfire or rough idle condition. You can find the test here:
- Check the fuel injectors.
- This now involves removing the upper intake manifold plenum to access all of the fuel injectors.
- Swap the fuel injector with its neighbor on the fuel injector rail.
- I'll swap out that fuel injector with its neighbor only if the following conditions are met:
- The ignition system is not at fault.
- That cylinder's compression value is good (compared to the rest of the cylinders).
- The fuel injector resistance is good.
- I think the fuel injector is clogged.
- I'll swap out that fuel injector with its neighbor only if the following conditions are met:
The most important thing to remember is to first identify the misfiring cylinder. Once you've identified it, keep in mind that either air, spark or fuel is missing and keeping that cylinder from producing power.
Precautions To Take When Removing The Intake Manifold Plenum

Removing the upper intake manifold plenum is a pretty straight-forward process. As you're removing it, keep in mind the following precautions:
- Buy or borrow a repair manual (preferably a Haynes repair manual -Chilton manuals suck) so that you can have the intake manifold removal process explained in detail.
- The manual will also give you the torque specifications for the bolts.
- Be careful that no foreign object, like a bolt, a nut, or any metal piece/part, falls into the open manifold port runners.
- Once the plenum has been removed, place a clean rag or rags on the open intake runners. This will keep things from falling into them.
- As you're removing bolts, nuts and stuff from the intake plenum to remove it, place them in a container and away from the engine compartment.
Anything falls into the open intake runners, without you knowing, and the engine is started, you are going to be in a big world of hurt! Since it may require the removal of the cylinder head to retrieve the part that fell in. So be alert and be careful.
When your testing is done and you're installing the plenum, don't use any type of gasket sealer on the gaskets (like RTV Silicone). Install the gaskets dry (without any adhesive). This will help you avoid vacuum leaks down the road.
Removing the plenum is not an out of this world thing that no one can do, it's done around the country in many shops without complications or unhappy endings by simply following some precautions.
More 3.0L Chrysler Diagnostic Tutorials
You can find a complete list of 3.0L Chrysler/Dodge/Plymouth tutorials in this index:
Here's a small sample of the tutorials you'll find in the index:
- How To Test The Throttle Position Sensor (1996-1997 3.0L Caravan/Voyager).
- How To Test For A Broken Timing Belt (1988-2000 3.0L SOHC Chrysler) (at troubleshootmyvehicle.com).
- How To Replace the Distributor (1988-2000 3.0L Chrysler) (at troubleshootmyvehicle.com).
- How To Test The Throttle Position Sensor (1991-1995 3.0L Chrysler) (at troubleshootmyvehicle.com).

If this info saved the day, buy me a beer!

