STEP 3: Checking For A Blown Head Gasket
")
A blown head gasket (and the 3.8L V6 engine has two of them) can cause the engine to not start.
In the majority of cases, a blown head gasket is usually caused by severe engine overheating.
There are four specific tests to check for a head gasket, in this section I'm gonna' explain how to do 2 of those 4.
If you want to find out more about all 4 tests, check out this tutorial: How To Test A Blown Head Gasket (3.8L V6 Chrysler, Dodge, Plymouth Min-Van).
Alright, let's get started:
- 1
Open the hood of your mini-van.
- 2
Remove the dipstick.
- 3
Check the color of the oil sticking to the dipstick.
- 4
You'll see one of two things:
1.) The oil will look like 'coffee with too much creamer'.
2.) The oil will look normal. - 5
Remove the radiator cap from the radiator.
CAUTION: Never remove the radiator cap if the engine is hot or has been running an extended amount of time. Wait till the engine has completely cooled down before removing the radiator cap. - 6
Check the coolant level. If the radiator is not full, then top it off with water.
- 7
Have your helper to crank the engine, while you stand at a safe distance from the open radiator.
- 8
You'll see one of two results:
1.) The water or coolant inside the radiator will shoot out.
2.) The coolant will not be disturbed. In other words, cranking the engine will have no effect on the level of the water or coolant in the radiator.
Let's take a look at what your test results mean:
CASE 1: The oil on the dipstick looks like 'coffee with too much creamer'. This test result lets you know that you've have a blown head gasket problem on your hands.
CASE 2: The coolant was shot out of the open radiator when the engine was cranked. This test result lets you know that you've have a blown head gasket problem on your hands.
CASE 3: The coolant WAS NOT shot out of the open radiator when the engine was cranked and the oil looks its normal color on the dipstick. These are the correct test results.
Since your mini-van's engine is not starting, your next test is to check the engine's compression. Go to: STEP 4: Making Sure The Engine Has Good Compression.
STEP 4: Making Sure The Engine Has Good Compression
")
If you have eliminated the ignition system, the fuel pump, and a blown head gasket as the cause of your mini-van's no-start problem, then I suggest testing the engine's compression.
If you own a 1994-2000 3.8L V6 Chrysler, Dodge, or Plymouth mini-van, a compression test can be a challenge to do. This is due to the fact that the spark plugs for cylinders 1, 3, and 5 are very difficult to remove.
On these particular mini-vans, I have found it necessary to remove the alternator and the alternator bracket to access spark plugs for cylinders 1 and 3.
Don't let this discourage you from performing the engine compression test, because it's not impossible to do for the DIY'er. It'll just take some planning and some time, but it can be done.
I've written a detailed 'how to test the engine compression' tutorial, and you can find it here: How To Test Engine Compression (3.8L V6 Chrysler, Dodge, Plymouth Min-Van).
Alright, let's get started:
- 1
Disconnect the spark plugs wires from the spark plugs.
NOTE: On the 1994-2000 3.8L V6 Chrysler, Dodge, or Plymouth mini-vans you'll need to remove the alternator and its bracket to access cylinder 1 and cylinder 3 spark plug wires and spark plugs. - 2
Remove the spark plugs.
- 3
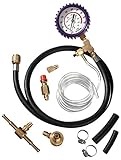
Thread the engine compression gauge into the spark plug hole for the number 1 engine cylinder.
Hand tighten the compression gauge only! Do not use any type of tool to get it tight. - 4
Have your helper crank the engine.
- 5
Once the needle on the compression gauge stops climbing have your helper stop cranking the engine.
- 6
Now, record the value on a piece of paper and the cylinder it belongs to.
- 7
Repeat steps 3 and 6 on the remaining cylinders.
Let's take a look at what your compression test results mean:
CASE 1: All cylinders have compression above 120 PSI. This is the correct and expected test result.
If all cylinders have at least 120 PSI of compression, then you can conclude that the engine does not have a compression problem (causing it not to start).
CASE 2: All cylinders have 0 PSI compression. This tells you that 0 compression is the cause behind the no-start problem on your mini-van.
The most likely cause will be a broken timing chain or the engine threw a rod.
CASE 3: Two adjacent cylinders have 0 PSI. This usually indicates a blown head gasket. Specially if your mini-van overheated before the no-start problem occurred.
For more testing suggestions, take a look at this tutorial: How To Test A Blown Head Gasket (3.8L V6 Chrysler, Dodge, Plymouth Min-Van).
No Start Troubleshooting Summary
Testing a 'cranks but does not start' condition all boils down to a process of elimination.
The most important thing you should remember is that the engine is not starting due to a lack of spark, or a lack of fuel, or a lack of compression.
By checking these basic things (spark, fuel, air), you'll save yourself the frustration of replacing components that won't solve the problem.
As you noticed, I started out the troubleshooting tests with a spark test (at all cylinders). This is due to the fact that the culprit behind most no-start problems is the ignition system, specifically a defective crankshaft position sensor.
Once you've confirmed that you've got spark at all cylinders, there isn't any need to spend time testing the crankshaft position sensor. The next step is to make sure the fuel pump is working and so on and so on.
Where To Buy An HEI Spark Tester And A Fuel Pressure Gauge
As I mentioned before, the HEI spark tester (OTC 6589) is an accurate spark tester and it doesn't cost and arm and a leg. The fuel pressure gauge that connects to the Schrader Valve on the fuel rail (of your mini-van) is a reasonably priced tool too:


If this info saved the day, buy me a beer!
