
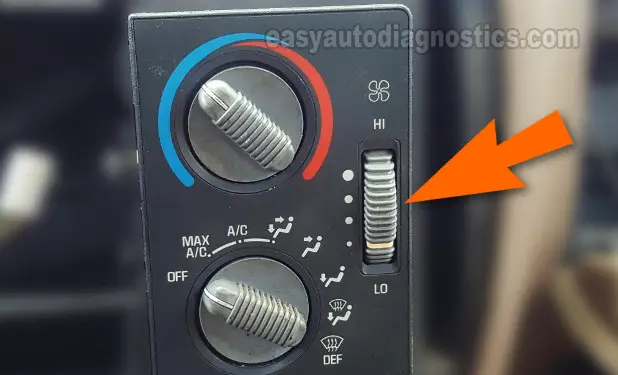
You'll be able to test the blower motor switch, with the help of this tutorial, and find out if it's bad or not.
Everything is explained in plain English and are simple tests a DIY'er can do with a multimeter and a jumper wire.
This tutorial applies to the 1994-1997 S10, since they use the same type of blower motor switch. Late 1997 S10 use a different blower motor switch.
Contents of this tutorial:
The following tutorials may be helpful:
- How To Test The Blower Motor Resistor (1995-2003 2.2L Chevy S10).
- Blower Motor Test (1994-2003 2.2L Chevy S10, GMC Sonoma).
Blower Motor Switch Basics
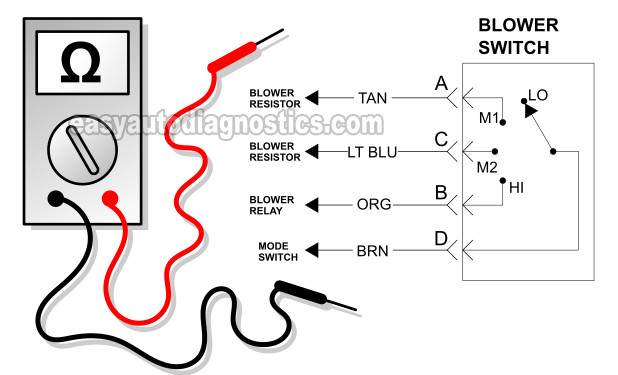
The blower motor switch is tasked with selecting the blower motor speeds (LO, M1, M2 and HI).
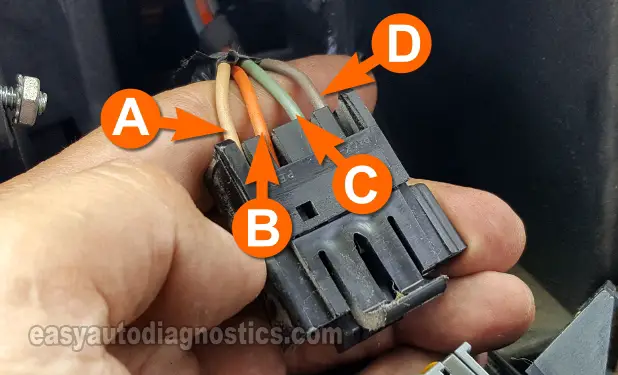
Once you accessed the rear of the blower switch, you'll notice that its 4 male terminals connect to 4 wires.
Here's a brief description of each (see illustration above for ID of each wire):
- A -Tan (TAN) wire that connects directly to terminal D of the blower resistor.
- B -Orange (ORG) wire that connects directly to the blower motor relay.
- C -Light blue (LT BLU) wire that connects directly to terminal A of the blower resistor.
- D -Brown (BRN) wire that connects to the Vent Mode Switch and terminal B of the blower resistor. This is the wire that feeds the blower switch with battery power.
When the blower motor switch fails, you'll usually see one or several blower speeds not working.
Where To Buy The Blower Motor Switch
The blower motor switch on the 1994-1997 Chevy S10 (GMC Sonoma) isn't expensive. The following links will help you comparison shop for the blower switch and blower motor:


Disclosure: As an Amazon Associate, I earn from qualifying purchases. Buying through these links helps support this site at no extra cost to you. Thanks for your support —it really means a lot!
TEST 1: Testing The Continuity Of The Blower Motor Switch Circuit
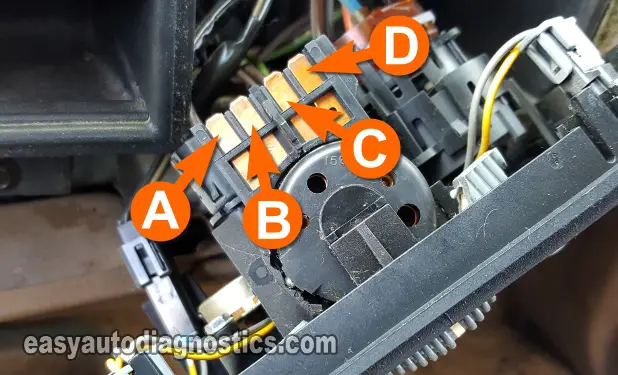
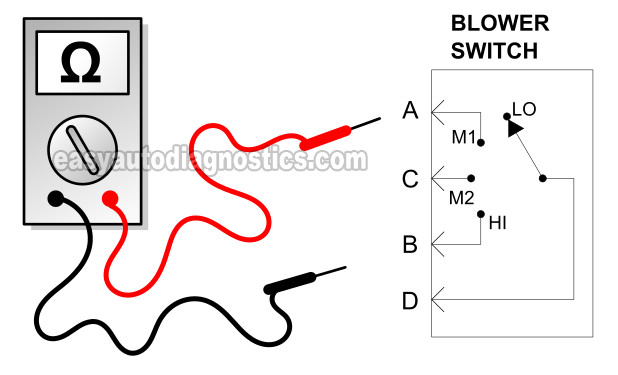
In this test section, we're gonna' test the continuity of the blower motor switch.
It's important to note that what we're looking for, on the digital multimeter reading, is a non-OL reading. In other words, the actual Ohms value is not important as long as the reading is not OL (when the test step indicates a continuity result).
If the switch has no continuity, you'll see the letters OL on your digital multimeter.
Let's get started:
- 1
Remove the AC Heater Control Panel from its location on the dash but don't disconnect it from any of its connectors or completely remove it from the dash.
- 2
Disconnect the blower motor switch from its connector. You don't need to remove the switch from the AC Heater Control Panel.
Place your multimeter in Ohms mode. - 3
With the blower switch in its LO speed position your multimeter should read OL across terminals D and A, D and B, D and C.
- 4
With the blower motor switch in its M1 speed position your multimeter should read continuity on male terminals D and A.
Your digital multimeter will display the letters OL if there's no continuity. - 5
With the blower motor switch in its M2 speed position your multimeter should read continuity on male terminals D and C.
Your digital multimeter will display the letters OL if there's no continuity. - 6
With the blower motor switch in its HI speed position your multimeter should read continuity on male terminals D and B.
Your digital multimeter will display the letters OL if there's no continuity.
Let's analyze your multimeter continuity test result:
CASE 1: Continuity exists in the indicated terminals at the indicated blower motor speeds. This is the correct and expected test result.
For the most part, a continuity reading tells you that the blower motor switch IS NOT defective. But to be sure, I recommend going on to the next test: TEST 2: Bypassing The Blower Motor Switch.
CASE 2: Continuity DOES NOT exist between two indicated terminals. This test result almost always means that the blower motor switch is defective.
To be sure, I suggest doing one more test and it's to bypass the switch itself. For this test go to: TEST 2: Bypassing The Blower Motor Switch.
TEST 2: Bypassing The Blower Motor Switch
In this test section, we're gonna' bypass the blower motor switch itself by using a jumper wire to jumper together two wires of the blower motor switch's connector.
This jumper wire will take the place of the blower switch and depending on what two terminals we jumper together, you'll get the blower motor to produce M1, M2 or HI speed.
For this test to work, you have to make sure that the blower motor resistor is OK (not defective) and that the blower motor itself is also not defective.
OK, these are the test steps:
- 1
Disconnect the blower motor switch from its connector.
NOTE: Leave the AC-Heater Control Panel connected to its other electrical connectors. - 2
Place the Vent Mode Select Switch in any position but OFF and turn the key ON (but don't start the engine). This will power up the BRN wire of the blower switch connector.
The blower motor will activate and blow in LO speed (even though the blower switch is not connected to its connector) and this is normal.
If the blower motor does not run at all, see CASE 3 below. - 3
Jumper wires D and A of the blower motor switch connector.
Your Chevy S10 or GMC Sonoma's blower motor should run in M1 speed. - 4
Jumper wires D and C of the blower motor switch connector.
Your Chevy S10 or GMC Sonoma's blower motor should run in M2 speed. - 5
Jumper wires D and B of the blower motor switch connector.
Your Chevy S10 or GMC Sonoma's blower motor should run in HI speed.
Let's take a look at your test results:
CASE 1: The blower motor ran in the indicated speed when the indicated wires were jumpered together. This is the correct test result.
You can conclude that the blower motor switch is defective only if:
- You got an OL (no-continuity) reading in TEST 1.
- The blower motor does not run in M1, M2, or HI with the blower switch connected to its connector (and the speed is selected and the key in the ON position).
CASE 2: The blower motor DID NOT run in the indicated speed when the indicated wires were jumpered together. This test result means one of several things:
- If M1 or M2 speeds did not activate, then the most likely cause is a bad blower resistor block.
- If HI speed did not activate, then the most likely cause is a bad blower motor relay. This is a very common problem.
- If M1, M2, and HI speeds did not activate, then the most likely cause is a blown fuse or a bad blower motor relay.
CASE 3: The blower motor did not run in LO speed when the Vent Mode Select Switch was turned on. This usually means that the 25 Amp HTR AC fuse (in the fuse box) is blown and not powering up the BRN wire of the blower switch connector or the blower motor.
This fuse can get blown for several reasons but the most common one is that the blower motor is defective and drawing too much amperage (25 Amps or more). You can find the blower motor amperage draw test here:
More 2.2L GM Tutorials
You can find a complete list of 2.2L Chevy S10 (GMC Sonoma) tutorials in this index:
Here's a small sample of the tutorials you'll find in the index:
- How To Test The Throttle Position Sensor (1998-2003 2.2L S10 and Sonoma).
- How To Test The Throttle Position Sensor (1995-1997 2.2L S10 and Sonoma).
- Oxygen Sensor Heater Test -P0141 (2.2L Chevy S10 - GMC Sonoma).
- How To Test the MAP Sensor (GM 2.2L) (at troubleshootmyvehicle.com).

If this info saved the day, buy me a beer!
