")
The fuel pump can be easily tested, with a fuel pressure gauge, to find out if it has failed (or not).
In this tutorial, I'll show you how to do it in a step-by-step way and in plain English.
You'll be able to find out if the fuel pump is bad and causing the engine to not start or causing the engine to have a lack of power.
Contents of this tutorial:
- Symptoms Of A Bad Fuel Pump.
- Where To Buy A Fuel Pressure Test Gauge.
- Fuel Pressure Test: With Fuel Pressure Test Port Type 1.
- Fuel Pressure Test: With Fuel Pressure Test Port Type 2.
- Fuel Pressure Test: Without A Fuel Pressure Test Port On Fuel Injector Rail.
- Using Starting Fluid.
- More 2.2L Honda Accord Tutorials.
APPLIES TO: This tutorial applies to the following vehicles:
- 2.2L Honda Accord: 1994, 1995, 1996, 1997.
Symptoms Of A Bad Fuel Pump
The fuel pump is tasked with supplying the gasoline that the engine needs as soon as you crank and start the engine.
Unfortunately, the fuel pump won't last forever and when it fails, it will usually fail in one of two ways:
- The fuel pump will fail completely and cause the engine to not start.
- The fuel pump will begin to fail and although the engine starts and runs, it runs with a lack of power.
When the fuel pump begins to fail, but keeps the engine running, you'll usually see one or more of the following symptoms:
- Engine backfires thru' the intake manifold when the engine is under load.
- The check engine light illuminates with lean air/fuel mixture codes.
- The check engine light illuminates with a MAP sensor trouble code.
- Lack of power when accelerating the engine under load.
- Engine stalls when the engine is accelerated under load.
Thankfully, testing the fuel pump is not hard and in this tutorial, I'll explain how to do it.
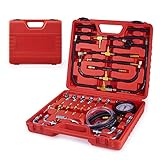
Where To Buy A Fuel Pressure Test Gauge
The fuel pressure test gauge kit, that you'll need to test the fuel pump, has to have a very specific type of adapter.
If your 2.2L Honda Accord's fuel injector rail comes with a fuel pressure test port, you'll need a M6 x 1.0 external adapter.
If it doesn't, then you'll need a M6 x 1.0 external adapter to connect the fuel pressure test gauge to the fuel filter.
The following fuel pressure test gauge kits have the M6 x 1.0 external adapter and the M12 x 1.25 external adapter needed to test the fuel pump pressure on the Honda Accord's covered by this tutorial:

Disclosure: As an Amazon Associate, I earn from qualifying purchases. Buying through these links helps support this site at no extra cost to you. Thanks for your support —it really means a lot!
Fuel Pressure Test: With Fuel Pressure Test Port Type 1
")
")
")
The Honda Accords covered by this tutorial will use 1 of 2 different types of fuel pressure test ports (located on the fuel injector rail) or none at all.
If the fuel pressure test port, on your particular 2.2L Honda Accord looks like the one in photo 1 of 3, then this test section applies to you.
To connect the fuel pressure test gauge, to the fuel system, we're gonna' remove the 6mm bolt sitting on top of the fuel pressure test port.
Once the 6mm bolt (M6 x 1.0 bolt) is removed, a M6 x 1.0 external adapter is installed in its place (see photo 2 of 3).
NOTE: If your particular 2.2L Honda Accord does not have a fuel pressure test port on the fuel injector rail, then go to this section: Fuel Pressure Test: Without A Fuel Pressure Test Port On Fuel Injector Rail.
These are the test steps:
- 1
Remove the bolt on top of the fuel pressure test port. The orange arrow points to the bolt that sits on top of the fuel pressure test port (see image 1 of 3).
IMPORTANT: There is a copper sealing washer beneath this bolt. As you remove the bolt, be careful that it doesn't fall off and get lost -you'll need it! If you lose it, you'll need to buy it from your Honda dealership (or at a junkyard). - 2
Install the brass adapter in place of the bolt you just removed (see photo 2 of 3).
The M6 x 1.0 external adapter should have an O-ring that will seal the test adapter to the fuel pressure test port. If it doesn't have it, use the sealing washer. - 3
Connect the fuel pressure gauge to the adapter.
- 4
Have your helper crank the engine while you check for fuel leaks around the test adapter.
If you find fuel leaks, resolve them before moving on to the next test step. - 5
If no fuel leaks, have your helper crank the engine while you observe the fuel pressure test gauge.
- 6
If the engine starts, you should see:
1994-1997: 38-47 PSI with the fuel pressure regulator's vacuum hose disconnected.
1994-1997: 30-38 PSI with the fuel pressure regulator's vacuum hose connected. - 7
If the engine DOES NOT start, you should see:
1994-1997: 38-47 PSI with the fuel pressure regulator's vacuum hose disconnected.
Let's take a look at what your results mean:
CASE 1: The fuel pressure is 0 PSI. This test result lets you know that the fuel pump is not supplying the engine with fuel. This generally means that the fuel pump has failed.
To make sure, you've got to make sure that the fuel pump fuse is OK and that power is reaching the fuel pump when you crank the engine. If both of these tests are passed, then you can confidently conclude that the fuel pump is bad.
CASE 2: The fuel pressure is lower than the indicated pressure specification. This test result lets you know that the fuel pump is not supplying enough fuel to the engine.
This low fuel pressure will cause the air/fuel mixture to run 'lean' and cause a trouble code P0171 to light up the check engine light.
Before you replace the fuel pump, replace the fuel filter and repeat the fuel pressure test. If the fuel pressure is now within the indicated specification, you don't need to replace the fuel pump.
If the fuel pressure is still not within specification (after replacing the fuel filter), then the fuel pump is bad and needs to be replaced.
CASE 3: The fuel pressure is within the indicated specification while the engine was cranking. This is the correct test result and lets you know that the fuel pump is working correctly.
If the engine is not starting, then you can conclude that the fuel pump itself is not behind the problem.
