")
I can tell you from personal experience that it's not difficult to determine if the manifold absolute pressure (MAP) sensor is working properly or if it's defective.
What's really cool is that you don't need any expensive automotive diagnostic tools to do it, not even a scan tool.
In this tutorial, I'll explain how to test the MAP sensor with a multimeter step by step. With the 3 tests that I'll show you, you'll easily find out if it the MAP sensor is good or bad.
Contents of this tutorial:
![]() You can find this tutorial in Spanish here: Cómo Probar El Sensor MAP (1985-1993 2.5L Chevrolet S10 Pickup, GMC S15 Pickup, GMC Sonoma (at: autotecnico-online.com).
You can find this tutorial in Spanish here: Cómo Probar El Sensor MAP (1985-1993 2.5L Chevrolet S10 Pickup, GMC S15 Pickup, GMC Sonoma (at: autotecnico-online.com).
APPLIES TO: This tutorial applies to the following vehicles:
- 2.5L Chevrolet S10 Pickup: 1985, 1986, 1987, 1988, 1989, 1990, 1991, 1992, 1993.
- 2.5L GMC S15 Pickup: 1985, 1986, 1987, 1988, 1989, 1990.
- 2.5L GMC Sonoma: 1991, 1992, 1993.
Symptoms Of A Bad MAP Sensor
The engine management system on your Chevy S10 (GMC S15) is a speed density type. You can almost always tell these fuel systems apart because they don't use a mass air flow (MAF) sensor.
In a speed density type fuel injection system, the fuel injection computer needs three information inputs to calculate the amount of air entering the engine. These three are:
- Engine load.
- Engine RPMs.
- Intake air temperature.
Once the fuel injection computer has calculated the amount of air entering the engine, it calculates the correct amount of fuel to inject into the engine.
The MAP sensor is the component that provides engine load information to the fuel injection computer.
When the MAP sensor fails, you'll see one of the following OBD I MAP sensor diagnostic trouble codes illuminating the check engine light:
- Code 33: MAP Sensor Signal Voltage High.
- Code 34: MAP Sensor Signal Voltage Low.
You'll also see one or more of the following symptoms:
- The engine won't start.
- The engine takes a long time to start (extended cranking time).
- Black smoke coming out of the tailpipe.
- Bad gas mileage.
- The engine idles rough when running.
- A lack of power when under load.
Where To Buy The MAP Sensor And Save


Disclosure: As an Amazon Associate, I earn from qualifying purchases. Buying through these links helps support this site at no extra cost to you. Thanks for your support —it really means a lot!
Not sure if the MAP sensor fits your vehicle? Don't worry. Once you get to the site, they'll make sure it fits by asking you the specifics of your vehicle. If it doesn't fit, they'll find you the right MAP sensor.
MAP Sensor Circuit Descriptions
")
| Wire | Color | Description |
|---|---|---|
| 1 | Grey (GRY) | 5 Volts |
| 2 | Light green (LT GRN) | MAP signal |
| 3 | Purple (PPL) or Black With Red Stripe (BLK/RED) or Black With Orange Stripe (BLK/ORG) | Ground |
TEST 1: Testing The MAP Sensor Signal
The MAP sensor is designed so that its voltage signal decreases as it gets vacuum. As the amount of vacuum received decreases, its voltage signal increases.
When the MAP sensor fails, its voltage signal generally stays stuck at a single voltage value regardless of the amount of vacuum it is receiving.
For our first MAP sensor test, we'll check its voltage signal while applying and then releasing vacuum to it.
If the MAP sensor is OK, its output voltage signal will decrease when we apply vacuum to the sensor.
Once we release the applied vacuum, the MAP signal voltage should rise back to its original no vacuum value.
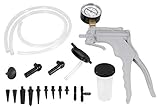
NOTE: If you don't have a vacuum pump, don't worry. You can use your mouth to apply vacuum to the MAP sensor.
IMPORTANT: The MAP sensor must remain connected to its electrical connector to read the voltage within its signal wire. You'll need to use a back probe on the connector or a wire piercing probe on wire. You can see an example of this tool here: Wire Piercing Probe.
OK, let's get started:
- 1
Disconnect the MAP sensor from its vacuum line or hose.
- 2
Connect your vacuum pump to the MAP sensor's vacuum inlet.
You'll need to use a piece of vacuum hose to connect the vacuum pump to the MAP sensor. - 3
Place your multimeter in Volts DC mode.
- 4
Connect the red multimeter probe to the wire that connects to the terminal labeled with the number 2 (in the image above).
This wire should be the light green (LT GRN) wire of the connector.
IMPORTANT: The MAP sensor must remain connected to its 3-wire connector. - 5
Connect the black multimeter test lead directly to the battery negative (-) terminal.
- 6
Turn the key ON but don't start the engine.
- 7
At this point your multimeter should register a value around 4.5 Volts DC.
- 8
Now, pump the vacuum pump to apply vacuum to the MAP sensor. The voltage should decrease.
- 9
Release the vacuum you applied to the MAP sensor. The voltage should increase.
OK, let's take a look at what your test results mean:
CASE 1: The MAP voltage signal decreased/increased as you applied/released vacuum to the sensor. This is the correct result and confirms that the MAP sensor is functioning correctly.
If a MAP sensor diagnostic trouble code keeps illuminating the check engine light, you can conclude the MAP sensor itself is not the cause. For more info, take a look at the section: MAP Sensor Code Won't Go Away.
CASE 2: The MAP voltage signal DID NOT increase/decrease as you applied/released vacuum. This test result usually indicates that the MAP sensor is bad.
Before replacing the MAP sensor, you need to make sure that it's getting power and Ground. Go to the next test: MAP TEST 2: Making Sure The MAP Sensor Is Getting 5 Volts.
CASE 3: Your multimeter registered 0 Volts. This test result generally tells you that the MAP sensor is bad.
Before replacing the MAP sensor, you need to make sure that it's getting power and Ground. Go to the next test: MAP TEST 2: Making Sure The MAP Sensor Is Getting 5 Volts.
