TEST 4: Testing The 7X REFERENCE Signal
Now we're gonna' test the 7X Reference signal. This is the digital signal that the module sends the ECM (that relays CKP signal information).
This test will be achieved using a multimeter (or an oscilloscope).
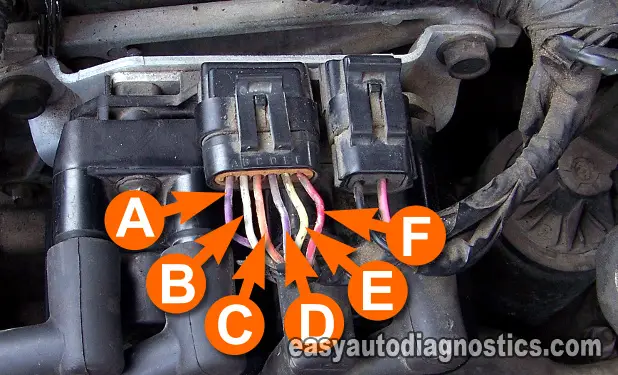
You're gonna' probe the wire to get a Hz frequency reading (if you're using a multimeter). This is the D circuit and is the PURPLE with WHITE stripe wire of the connector.
IMPORTANT: The battery must be in a fully charged condition for this test.
CAUTION: You'll be working around a cranking engine. Be careful, use common sense and take all necessary safety precautions.
These are the test steps:
- 1
Put multimeter in Hertz (Hz) mode
NOTE: The ignition control module (ICM) must remain connected to its two electrical connectors. - 2
Connect the red multimeter test lead to the purple with white stripe (PPL/WHT) wire of the 6-wire connector.
- 3
Connect the black multimeter test lead to the battery negative (-) terminal.
- 4
With the key ON and engine NOT CRANKING, you should have 0 Hz.
- 5
Have an assistant crank the engine while you observe the multimeter (or oscilloscope).
- 6
The multimeter's Hertz reading should fluctuate from 13 Hz to 23 Hz continuously as the engine is cranking.
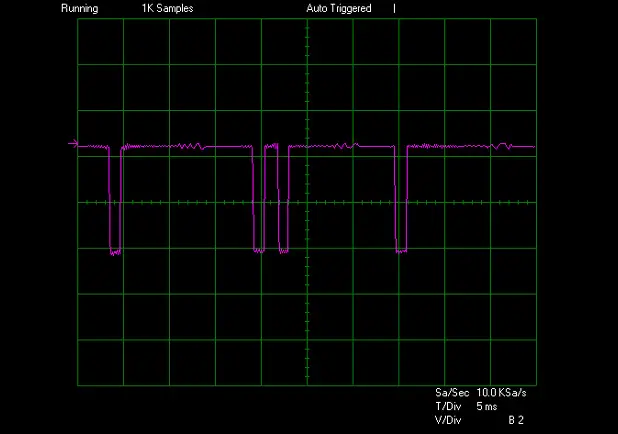
If you're using an oscilloscope, look at image 2 for the wave-form.
The minimum and maximum Hertz reading attained will depend on the cranking RPMs. Engine temperature, oil viscosity and battery charge condition will have a direct effect on this.
Let's interpret your test results:
CASE 1: The multimeter registered the indicated Hertz values. This is the correct test result and it means that the ignition control module is sending the 7X Reference signal to the ECM.
The next step is to go to: TEST 5: Testing The 2-3 And 1-4 IC Signal.
CASE 2: The multimeter DID NOT register the indicated Hertz values. Recheck all connections. Try again.
If you still don't see the indicated Hz value, then you can conclude that the ignition control module (ICM) is not creating the 7X Reference signal.
You can also conclude that the ICM is defective and needs replacement if you have:
- Confirmed that the four spark plug wires are not sparking.
- Confirmed the ICM is getting power (TEST 1).
- Confirmed the ICM is getting Ground (TEST 2).
- Confirmed the ICM is receiving the CKP sensor signal (TEST 3).
- Confirmed the ICM is NOT producing the 7X Reference signal (this test section).
So What Is The 7X REFERENCE SIGNAL? This is the signal that the ignition control module (ICM) on your Chevy Cavalier (or Pontiac Sunfire) sends the fuel injection computer after:
- The engine starts cranking and starts and the ignition module receives the crankshaft position signal.
- Without this 7X REFERENCE the fuel injection computer WILL NOT activate the fuel injectors.
- Also, this is the signal that let's the fuel injection computer know when to start activating the ignition coils sitting on top of the module.
TEST 5: Testing The 2-3 And 1-4 IC Signal
After the ECM receives the 7X Reference signal, it sends the module two signals. One is the 1-4 Coil Control signal and the other is the 2-3 Coil Control signal. These are the input signals that the module uses to start sparking the two ignition coils.
In this test step, we're gonna' test these two signals (individually). This will be achieved by using a multimeter (or an oscilloscope).
You'll be testing the B (white) and C (orange) wires of the six-wire connector.
It doesn't matter which wire you test first. The signal reading (on the multimeter or oscilloscope) will be the same for both wires, since the signals are identical to each other.
CAUTION: You'll be working around a cranking engine. Be careful, use common sense and take all necessary safety precautions.
IMPORTANT: The battery must be in a fully charged condition for this test.
These are the test steps:
- 1
Put multimeter in Hertz (Hz) mode
NOTE: The ignition control module (ICM) must remain connected to its two electrical connectors. - 2
Connect the red multimeter test lead to either wire.
- 3
Connect the black multimeter test lead to the battery negative (-) terminal.
- 4
With the key ON and engine NOT CRANKING, you should have 0 Hz.
- 5
Have an assistant crank the engine while you observe the multimeter (or oscilloscope).
- 6
The multimeter's Hertz reading should fluctuate from 3 Hz as the engine is cranking.
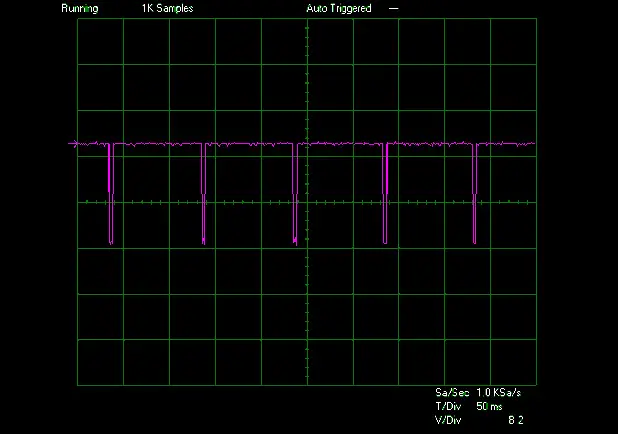
If you're using an oscilloscope, look at image 2 for the wave-form.
The minimum and maximum Hertz reading attained will depend on the cranking RPMs. Engine temperature, oil viscosity and battery charge condition will have a direct effect on this. - 7
Repeat steps 2 thru' 6 on the other wire.
Let's interpret your test results:
CASE 1: The multimeter registered the indicated Hertz values. This is the correct and expected test result.
You can conclude that the ignition control module (ICM) is bad and needs replacement if you have:
- Confirmed that the four spark plug wires are not sparking.
- Confirmed the ICM is getting power (TEST 1).
- Confirmed the ICM is getting Ground (TEST 2).
- Confirmed the ICM is receiving the CKP sensor signal (TEST 3).
- Confirmed the ICM is producing the 7X Reference signal (TEST 5).
- In this section, you've confirmed that the ICM is receiving the two signal it needs to activate the ignition oil packs.
CASE 2: The multimeter DID NOT register the indicated Hertz values. If you have do not have a Hertz reading, recheck all connections and repeat the test.
If you still do not have a Hertz reading, you can conclude that the ICM is not receiving the activation signal it needs to activate the ignition coil.
This test result eliminates the ICM itself as bad. The most likely cause of this missing signal is an open-circuit problem between the ICM connector and the PCM connector.

If this info saved the day, buy me a beer!


