
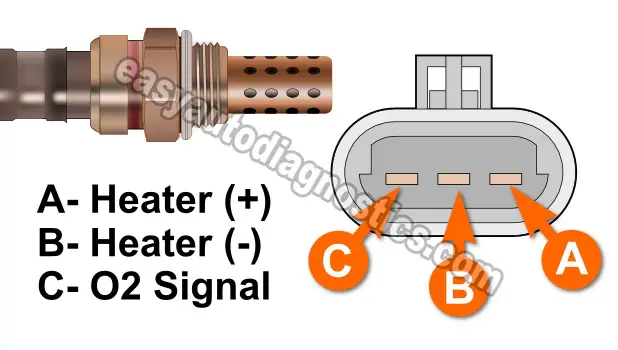
The oxygen sensor on the 1993 3.8L equipped GM vehicles is a 3 wire sensor. In this tutorial, I'll show you how to test it's internal heater with a simple multimeter.
You don't need any expensive diagnostic test equipment and with the 3 basic diagnostic tests I'm going to show you, you'll find out if the O2 heater is fried or not.
Contents of this tutorial:
 You can find this tutorial in Spanish here: Prueba: Calentador Del Sensor De Oxígeno (1993 3.8L V6 GM) (at: autotecnico-online.com).
Circuit Descriptions Of The Oxygen Sensor
For the oxygen sensor to start sensing the oxygen content of the exhaust, it has to reach a constant temperature of about 600°F. The exhaust stream, that the O2 sensor is in contact with can't keep it this hot consistently.
To overcome this limitation, the oxygen sensor comes equipped with an internal heater so that it can activate faster (and stay activated) than it would from just the exhaust stream's heat it's exposed to.
Therefore, 2 of the 3 wires feed the heater element with power and Ground. The third wire is the one that sends the oxygen content voltage signal to your vehicle's fuel injection computer.
Below, you'll find the color of the wires of the engine wiring harness oxygen sensor connector for the 3-wire oxygen sensor:
| Oxygen Sensor Pinout (1993 3.8L V6 GM) | ||
|---|---|---|
| Pin | Wire Color | Description |
| A | PNK/BLK | Heater Power (+) |
| B | BLK | Heater Ground (-) |
| C | PPL | O2 Signal |
NOTE: The connector in the illustration (that I'm using in this tutorial) is of the connector on the oxygen sensor itself. The connector on the O2 sensor itself has male spade terminals.
TEST 1: Verifying The Heater Element Is Getting Power
Your 1993 3.8L equipped GM vehicle's oxygen sensor gets power (12 Volts DC) from a fuse in the under-dash fuse block.
These 12 Volts are then sent to the 3-wire O2 sensor thru' the pink with black stripe (PNK/BLK) wire of the engine wiring harness oxygen sensor connector.
To check for these 12 Volts, we need to do a simple multimeter voltage test.
CAUTION: The oxygen sensor gets and stays very hot even after the engine is off! Perform this test with a completely cold engine. Be careful and take all necessary safety precautions! If you raise your vehicle with a jack, place it on jack stands!
IMPORTANT: The illustration above is of the connector on the oxygen sensor itself. To check for power, you need to test the PNK/BLK wire of the engine wiring harness sensor connector.
OK, this is what you'll need to do:
- 1
Locate the 3-wire oxygen sensor and disconnect it from its harness connector.
- 2
Locate the PNK/BLK wire of the engine wiring harness oxygen sensor connector.
- 3
With your multimeter in Volts DC mode, probe the PNK/BLK with the red multimeter test lead.
Ground the black multimeter test lead directly on the battery negative (-) terminal. - 4
With the Key On Engine Off (KOEO), the RED wire should have 10 to 12 Volts DC.
Let's take a look at your test results:
CASE 1: The PNK/BLK wire has 10 to 12 Volts DC. Good, since this confirms that the 3-wire oxygen sensor's heater element is getting power.
The next step is to make check that the black (BLK) wire, of the O2 sensor engine wiring harness connector, is feeding Ground to the heater element. For this test, go to: TEST 2: Verifying The Heater Element Is Getting Ground.
CASE 2: The PNK/BLK wire DOES NOT have 10 to 12 Volts DC. Re-check that you're testing the correct wire and that the key is in the RUN position (but don't crank or start the engine) and re-test.
If you still don't see 10 to 12 Volts DC, then this test result tells you that the 3-wire oxygen (O2) sensor itself IS NOT bad since without power, the heater element won't work.
Although it's beyond the scope of this article, the next step is to find out why this battery power is missing using a wiring diagram.
TEST 2: Verifying The Heater Element Is Getting Ground
Now that you've confirmed that the oxygen sensor's heater is being fed with power, the next step is to make sure that it's getting chassis Ground.
The black (BLK) wire, of the engine wiring harness O2 sensor's electrical connector, is the one that supplies this chassis Ground to the 3-wire oxygen sensor.
We can do a very simple multimeter voltage test to see if Ground is indeed present or not.
IMPORTANT: The pinout in the illustration above is of the connector on the oxygen sensor itself. To check for power, you need to test the BLK wire of the engine wiring harness sensor connector.
These are the test steps:
- 1
Locate the BLK wire of the O2 sensor's engine wiring harness connector.
NOTE: Remember, you'll test the wire that's on the engine wiring harness connector side and NOT on the O2 sensor itself. - 2
Place your multimeter in Volts DC mode and connect the red multimeter test lead to battery (+).
With the black multimeter test lead, probe the BLK wire of the O2 sensor's harness connector. - 3
With the Key On, engine Off, this wire should have 10 to 12 Volts DC.
Let's take a look at your test results:
CASE 1: The multimeter confirms that the BLK wire is feeding Ground since it registered 10 to 12 Volts DC. This confirms the 3-wire O2 sensor's heater is being fed with Ground.
So far you've confirmed that the 3-wire O2 sensor's heater element is getting both power and Ground. The next step is to check the heater element's resistance with your multimeter. For this test, go to: TEST 3: Testing The Heater Element's Resistance.
CASE 2: The multimeter confirms that the BLK wire IS NOT feeding Ground since it DID NOT register 10 to 12 Volts DC. Re-check all of your connections and make sure you're testing the correct terminal.
If your multimeter still doesn't register the 10 to 12 Volts DC, then the most likely cause of this missing Ground is an 'open' in the BLK wire between the O2 sensor's harness connector and chassis Ground.
TEST 3: Testing The Heater Element's Resistance
Having checked the basics, which are:
- The PNK/BLK wire has 10 to 12 Volts DC (TEST 1).
- The BLK wire is feeding the 3-wire O2 sensor with Ground (TEST 2).
In this last test section, we're gonna' verify that the 3-wire O2 sensor's heater resistance is within factory specification.
If the resistance is not within specification, then we now know the O2 sensor is bad and needs to be replaced.
NOTE: Just a reminder that the 3-wire oxygen sensor has to be completely cold before proceeding with this test since the manual calls for the O2 sensor to be at room temperature for the resistance test.
OK, this is what you need to do:
- 1
Locate the O2 sensor terminals A and B of the O2 sensor connector itself (not the engine wiring harness O2 connector).
- 2
With your multimeter in Ohms mode, probe terminals A and B of the O2 sensor itself.
- 3
If all is OK, you should see about 3.5 to 14 Ωs on your multimeter.
If the heater element is fried, your multimeter will show an open (usually indicated by the letters OL) or a number over 10 K Ωs.
Let's take a look at your test results:
CASE 1: The 3-wire O2 sensor's heater resistance is within spec.. This test result tells you that oxygen sensor's heater is OK.
CASE 2: Your multimeter showed an open circuit (OL). This confirms that the O2 sensor's heater element is fried and needs to be replaced with a new one.
Here are some more specifics: Since you have:
- Confirmed that the 3-wire O2 sensor's heater element is getting power (TEST 1).
- -AND-
- Confirmed that the 3-wire O2 sensor's heater element is getting Ground (TEST 2).
- -AND-
- In this test, you have confirmed that the heater element's resistance is out of specification.
Taking all of the above into account you can correctly conclude that the 3-wire O2 sensor needs to be replaced with a new one.
Where To Buy The Oxygen Sensor And Save
If you find, after testing the 3-wire oxygen sensor that its heater element is fried, take a look at the links below. I think they'll save you some bucks (especially if you want to buy the original AC DELCO 3-wire O2 sensor):


Disclosure: As an Amazon Associate, I earn from qualifying purchases. Buying through these links helps support this site at no extra cost to you. Thanks for your support —it really means a lot!
NOTE: If you're not sure if the above 3-wire O2 sensor fits your particular 3.8L V6 equipped GM vehicle don't worry, once you get to the site, they'll make sure the sensor fits, if not, they'll find you the correct one.
More 3.8L GM Diagnostic Tutorials
You can find a complete list of 3.8L GM tutorials in the following 2 indexes:
- GM 3.8L Index Of Articles.
- GM 3.8L Index Of Articles (at troubleshootmyvehicle.com).
Here's a small sample of the tutorials you'll find in the indexes:
- GM 3.8L Ignition Control Module And Crank (3X, 18X) Sensor Test.
- How To Test The Ignition Coil Pack -Misfire Troubleshooting Tests (GM 3.8L).
- How To Test The GM 3.8L Throttle Position Sensor (TPS).
- How To Test The 3.8L GM Cam Sensor (P0341) (at: troubleshootmyvehicle.com).

If this info saved the day, buy me a beer!


