TEST 4: Swapping Ignition Coils

The ignition coil receives an activation signal from the fuel injection computer.
In this test section, you'll test for the presence of the ignition coil's activation signal by swapping out the non-sparking coil with a good sparking coil.
If the good sparking coil sparks when connected to the non-sparking coil's electrical connector, you can conclude that the activation signal is present.
The wire supplying the ignition coil's activation signal is the middle wire of the connector.
Each ignition coil's middle wire is a different color. You can consult the ignition coil pin-out charts to find the color of the wire of the specific ignition coil you're testing here: Ignition Coil Pin Outs.
These are the test steps:
- 1
Disconnect and remove the ignition coil that did not spark.
- 2
Remove one of the other ignition coils from its place. This coil should be one that sparked when tested in TEST 1.
- 3
Connect the good ignition coil to the non-sparking ignition coil's electrical connector.
- 4
Connect the HEI spark tester to the ignition coil.
- 5
Ground the HEI spark tester with a jump start cable directly on the battery negative (-) terminal.
- 6
Place the non-sparking ignition coil in the location of the good one, connect it to the electrical connector, and bolt it down.
- 7
Have your helper crank the engine when everything is set up.
- 8
The good ignition coil should spark.
Let's examine your test results:
CASE 1: The ignition coil sparked. This is the correct and expected test result and confirms the non-sparking ignition coil's electrical connector is supplying an activation signal.
The non-sparking ignition coil is defective if you have confirmed:
- The ignition coil is not sparking (TEST 1).
- The ignition coil is getting 10 to 12 Volts (TEST 2).
- The ignition coil is getting Ground (TEST 3).
- The non-sparking ignition coil's connector is supplying an activation signal (this test section).
Check out my ignition coil recommendations here: Where To Buy The Ignition Coil And Save.
CASE 2: The ignition coil did not spark. This test result lets you know that an activation signal is not present in the non-sparking ignition coil's electrical connector.
Without this activation signal the ignition coil will not spark. The most common causes of this missing activation signal are:
- A bad/damaged ignition coil connector.
- An open-circuit problem in the wire between the ignition coil's connector and the fuel injection computer's connector.
- A bad fuel injection computer (very rare).
Although it's beyond the scope of this tutorial to troubleshoot this problem, you have eliminated the ignition coil itself as the cause of the misfire. Once the ignition coil receives its activation signal it will function again.
Other Common Misfire Causes

Unfortunately, quite a few issues will cause an engine cylinder to misfire.
If the misfiring cylinder's ignition coil is functioning correctly (in other words, it's sparking), the following testing tips/suggestions may help:
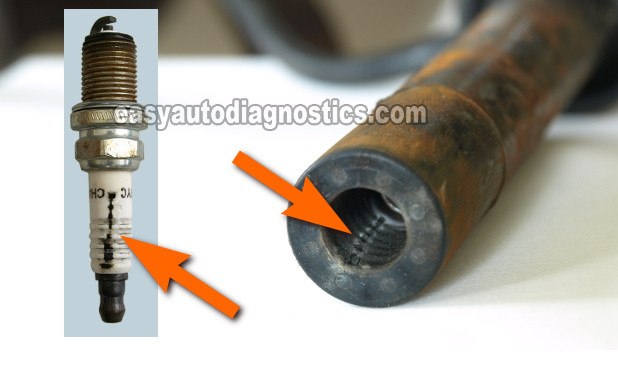
- Check for carbon tracks on the inside of the ignition coil's boot (see photo above).
- You'll have to remove all of the spark plugs and visually inspect their ceramic insulators and the inside of each spark plug wire boot to see if carbon tracks have developed. The photo above shows you what a carbon track looks like inside the boot and on the spark plug.
- Check to see if the ignition coil and spark plug are swimming in engine oil inside the spark plug tube.
- Check the to see if the dead cylinder's spark plug is broken.
- The dead cylinder has a compression problem.
- You can find the engine compression test here: How To Test Engine Compression (2002-2004 4.2L Oldsmobile Bravada, 2004-2007 4.2L Buick Rainier).
- Intake manifold gasket leaking air into the engine.
- The dead cylinder's fuel injector is bad.
More 4.2L Oldsmobile Bravada And Buick Rainier Tutorials
You can find a complete list of 4.2L Oldsmobile Bravada and Buick Rainier tutorials and wiring diagrams here:
Here's a list of articles you'll find there:
- Blown Head Gasket Tests (2002-2004 4.2L Oldsmobile Bravada, 2004-2007 4.2L Buick Rainier).
- Electronic Throttle Body Tests (2002-2004 4.2L Oldsmobile Bravada, 2004-2007 4.2L Buick Rainier).
- How To Test Engine Compression (2002-2004 4.2L Oldsmobile Bravada, 2004-2007 4.2L Buick Rainier).
- TAC System Wiring Diagram (2002-2004 4.2L Oldsmobile Bravada, 2004-2005 4.2L Buick Rainier).

If this info saved the day, buy me a beer!


