TEST 2: Testing For Spark At The Distributor Cap

If you've reached this point, then you've confirmed that you've got a wire that isn't sparking (while the other are) on your 2.0L Honda CR-V.
The next step is to now check for spark directly on the distributor cap tower (of the high tension wire that did not spark in TEST 1).
All we have to do is place the spark tester directly on the distributor cap tower and hold it there while a helper cranks the engine.
I'm gonna' suggest you do this by using a battery jump start cable. The battery jump start cable will both hold spark tester in place and give it Ground.
Let's get started:
- 1
Remove the spark plug wire (that did not spark in TEST 1) from its distributor tower.
- 2
Attach an HEI spark tester directly to the distributor tower that you just disconnected from its spark plug wire (see image above).
Hold the HEI spark tester with a battery jump start cable. Connect the other end of the jump start cable to the battery negative (-) terminal. - 3
Have your assistant crank the car while you observe the spark tester for spark. The engine may start, so be careful.
- 4
Once you've observed the spark tester sparking or not, have your assistant turn off the engine.
- 5
This test will give you one of two results: The spark tester will spark or it won't.
Let's take a look at what your test results mean:
CASE 1: You got spark. This result confirms that the spark plug wire is bad, replace the spark plug wires as a set.
You have indirectly tested the spark plug wire (that isn't sparking in TEST 1) and this test result confirms it's defective.
CASE 2: You got NO spark. This result indicates that the distributor cap. Replacing the ignition coil should solve the misfire condition.
Here's why: Since in TEST 1 you confirmed that the other spark plug wires are sparking, you can conclude that those distributor towers are transmitting spark. This this tower IS NOT, then you can conclude the distributor cap is defective.
Other Misfires Trouble Code Causes

Quite a few things can cause a misfire condition. So far, you've either confirmed or eliminated the distributor cap and the spark plug wires as defective (and behind the misfire problem).
Here's a list of a few things you should look for that may be behind the misfire condition on your 2.0L Honda CR-V:
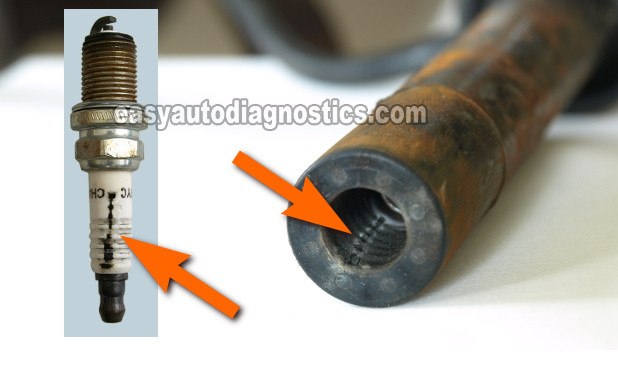
- Carbon tracks on the inside of the spark plug wires' boot and/or the spark plug boot (see photo above).
- You'll have to remove all of the spark plugs and visually inspect their ceramic insulators and the inside of each spark plug wire boot to see if carbon tracks have developed. The photo above shows you what a carbon track looks like inside the boot and on the spark plug.
- Spark plug tube seals (in the valve cover) leaking oil onto the spark plugs and the spark plug wire boots.
- Broken spark plug.
- You'll have to remove them all and visually inspect them.
- An engine cylinder with lower compression than the rest.
- You'll have to remove all of the spark plugs and with a compression gauge, test all cylinders to get their compression readings/values.
- Intake manifold gasket leaking air into the engine.
- Defective Fuel injector.
- Fuel pressure regulator leaking gasoline into its vacuum hose.
- For this test, all you have to do is remove the vacuum line that's attached to the vacuum line/hose nipple on the fuel pressure regulator itself and start the engine. If after about 30 seconds of engine run time the fuel pressure regulator starts leaking fuel from its vacuum hose nipple, the regulator is defective.
More 2.0L Honda CR-V Tutorials
You can find a complete list of tutorials here: Honda 2.0L Index Of Articles.
Here's a sample of the tutorials you'll find there:
- How To Test The Ignition Coil (1999-2001 2.0L Honda CR-V).
- How To Test The TPS (1997-2001 2.0L Honda CR-V).
- How To Test The MAP Sensor (1997-2001 2.0L Honda CR-V).
- How To Test Engine Compression (1997-2001 2.0L Honda).
On YouTube, check out my following videos:
- How To Test The Ignition Coil (1999-2001 2.0L Honda CR-V) (at YouTube).
- How To Test The Ignition Control Module (1999, 2000, 2001 2.0L Honda CR-V) (at YouTube).
- How To Test The Fuel Pump (1997-2001 2.0L Honda CR-V) (at: YouTube).

If this info saved the day, buy me a beer!

