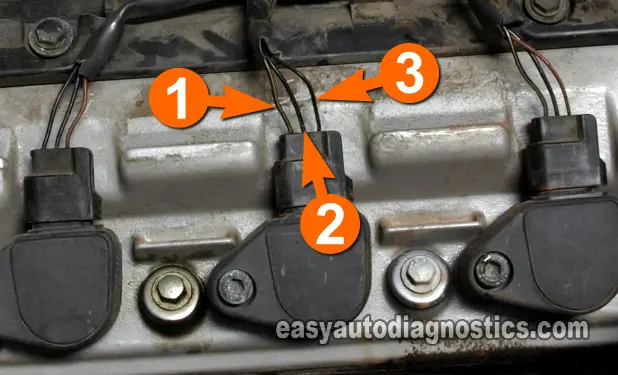
TEST 2: Making Sure The Ignition Coil Is Getting 12 Volts

OK, so far TEST 1 has confirmed that one or more of the ignition coils are not firing spark.
The next step is to verify that that ignition coil or coils (that did not spark) are receiving 10 to 12 Volts DC.
The wire that delivers this voltage to the ignition coil is the wire labeled with the number 1 in the photo above.
We'll check for the presence of this voltage with a multimeter voltage test.
NOTE: Be careful when probing the front of the female terminal of the ignition coil's connector to avoid damaging it.
OK, let's get started:
- 1
Disconnect the ignition coil from its electrical connector.
- 2
Put the multimeter in Volts DC mode.
- 3
Probe the wire labeled with the number 1 with the red multimeter test lead (using an appropriate tool).
- 4
Connect the black multimeter test lead to the battery negative (-) terminal.
- 5
Have your helper turn the key to the ON position.
- 6
You should see 10-12 Volts on your multimeter
If you're using a 12 Volt test light, the test light should light up.
Let's take a look at what your test results mean:
CASE 1: The multimeter registered 10-12 Volts (or the test light lit up). This is the correct test result and lets you know that the ignition coil is getting power.
The next step is to make sure the ignition coil is getting Ground. Go to: TEST 3: Making Sure The Ignition Coil Is Getting Ground.
CASE 2: The multimeter DID NOT register 10-12 Volts (or the test light DID NOT light up). This tells you that the ignition coil is not getting power and without it, the ignition coil will not spark.
This test result eliminates the COP ignition coil itself as bad and as the source of the misfire condition.
Since the power circuit is shared by all of the COP ignition coils, the most likely cause of this missing voltage is a bad ignition coil connector or an open-circuit problem in the wire between the connector and the engine wiring harness.
TEST 3: Making Sure The Ignition Coil Is Getting Ground

OK, you're here because in TEST 2 your multimeter (or test light) confirms that the ignition coil is getting 10 to 12 Volts DC.
The next step is to verify that that ignition coil is getting Ground.
The wire that delivers Ground to the ignition coil is the wire labeled with the number 2 in the photo above.
We'll check for the presence of this Ground by doing a multimeter voltage test.
NOTE: Be careful when probing the front of the female terminal of the ignition coil's connector to avoid damaging it.
These are the test steps:
- 1
Disconnect the ignition coil from its electrical connector.
- 2
Put the multimeter in Volts DC mode.
- 3
Probe the wire labeled with the number 2 with the black multimeter test lead (using an appropriate tool).
- 4
Connect the red multimeter test lead to the battery positive (+) terminal.
- 5
Have your helper turn the key to the ON position.
- 6
You should see 10-12 Volts on your multimeter
If you're using a 12 Volt test light, the test light should light up.
Let's examine your test result:
CASE 1: The multimeter registered 10-12 Volts (or the test light lit up). This is the correct test result and confirms that the ignition coil is getting Ground.
The next step is to verify that the ignition coil is receiving a Triggering signal, go to: TEST 4: Testing For The Presence Of The Triggering Signal.
CASE 2: The multimeter DID NOT register 10-12 Volts (or the test light DID NOT light up). This test results tells you that the ignition coil is not getting Ground and without it, the ignition coil will not spark.
This test result eliminates the COP ignition coil itself as bad and as the source of the misfire condition.
Since the Ground circuit is shared by all of the COP ignition coils, the most likely cause of this Ground is a bad ignition coil connector or an open-circuit problem in the wire between the connector and the engine wiring harness.
