TEST 1: Making Sure The VAF Sensor Is Getting Power

The very first thing that we'll do is check that the vane air flow sensor is receiving 12 Volts.
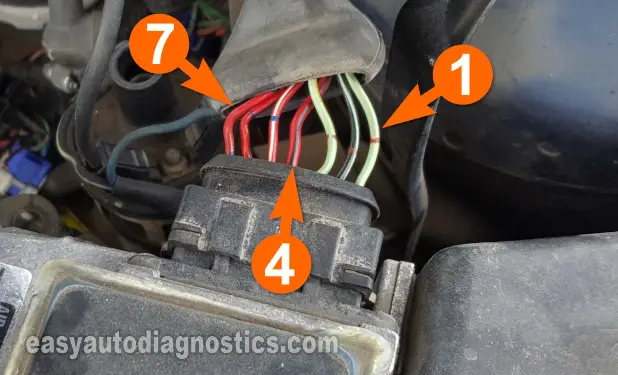
The wire that feeds power to your Mazda's vane air flow meter is the one labeled with the number 4 in the photo above.
OK, let's get started:
- 1
Place your multimeter in Volts DC mode and disconnect VAF sensor from its electrical connector.
- 2
With the red multimeter test lead and an appropriate tool, probe the VAF sensor connector's number 4 circuit as shown in the photo. This is the red with black stripe wire.
- 3
With the black multimeter test lead probe the battery negative (-) terminal.
- 4
Turn key ON but don't crank or start your Mazda's engine.
Let's interpret your voltage test result:
CASE 1: Your multimeter registered 10 to 12 Volts DC. This is the correct test result.
Your next step is to make sure your Mazda's vane air flow sensor is getting Ground. For this test go to: TEST 2: Making Sure The VAF Sensor Is Getting Ground.
CASE 2: Your multimeter DID NOT register 10 to 12 Volts DC. Without power, the VAF sensor on your Mazda 626 will not function.
Your next step is to find out why this power is missing and restore it. This will get the VAF sensor back on its feet.
TEST 2: Making Sure The VAF Sensor Is Getting Ground

In the previous test we checked that the VAF sensor was receiving 12 Volts.
Now we'll check that the VAF sensor is getting a good Ground.
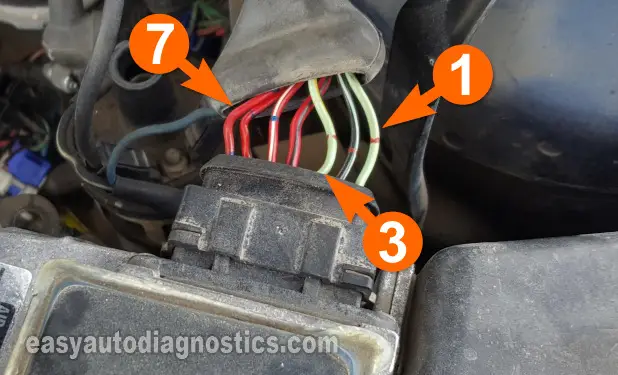
This Ground is fed to the sensor via the wire identified with the number 3 in the photo above.
IMPORTANT: Be careful and take all necessary safety precautions not to short this Ground wire to battery voltage (12 Volts). This Ground is provided thru' the fuel injection computer itself.
Let's start:
- 1
Place your multimeter in Volts DC mode.
- 2
Connect the black multimeter test lead to the number 3 wire shown in the photo above.
This is the light green with yellow stripe wire of the connector. - 3
Connect red multimeter test lead to the battery positive (+) terminal.
- 4
10 to 12 Volts should be present with the key ON or OFF since this Ground is a chassis Ground.
Let's interpret your voltage test result:
CASE 1: Your multimeter registered 10 to 12 Volts DC. This is the correct test result.
Now that you've confirmed that the VAF sensor is getting power and Ground, the next (and last) step is to test the vane air flow sensor's signal. For this test go to: TEST 3: Testing The VAF Signal With A Multimeter.
CASE 2: Your multimeter DID NOT register 10 to 12 Volts DC. Without Ground, the VAF sensor on your Mazda 626 will not function.
Your next step is to find out why this Ground is missing and restore it. This will get the VAF sensor back on its feet.

