TEST 4: Testing The Ignition Coil For Spark

In this test step, you'll test for spark directly on the Altima's ignition coil's tower.
This will either confirm that the high tension wire is bad and you'll stop here or you'll move on to the next test step.
These are the test steps:
- 1
Place the HEI spark tester directly on the ignition coil's tower.
- 2
Ground the HEI spark tester with the battery jump start cable to the battery negative (-) terminal.
- 3
Have your helper crank the engine as you hold the HEI spark tester in place.
- 4
You'll get one of the 2 results: (1) spark or (2) no spark.
Let's analyze each result in more detail below:
CASE 1: The spark tester sparked. This result confirms that the ignition coil's high tension wire is bad. Replacing the spark plug wires as a set should get your Altima to finally start.
Now, you may be wondering why didn't I just suggest measuring the resistance of the high tension wire and compare that to some specification. Well, in my experience this is the most useless and the most complete waste of time test ever suggested in a repair manual (obviously written by technical writer who has never even opened a hood on a car!).
CASE 2: The spark tester DID NOT spark. The next step is to test the two circuits that feed power and the Switching signal to the ignition coil. Go to: TEST 5: Testing The Ignition Coil's Power (12 V) Circuit.
TEST 5: Testing The Ignition Coil's Power (12 V) Circuit

So far, you have gotten a no-spark result on everything you have tested for spark on your Nissan Altima and in the process, you've been narrowing down the list of possible causes.
In this test, you're gonna' verify that the ignition coil is getting power. Because if it isn't, then it won't spark and you've found the cause of the no-start and of course no further testing is required.
These are the test steps:
- 1
Select Volts DC mode on your multimeter.
- 2
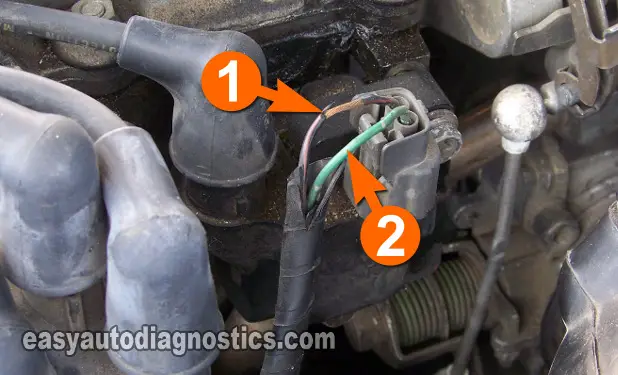
With the red multimeter test lead probe the wire identified with the number 1 in the photo above.
- 3
Connect the black multimeter test lead to the battery negative (-) terminal.
- 4
Ask your assistant to turn the key ON but with the engine OFF.
- 5
You should see 10 to 12 Volts on the multimeter if power is present.
Let's interpret your test result:
CASE 1: Your multimeter displayed 10 to 12 Volts. This is the correct and expected test result and it let's you know that the ignition coil is getting power.
The next step is to verify that the ignition coil is being fed with the Switching signal that comes from the power transistor. Go to: TEST 6: Testing The Ignition Coil's Switching Signal.
CASE 2: Your multimeter DID NOT display 12 Volts. You must find out why you're missing this voltage. Without this voltage the ignition control module (ICM) nor the ignition coil will work.
Resolving this power issue should solve your 'no-start no-spark' condition.
TEST 6: Testing The Ignition Coil's Switching Signal

The ignition coil is activated (to spark) by the Switching signal it gets from the Altima's power transistor's Switching signal. Without this signal, the ignition coil won't spark.
This Switching signal can be easily tested with an LED light and I'll show how in this test step.
- 1
Connect the black lead of the LED light to the wire (circuit) identified with the number 2 in the photo.
- 2
Connect the red lead of LED to the battery positive (+) terminal.
It is IMPORTANT that it be connected at the battery positive (+) terminal. - 3
Have your assistant crank the engine while you observe the LED light.
- 4
The LED light will blink ON and OFF the whole time the engine is being cranked.
NOTE: Don't worry about what the LED light does before or after your helper starts cranking the engine. The only results you're interested in interpreting are the results obtained with the engine cranking.
Let's interpret your test result:
CASE 1: The LED light flashed ON and OFF. Then the ignition coil is bad, replace it. This also means that the power transistor is GOOD. Replacing the ignition coil will solve your 'no-spark no-start' condition.
Here's the reason why: If the ignition coil is getting power, which you verified it is in TEST 5 and it is being supplied by the power transistor's Switching signal, which you verified in this test step, then the ignition coil has to spark. Since it didn't spark (in TEST 4) the result you obtained here confirms beyond a shadow of a doubt that the ignition coil is fried.
CASE 2: The LED DID NOT flash ON and OFF. Re-check all of your connections and retry the test again. If still no light pulses on the test LED, then the next step is to check the power transistor's two circuits for their respective signals, go to: TEST 7: The Power Transistor's Ground Circuit.

