TEST 2: Checking The Continuity Of The Bat (+) Cable

As you're probably already aware, a heavy gauge wire delivers the alternator's charge to the battery. This wire connects to the alternator with a nut.
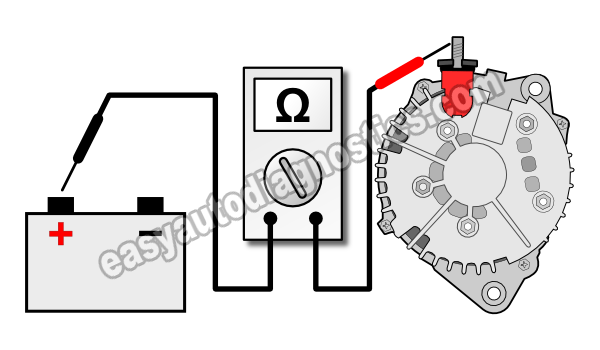
In this test step, you're gonna' make sure that this heavy gauge wire (that connects your Nissan Altima's alternator to the battery) is OK. To be a bit more specific, we want to make sure that his wire isn't 'open' and preventing the alternator's charge from reaching the battery positive (+) terminal.
We can check this wire by doing a simple multimeter continuity test.
This is what you'll need to do:
- 1
Disconnect the battery negative (-) cable terminal from the battery negative post. The positive cable remains connected.
IMPORTANT: Don't continue to the next step without first disconnecting the negative cable from the negative battery post. - 2
With the battery negative (-) cable disconnected from the negative battery post, turn on your multimeter and select Ohms mode.
- 3
Locate the stud that the battery current output wire connects to on the back of the alternator. This wire is attached with a nut to the stud. Place your multimeter's RED test lead on the stud to which this wire is connected to.
The orange arrow in the photo above points to this stud. - 4
With the black multimeter test lead probe the center of the battery positive post on your Nissan's battery.
- 5
You'll get one of two results.
1.) The multimeter WILL NOT register continuity and it will register the letters OL (which means over limit).
2.) If the battery wire does have continuity, your multimeter will register an Ohms reading of 0.5 Ohms or less.
Let's take a look at what your results mean:
CASE 1: Your multimeter registered continuity. This is good, since it indicates that the entire circuit (including the 120 Amp Main Fuse on the battery positive (+) terminal assembly) is OK and that if the alternator were charging the battery, this charge would actually reach the battery.
There's one more test to do. This one involves checking the condition of 3 fuses. For this test, go to: TEST 3: Checking The Alternator Circuit Fuses.
CASE 2: Your multimeter DID NOT register continuity. This result tells you that the alternator's BATTERY wire has an open. This means that the alternator's charge is not reaching the battery.
Your next step is to go to TEST 3 and check the 120 Amp Main Fuse that's located on the battery's positive (+) terminal assembly.
TEST 3: Checking The Alternator Circuit Fuses

There a total of 3 fuses to check. These are:
- The 120 Amp fusible link located on the battery positive (+) terminal/cable fusible link holder (see image above).
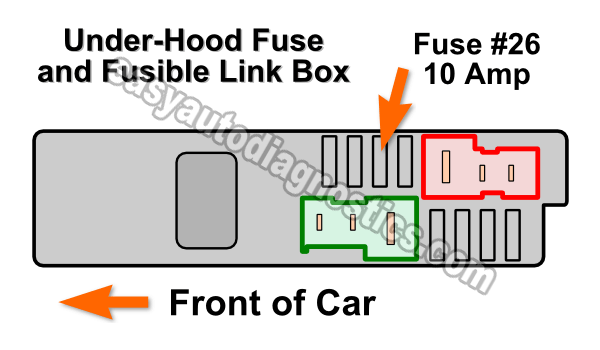
- Fuse #26 (10 Amp) located on the underhood fuse and fusible link holder box (see illustration below).
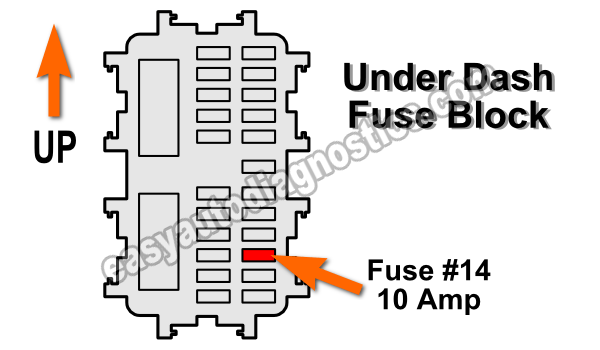
- Fuse #14 (10 Amp) in the under-dash fuse box (see the illustration below).
NOTE: If you have done TEST 2 and your multimeter registered continuity in the battery output circuit, then you have confirmed that the 60 Amp Main Fuse is OK.
FUSE CHECK RESULT: If in TEST 1 the battery voltage (with the engine running) was below 12.5 Volts, in TEST 2 the battery output circuit has continuity and all of the fuses are OK, then the alternator is defective and replacing it should solve the no charge condition.


Related Test Articles
To see all of the 2.5L Nissan specific articles, go to: Nissan 2.5L Index Of Articles.
Here's a sample of the articles, you'll find in the Index of Articles:
- Coil-On-Plug (COP) Coil Test 2.5L Nissan Altima, Sentra (2002-2006).
- How To Test Engine Compression (2.5L Nissan Altima, Sentra).
- Testing A Bad Alternator: Symptoms And Diagnosis.
- How To Bench Test The Starter Motor.
- How To Troubleshoot a Blown Head Gasket (2.5L) (at: troubleshootmyvehicle.com).

If this info saved the day, buy me a beer!


