In this tutorial, I'll explain how to test the MAF sensor to find out if its good or bad. All of the tests are done with a simple multimeter -no scan tool required.
VW used several types of mass air flow sensors, for the most part they can be divided into two categories.
One type has 4 male spade terminals and the other has 5 male spade terminals. This test tutorial is for the one with the 4 male spade terminals.
Contents of this tutorial:
- Symptoms Of A Bad MAF Sensor.
- MAF Sensor Diagnostic Basics.
- MAF Sensor Circuit Descriptions.
- TEST 1: Making Sure The MAF Sensor Is Getting Power.
- TEST 2: Making Sure The MAF Sensor Is Getting Chassis Ground.
- TEST 3: Making Sure The MAF Sensor Is Getting Sensor Ground.
- TEST 4: Testing The MAF Signal.
APPLIES TO: This tutorial applies to the following vehicles:
- VW Passat 1.8L Turbo: 1998, 1999
The exact same MAF sensor used on the 1998-1999 1.8L Turbo Passat is also used in the following vehicles (and the test procedure in this tutorial applies to them too):
- VW Cabrio 2.0L: 1995, 1996, 1997, 1998, 1999.
- VW Golf 2.0L: 1993, 1994, 1995, 1996, 1997, 1998, 1999.
- VW Jetta 2.0L: 1993, 1994, 1995, 1996, 1997, 1998.
- VW Passat 2.0L: 1995, 1996
Symptoms Of A Bad MAF Sensor
The most common symptoms of a bad MAF sensor are:
- A MAF sensor code.
- Lean and/or Rich code(s).
- Fuel Trim code(s).
- A tremendous lack of power upon acceleration.
- Black smoke coming from the tail-pipe.
- Vehicle may idle rough and stall.
MAF Sensor Diagnostic Basics
The mass air flow (MAF) test is simple, but there are a couple of things you need to check before starting.
First off, ensure the MAF sensor is clean from dirt and oil, since the tests in this tutorial assume it's not contaminated.
Contaminated MAF sensor? I'll explain: This MAF sensor is a hot-film type sensor and it gets easily covered in dirt, dust and engine oil if the air filter isn't doing its job.
If the MAF sensor is dirty (contaminated), it can misread the airflow entering the engine and send incorrect airflow info to the fuel injection computer, leading to engine hesitation or delayed response when you hit the gas pedal. You may also see a MAF sensor diagnostic trouble code (DTC) lighting up the check engine light.
Even though the sensor's heat-film isn't easily visible, it's possible to clean it. The cleaning must be done with an electronics spray cleaner (which you can buy online or at your local auto parts store). Keep in mind the following:
- Don't use carburetor or brake cleaner spray. These solvents can/will damage the sensor.
- Don't attempt to physically clean the sensor with anything.
I've had many cases where cleaning the MAF sensor solved the engine performance issue, so check it before performing any of the tests in this tutorial.
The other things you must check for (and eliminate if present) are:
- That the engine does not have any vacuum leaks.
- That there are no ignition system misfires. A misfire condition will skew the results of the test you'll perform here.
If the above conditions exist, repairing them first will more than likely solve your vehicle's drive-ability issue without having to test the MAF sensor, if not continue with the MAF sensor test in this tutorial.
MAF Sensor Circuit Descriptions

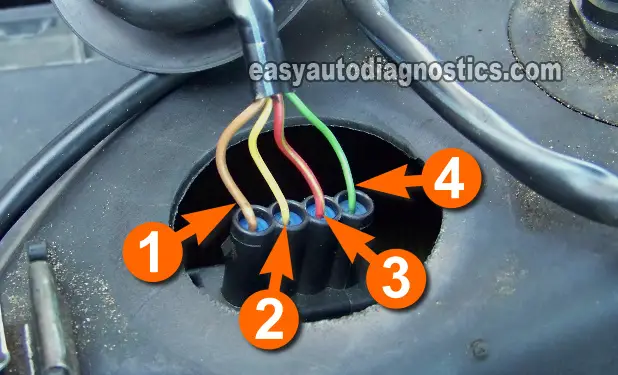
Here's a brief description of the MAF sensor's 4 wires:
| MAF Sensor Circuits | |
|---|---|
| Wire | Description |
| 1 | Chassis Ground |
| 2 | Sensor Ground (provided by ECM) |
| 3 | 12 Volts DC |
| 4 | MAF Signal (output) |
NOTE: The colors of the wires in the photo may not match what's on your vehicle. This is no cause for concern. The circuit descriptions are not tied to the color of the wire. In other words, no matter what the color of the wire, the circuit descriptions remain the same.
TEST 1: Making Sure The MAF Sensor Is Getting Power

In this first test section, you'll make sure that the MAF sensor in your Passat is getting power.
This power is in the form of 10 to 12 Volts and are delivered to the MAF sensor by the wire I've labeled with the number 3 in the photo above.
IMPORTANT: Be careful not to damage the connector's female terminals with the multimeter test lead.
Alright, this is what you'll need to do:
- 1
Disconnect the MAF sensor from its connector.
- 2
Put the multimeter in Volts DC mode.
- 3
Connect the black multimeter test lead to the battery negative (-) terminal.
- 4
Gently probe the terminal of the connector that connects to the wire identified with the number 3 with the red multimeter test lead.
- 5
Turn the key ON but don't crank or start the engine.
- 6
You should see 10 to 12 Volts on the multimeter.
Let's interpret your multimeter test results:
CASE 1: Your multimeter registered 10 to 12 Volts. This is good and tells you that the MAF sensor is getting power.
The next step is to make sure the MAF sensor is getting chassis Ground. Go to: Making Sure The MAF Sensor Is Getting Chassis Ground.
CASE 2: Your multimeter DID NOT register 10 to 12 Volts. Recheck all of your multimeter connections and retest.
If you still do not see these 12 Volts, then this exonerates the MAF sensor as bad since without this voltage it's not gonna' work.
