TEST 6: Checking The Switching Signal For Cylinders 2/5
In this test step, you'll be verifying that the PCM is creating and feeding the Switching signal (for cylinders 2 and 5) with an LED light.
This is a very simple and straight forward process in which the ignition coil pack must be connected to its connector.
NOTE: To see an example of the LED light, go here: The LED Light Test Tool And How To Make One.
Let's get started:
- 1
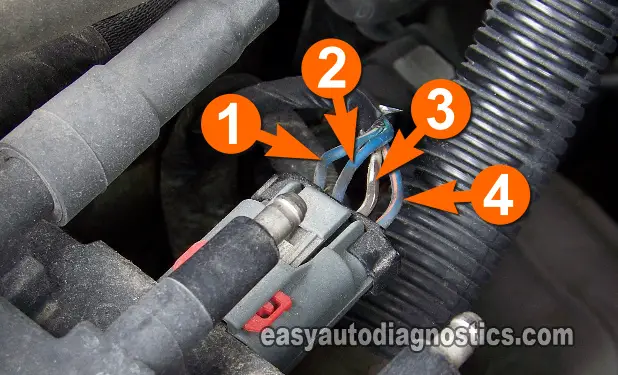
With an appropriate tool, connect the black lead of the LED light to the wire identified with the number 1 in the image viewer.
This is the circuit that feeds the Switching signal to the ignition coil (within the coil pack) that feeds spark to cylinders 2 and 5 simultaneously. - 2
Connect the red lead of the LED light to the battery positive (+) terminal.
- 3
Have your helper crank the mini-van (the mini-van may start so be careful).
- 4
If the car started, have your helper turn it off.
- 5
If the Switching signal is present, the LED light will flash ON and OFF the whole time the engine was cranking and during the time it was running.
Let's take a look at what your test results mean:
CASE 1: The LED light flashed ON and OFF the whole time the engine was cranking or running. This result indicates the PCM is providing the Switching signal and the circuit is OK. This result confirms that the ignition coil pack is bad, replace it.
CASE 2: The LED light DID NOT flash ON and OFF the whole time the engine was cranking or running. This test result tells you there's either an open-circuit problem in the circuit between the connector and the PCM or the PCM is fried (altho' a fried PCM is rare). With this result you have eliminated the coil pack as the source of the misfire condition or no-spark condition.
TEST 7: Checking The Switching Signal For Cylinders 3/6
In this test step, you'll be verifying that the PCM is creating and feeding the Switching signal (for cylinders 3 and 6) with an LED light.
This is a very simple and straight forward process in which the ignition coil pack must be connected to its connector.
NOTE: To see an example of the LED light, go here: The LED Light Test Tool And How To Make One.
These are the test steps:
- 1
With an appropriate tool, connect the black lead of the LED light to the wire identified with the number 4 in the image viewer.
This is the circuit that feeds the Switching signal to the ignition coil (within the coil pack) that feeds spark to cylinders 3 and 6 simultaneously. - 2
Connect the red lead of the LED light to the battery positive (+) terminal.
- 3
Have your helper crank the mini-van (the mini-van may start so be careful).
- 4
If the car started, have your helper turn it off.
- 5
If the Switching signal is present, the LED light will flash ON and OFF the whole time the engine was cranking and during the time it was running.
Here's what your test results mean:
CASE 1: The LED light flashed ON and OFF the whole time the engine was cranking or running. This result indicates the PCM is providing the Switching signal and the circuit is OK. This result confirms that the ignition coil pack is bad, replace it.
CASE 2: The LED light DID NOT flash ON and OFF the whole time the engine was cranking or running. This test result tells you there's either an open-circuit problem in the circuit between the connector and the PCM or the PCM is fried (altho' a fried PCM is rare). With this result you have eliminated the coil pack as the source of the misfire condition or no-spark condition.
Other Possible Misfire Causes

So you've done all of the spark tests, and your 3.3L or 3.8L Chrysler (or Dodge) mini-van is still misfiring. Well, here are a couple of suggestions that might help:
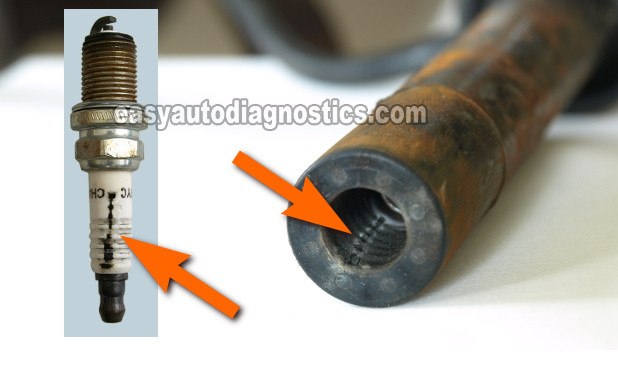
- Inspect the inside of the spark plug wire boots and remove the spark plugs to visually check their ceramic insulators for carbon tracks.
- The the orange arrows in the photo above points to what carbon tracks look like.
- Replace the components as affected with carbon tracks.
- Engine compression test to see if one or several cylinders have low compression.
- This is one of the easiest, yet most overlooked test to find the cause of a misfire condition.
- You'll need an engine compression tester of course.
- The engine between cylinders should not vary more 15%.
- Fuel injector test to see if there's a bad fuel injector in the bunch.
- The fastest way to test them is checking the resistance (Ohms) value of each one and then comparing them to each other.
- Any resistance that's not within the average of the others indicates the fuel injector is fried. If the Ohms values are nearly identical, then the fuel injectors are OK and not the cause of the misfire.
- You can buy a specific fuel injector tester (on line) that activates them by a predetermined pulse width. This tester is used in conjunction with a fuel pressure gauge (which will measure the fuel pressure drop of the activated injector).

If this info saved the day, buy me a beer!


