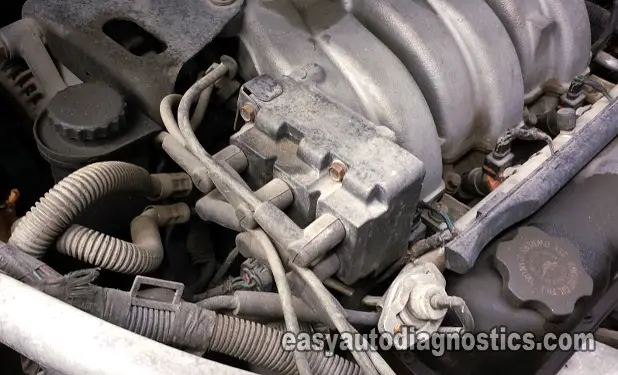
This is a complete diagnostic test of the ignition coil pack that's used on the 1990-1998 3.3L, 3.8L V6 engines on Chrysler cars and mini-vans.
With the help of this article, you'll be able diagnose a malfunctioning ignition coil pack and or troubleshoot diagnostic trouble code (DTCs) P0300, P0301, P0302, P0303, P0304, P0305, P0306 (if your Chrysler car is OBD II equipped).
If this is not the Chrysler V6 coil pack test you need, there are two more and you can find them at: 3.3L, 3.8L Main Index Of Articles.
Contents of this tutorial:
- Symptoms Of A Bad Chrysler Coil Pack.
- Precautions, Do's And Don'ts.
- What Tools Do I Need?
- Coil Pack Circuit Descriptions.
- How The Coil Pack Works.
- Where To Buy The Ignition Coil And Save.
- Do I Need To Test All Of The Spark Plug Wires?
- TEST 1: Checking For Spark.
- TEST 2: Testing For Spark Directly On The Coil Tower.
- TEST 3: Testing For Spark Directly On The Coil Tower.
- TEST 4: Verifying Coil Pack Is Getting Power.
- TEST 5: Switching Signal Cylinders 1/4.
- TEST 6: Switching Signal Cylinders 2/5.
- TEST 7: Switching Signal Cylinders 3/6.
- Other Possible Misfire Causes.
Symptoms Of A Bad Chrysler Coil Pack
When the ignition coil pack or the spark plug wires are bad, your Chrysler (or Dodge or Eagle or Plymouth) mini-van will display one or more of the following symptoms:
- The car idles rough and wants to stall (die).
- When you accelerate the car, it has no power.
- Really bad gas mileage.
- The vehicle will not start.
- The car will not run on all cylinders.
- Misfire codes that are lighting up the check engine light on your instrument cluster.
- P0300, P0301, P0302, P0303, P0304, P0305, P0306.
- Rotten egg smell coming out of the tail-pipe.
Precautions, Do's And Don'ts
The tests you're about to learn are pretty simple and easy but, since most of them are done with the engine cranking, you need to be alert and on your toes. Take all necessary safety precautions to keep your fingers, hands and entire self safe. Here are a few other tips and suggestions:
TIP 1: The coil pack test described in this article is an ON-CAR test, so do not remove the coil pack from your car or mini-van. The coil pack is removed from the engine, in the photos I'm using, just to make it easier to explain the tests.
TIP 2: Do not use a regular spark plug instead of a spark tester to test for spark. Using a spark plug to test for spark is the surest way to guarantee a fake spark result that will have you wasting time and money. Use or buy the HEI spark tester.
TIP 3: Do not remove the spark plug wire from the spark plug or the ignition coil while the engine is cranking to test for spark. This procedure will fry the ignition coil pack and you run the risk of getting shocked.
TIP 4: It's important that you start your diagnostic from TEST 1, do not skip around from test to test unless specifically instructed to do so by the TEST you are currently on.
TIP 5: Do not use a test light where an LED light is called for. Use the recommended/indicated tools for all of your tests.
TIP 6: Read the entire article first. Familiarize yourself with what the tests are going to accomplish. It seems like a lot of reading and/or a complicated testing procedure, but it's not, as you'll see once you start the actual testing on your vehicle.
TIP 7: Before you do the actual tests on your car or mini-van, it's important the you know what ‘Paired Cylinders’ and ‘Non-Paired Cylinders’ mean to successfully diagnose a bad coil pack.
TIP 8: You'll be working in the engine compartment while the car or mini-van is cranking or starting, so be alert and take all necessary safety precautions. Think safety all of the time.
TIP 9: Since you'll need a helper to crank the engine for you, have him or her wait outside of the vehicle before and after you need them to crank the engine. This is important, since it will save you from having your helper crank the engine accidentally as your installing or removing a spark plug wire or the spark tester.
What Tools Do I Need
To successfully use this information to diagnose and troubleshoot your Chrysler (or Dodge or Eagle or Plymouth) mini-van, you need a few specific tools. Don't worry, none of this stuff is expensive.:
- A 12 Volt automotive test light.
- A multimeter (don't have a digital multimeter? Need to buy one? Click here to see my recommendations: Buying A Digital Multimeter For Automotive Diagnostic Testing).
- An LED light.
- To see what this tool looks like, click here: The LED Light Test Tool And How To Make One.
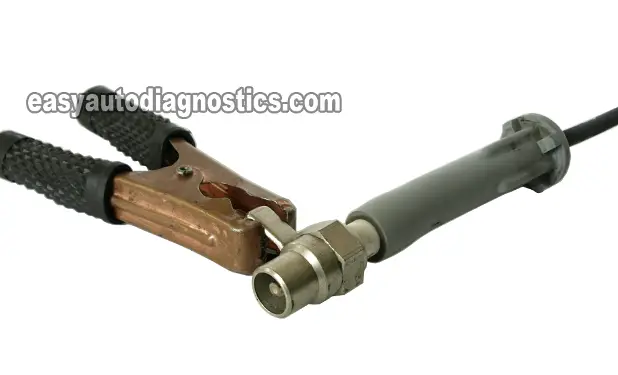
- An HEI spark tester
- This tool is a must have (don't have an HEI spark tester? Need to buy one? You can buy it here: OTC 6589 Electronic Ignition Spark Tester).
- Battery jump start cables.
- Someone to help you crank the car.
The most important tool of the bunch that you should use for the tests indicated in this article is the HEI spark tester and it's NOT because I own the company that makes the HEI spark tester (If I did, I'd be spending the week it takes me to write an article, like this one, at the lake, I'm just a little nobody just giving back to the internet DIY auto community). The principal reasons are:
1.) This tool is accurate. It will give a true dependable result that is not based on the color of the spark to figure out if the spark is weak or good. If the HEI spark tester sparks, the spark is good and strong. If it does not spark, then you've got a bonafide no-spark result you can take to the bank.
2.) This tool is inexpensive. The only thing that sucks is that at the moment, your local auto parts store does not carry it, you have to buy it online, but because this spark tester is extremely accurate, it's well worth the wait.
Coil Pack Circuit Descriptions
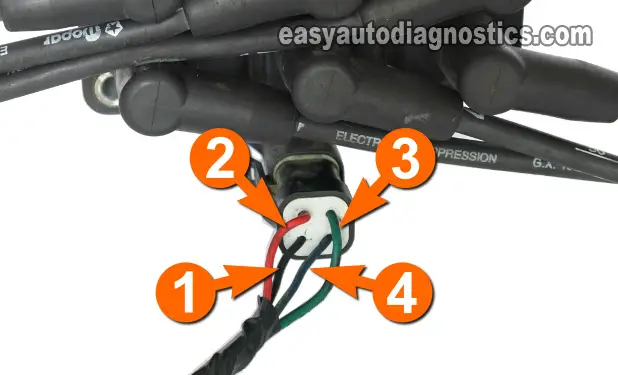
It's important to know what the 4 wires coming out of the Chrysler coil pack connector do and below you'll learn the circuit descriptions of each.
- Circuit labeled 1:
- Switching Signal Circuit for spark plugs 3 and 6.
- Circuit labeled 2:
- Switching Signal Circuit for spark plugs 1 and 4.
- Circuit labeled 3:
- Power (12 Volts) Circuit
- Circuit labeled 4:
- Switching Signal Circuit for spark plugs 2 and 5.
You've probably noticed that there's no mention of the color of the wires of the three wires coming out of the connector, well the color is not important (to take advantage of the info in this article) as long as you're able to correctly identify the circuit by its number in the photos supplied.
How The Coil Pack Works
The PCM (Powertrain Control Module=Fuel Injection Computer) is the one that controls the whole show in this type of ignition system since the ‘Ignition Control Module’ function is handled by the PCM itself. So, in a nutshell, here's what happens when you turn the key to crank and start the car:
- The Auto Shut Down (ASD) Relay provides the ignition coil pack with 12 Volts (only when the engine is cranking or running).
- The crankshaft position (CKP) sensor starts to create its CKP signal, as the engine cranks.
- The CKP signal, upon being received by the PCM along with other necessary sensor information, starts to do its little song and dance and decides which ignition coil (within the coil pack assembly) to fire. It does this by sending the coil pack three different Switching signals (thru' separate circuits).
- The term Switching signal describes the PCM's action of switching the Primary Current (12 Volts), flowing thru' each ignition coil within the coil pack, ON and OFF by interrupting their Ground path. It's this signal that makes the ignition coils fire spark.
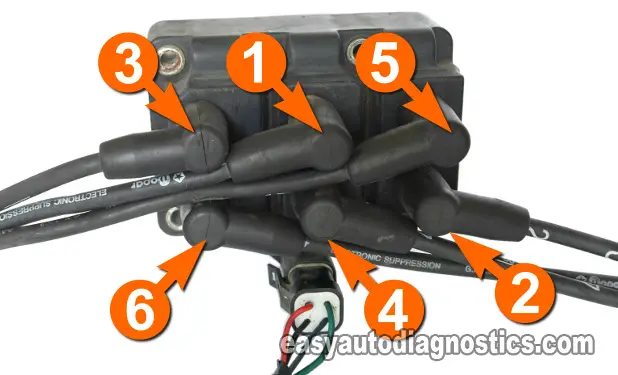
- The coil pack is made up of three separate and individual ignition coils, therefore each one gets its own switching signal from the PCM. Each ignition coil within the coil pack has two towers that feed spark to two cylinders at the same time. These two cylinders (that get spark at the same time) are called ‘Paired Cylinders’
- One ignition coil within the coil pack fires spark to cylinders 3 and 6. So, cylinders 3 and 6 are ‘Paired Cylinders’.
- One ignition coil fires cylinders 1 and 4. So, cylinders 1 and 4 are ‘Paired Cylinders'.
- The other ignition coil fires cylinders 2 and 5. So, cylinders 2 and 5 are ‘Paired Cylinders’.
- As each individual ignition coil, within the ignition coil pack, get their Switching signal, they then fire spark to two different cylinders at the exact same time (in what's known as the Waste Spark method).
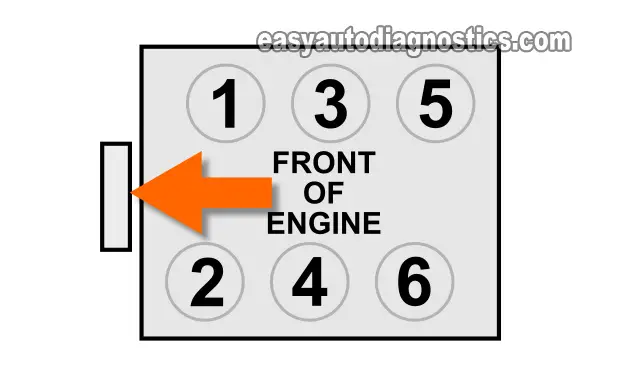
To test the Chrysler ignition coil (for these specific 3.3L, 3.8L Chrysler engines this article covers) the only thing that you have to worry about is knowing that two cylinders get spark at the exact same time (#3 and #6, #1 and #4, #2 and #5) from separate ignition coils within the coil pack assembly.
Where To Buy The Ignition Coil And Save
The following links will help you comparison shop for the ignition coil pack:
Disclosure: As an Amazon Associate, I earn from qualifying purchases. Buying through these links helps support this site at no extra cost to you. Thanks for your support —it really means a lot!
Not sure if the above ignition coils fit your particular vehicle? Don't worry, once you get to the site they'll make sure it fits by asking you the specifics of your vehicle. If they don't fit, they'll find you the right ones.
Do I Need To Test All Of The Spark Plug Wires?
You don't need to test all six spark plugs. Especially since the 3 spark plug wires that face the firewall are hard to get to (actually, they are a complete pain the neck to get to).
To help you get the maximum benefit of this article, I'll go into some detail why you don't have to and under what conditions you would need to test them all:
TEST ONLY 1 SPARK PLUG WIRE
- You have a specific misfire code such as: P0301, P302, P0303, P0304, P305, P0306 and you only want to test that specific cylinder.
- You have already replaced the ignition coil pack, spark plug wires, and the spark plugs with a new ones and you are still getting a specific misfire code lighting up the check engine.
TEST ALL SPARK PLUG WIRES
- You have a misfire code such as: P0300. This code doesn't specify which cylinder is the one misfiring and so you'll need to test them all.
- You have a pre-1995 (pre-OBD II) 3.3L or 3.8L Chrysler car or mini-van and this means that you are not gonna' get any type of misfire codes to help you find out which cylinder is the one affected, so you have to test them all (yeah, I know, life sucks).
TEST 1: Checking For Spark
Before you start this test, you must be aware of the principle behind ‘Paired Cylinder’ and ‘Non-Paired Cylinder’. Knowing the difference between both is very important. So before you start, take a look at the section: How The Coil Pack Works..
Also, to successfully accomplish this test without complications, please read the section: Precautions, Do's And Don'ts.
The first order of business is to find out if all the spark plug wires are delivering spark or not to the spark plugs. You don't have to test all of the spark plug wires, although if I where in your shoes, I would. For more info on this, see/read the section: Do I Need To Test All Of The Spark Plug Wires.
You'll need someone to help you to crank the engine. OK, this is what you'll need to do:
- 1
Remove the spark plug wire from the spark plug and connect the HEI spark tester to the spark plug wire.
- 2
Using a jump start cable, Ground the HEI spark tester directly on the battery negative (-) terminal.
- 3
When everything is set up, have your helper crank the engine while you eyeball the spark tester.
- 4
You'll see one of two results: spark or no-spark jumping across the air gap of the HEI spark tester.
Let's take a look at what your test results mean:
CASE 1: You got spark from all six spark plug wires. Then this result indicates that the ignition coil pack and the spark plug wires are OK. The cause of the misfire is somewhere else.
CASE 2: You got a no-spark result from only one spark plug wire. This result either means that the spark plug wire is bad or the ignition coil pack is fried. Both can be tested and for this test, got to TEST 2: Testing For Spark Directly On The Coil Tower.
CASE 3: You got a no-spark result from two ‘Paired Cylinder’ spark plug wires. This spark test result could mean that the coil pack is fried. To further verify/confirm this, got to TEST 3: Testing For Spark Directly On The Coil Tower.
CASE 4: You got a no-spark result from two ‘Non-Paired Cylinder’ spark plug wires. This result either means that the spark plug wire is bad or the ignition coil pack is fried. Both can be tested and for this test, go to: TEST 2: Testing For Spark Directly On The Coil Tower.
CASE 5: You got a no-spark result from all of the spark plug wires. This is not good, but doesn't condemn the ignition coil pack as bad yet. The next step is to make sure that the ignition coil is getting power (12 Volts) and then see if the Powertrain Control Module (Fuel Injection Computer) is activating the ignition coils within the coil pack. Go to: TEST 4: Verifying Coil Pack Is Getting Power.

