")
A compression problem can cause no-start issues, rough idle, and hard-to-find misfires —even if everything else looks fine.
In this step-by-step guide, I'll show you exactly how to run a dry and wet compression test at home using basic tools.
These are the same methods I used in the field for years to track down internal engine problems.
So, if your 4.7L V8 Dodge Dakota or Durango cranks but won't start, runs rough, or throws misfire codes, testing engine compression is one of must-do diagnostic test.
Let's get started and find out what your engine is trying to tell you.
Contents of this tutorial:
- Symptoms Of Low Or No Cylinder Compression.
- Which Compression Tester Should I Buy?
- Read This Before You Start.
- TEST 1: Running a Dry Compression Test.
- How To Read and Make Sense of Your Compression Numbers.
- TEST 2: Wet Compression Test (Confirming Ring vs Valve Issues).
- More 4.7L V8 Dodge Dakota And Durango Tutorials.
APPLIES TO: This tutorial applies to the following vehicles:
- 4.7L V8 Dodge Dakota: 2000, 2001, 2002, 2003, 2004, 2005, 2006, 2007, 2008, 2009.
- 4.7L V8 Dodge Durango: 2000, 2001, 2002, 2003, 2004, 2005, 2006, 2007, 2008, 2009.
ENGINE NO-START DIAGNOSTICS:
CYLINDER MISFIRE DIAGNOSTICS:
Symptoms Of Low Or No Cylinder Compression
If your Dodge Dakota or Durango cranks but won't start, or starts and runs like it's missing a cylinder, there's a chance you're dealing with low or no compression. Compression issues usually show up in one of two ways:
- No-start condition: When three or more cylinders have zero compression, the engine won't fire up —it'll just crank endlessly.
- Misfire condition: A single cylinder with weak compression (usually 15% lower than the others) can cause a rough idle and trigger a misfire code.
You might also notice symptoms like these:
- Blue smoke from the exhaust: Often a sign of worn piston rings or valve seals.
- Engine runs rough at idle: Compression loss causes uneven power between cylinders.
- Poor fuel economy: Misfires lead to wasted fuel and unburned mixtures.
- Misfire that clears under load: Idle feels rough, but smooths out when driving.
- MAP sensor codes: A faulty reading might actually be caused by compression loss, not the sensor itself.
- Misfire codes stored in memory:
- P0300: Random/multiple cylinder misfire.
- P0301 to P0308: Misfire in a specific cylinder (#1 through #8).
Which Compression Tester Should I Buy?
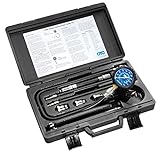
I've been using the same compression tester for years —and it's never let me down:
- Innova 3612 Compression Tester - 4 Piece Kit (Amazon affiliate link).
It's accurate, reliable, and comes with everything you need to test engines like the 4.7L V8 —including the right hose fitting for these spark plug holes. If you're serious about diagnosing engine problems at home, this one's a solid investment that'll serve you for years to come.
Want to compare? I've linked a few more solid options below —so you can pick the one that fits your budget and tool setup best.


Disclosure: As an Amazon Associate, I earn from qualifying purchases. Buying through these links helps support this site at no extra cost to you. Thanks for your support —it really means a lot!
Read This Before You Start
TIP 1 –Remove spark plugs only from a cold engine: On these 4.7L aluminum cylinder heads, pulling plugs from a hot engine can damage the threads —and that's a repair you definitely don't want to deal with.
TIP 2 –A cold engine is safer and easier to work on: Not only does it protect the threads when removing spark plugs, but it also helps prevent burns when working near hot intake or exhaust components.
TIP 3 –Use caution during engine cranking: When performing a compression test, be alert and keep your hands, tools, and sleeves well away from belts, pulleys, and other moving parts. Safety first, always.
TIP 4 –Use compressed air to clear debris from plug wells: If you have access to compressed air, blow out the spark plug wells before and after removing the ignition coils —this helps prevent dirt or debris from falling into the cylinder.
TEST 1: Running a Dry Compression Test
")
To get the clearest picture of your engine's internal health, I recommend testing all eight cylinders —not just the one that's misfiring.
You don't have to, but the more cylinders you test (especially when troubleshooting a misfire), the better your chances of confirming whether low compression is part of the problem.
If you're only testing one cylinder, be sure to check at least two others that aren't misfiring —so you have a baseline to compare against.
Compression numbers don't mean much on their own —it's the differences between them that tell the real story.
And if the engine won't start at all, then yes, it's best to test all 8 cylinders.
Alright, let's walk through the dry compression test step-by-step:
- 1
Disable the ignition system by unplugging all 8 coil-on-plug (COP) connectors. This prevents spark during the test.
- 2
Disable the fuel system by pulling the fuel pump relay or unplugging the fuel injectors. We don't want raw fuel getting into the cylinders while cranking.
- 3
Remove all eight spark plugs. Make sure the engine is stone-cold before you do this —never pull plugs from a hot aluminum head. And don't drop the plugs! Cracked porcelain equals future misfires.
- 4
Install the compression gauge into the spark plug hole for cylinder #1. Thread it in by hand only —don't use pliers or a wrench.
- 5
Have your helper crank the engine while you watch the gauge. Let it crank until the needle stops climbing.
- 6
Write down the PSI reading and which cylinder it came from.
- 7
Release the pressure from the gauge and repeat the reading one more time for accuracy.
- 8
Repeat this process for the remaining cylinders —one at a time, until you've got compression values for all 8.
Here's what your results might be telling you:
CASE 1: One or more cylinders have noticeably lower compression than the rest. This could be normal depending on how low the readings are.
You'll need to interpret the numbers to know for sure —more on that in the next section: How To Read and Make Sense of Your Compression Numbers.
CASE 2: All cylinders are reading zero or very low PSI. That's a big red flag and usually means the engine can't start due to internal damage. Common causes include:
- A broken timing chain.
- A blown head gasket.
- A thrown connecting rod.
CASE 3: All compression readings are similar and 120 PSI or higher —If that's what you're seeing across all eight cylinders, then low compression isn't the cause of your no-start or misfire issue.
At this point, it's time to dig in another direction —and I've got you covered there too:
- How To Diagnose A No Start (2000–2009 4.7L V8 Dodge Dakota).
- How To Diagnose A Misfire (2000–2009 4.7L V8 Dodge Dakota).
Each guide is packed with step-by-step tests you can do yourself —just like this one.
How To Read and Make Sense of Your Compression Numbers
After running a compression test, you'll probably notice that a few cylinders read slightly lower than others —and that's perfectly normal (up to a point).
What really matters is how "much" lower those readings are. As long as all cylinders are within a tight range, you're usually in good shape. But when one or two cylinders drop significantly —that's when drivability issues start showing up, especially misfires and rough idle.
So what's the threshold? As a rule of thumb, no cylinder should be more than 15% lower than the strongest one. If it is, then it's considered weak and will be the root cause of your engine's cylinder misfire problem or rough idle.
To make this easier, I created a free tool that does the math for you: Online Low Compression Calculator. But if you'd rather crunch the numbers yourself, here's how to do it manually —let's walk through an example.
Let's say you recorded these readings:
- Cylinder #1 – 175 PSI
- Cylinder #2 – 165 PSI
- Cylinder #3 – 170 PSI
- Cylinder #4 – 120 PSI
- Cylinder #5 – 170 PSI
- Cylinder #6 – 170 PSI
- Cylinder #7 – 170 PSI
- Cylinder #8 – 90 PSI
The highest value is 175 PSI. Now, take 15% of that number:
- 175 x 0.15 = 26.25 → Round to 26.
- 175 - 26 = 149.
This tells us that any cylinder with less than 149 PSI is out of spec. That means #4 (120 PSI) and #8 (90 PSI) are underperforming and likely causing those cylinders to misfire.
At this point, you've identified weak cylinders —now it's time to find out "why" they're low. Head over to TEST 2: Wet Engine Compression Test for the next step in the diagnosis.
TEST 2: Wet Compression Test (Confirming Ring vs Valve Issues)
. How To Test Engine Compression (2000, 2001, 2002, 2003, 2004, 2005, 2006, 2007, 2008, 2009 4.7L V8 Dodge Dakota And Durango)")
If one or more cylinders showed low compression during the dry test, this follow-up test helps you figure out why. A wet compression test is a simple and effective way to narrow the cause down to either worn piston rings or worn valves.
The process is easy: add a small amount of engine oil into the low cylinder, then recheck the compression. The oil creates a temporary seal around the piston rings, and how the compression reading responds will tell you a lot.
Alright, here's how to interpret what you see:
- Compression jumps up: This means the piston rings are worn —the added oil helped seal the cylinder temporarily, boosting the pressure.
- Compression stays low: If there's no real change, the problem is in the valves or valve seats —the oil won't seal those.
Here's how to run a wet compression test:
- 1
Add 1–2 tablespoons of motor oil into the cylinder you're retesting. A small funnel or squeeze bottle works great to get the oil directly into the spark plug hole.
- 2
Thread in the compression gauge again. Just like before, hand-tighten only —no tools needed.
- 3
Crank the engine and watch the needle. Stop cranking when the needle stops rising.
- 4
Compare the results:
1: The needle climbs noticeably higher than it did during the dry test.
2: The needle stays the same or barely moves at all.
Either way, write the new reading down so you can compare all your numbers clearly. - 5
Repeat the process for any other low-compression cylinders you want to double-check.
Here's how to read those results:
CASE 1: Compression reading increased. That means the low compression is being caused by worn piston rings.
The oil you added helped seal the rings just enough to bump the reading up —which wouldn't happen if the issue was with the valves.
CASE 2: Compression reading stayed the same. This tells you the problem is higher up —worn or burned valves or issues with the valve seats.
The oil you added has no effect in this case because it can't seal anything in the cylinder head.
More 4.7L V8 Dodge Dakota And Durango Tutorials
There's a growing library of step-by-step tutorials and wiring diagrams made specifically for these Dodge trucks —all organized in one place:
You'll find everything from no-start diagnostics to sensor tests and more —all written in plain English with real-world tips. Here's a quick preview of what's inside:
- How To Test The Throttle Position Sensor (2000-2007 4.7L V8 Dodge Dakota And Durango).
- How Often Should I Replace The Spark Plugs? (2000-2009 4.7L V8 Dodge Dakota And Durango).
- How To Test The Alternator (2001-2002 4.7L V8 Dodge Dakota And Durango).
- How To Test The Fuel Pump (2000-2007 4.7L V8 Dodge Dakota And Durango).

If this info saved the day, buy me a beer!
