TEST 7: Switching Signal Cylinders 3 And 4

In this test step, you're gonna' check that the PCM (or ignition control module) is creating and feeding a Switching signal for the ignition coil within the Ford coil pack that feeds cylinders 3 and 4.
If the Switching signal is present, then you now know the coil pack is bad.
If the Switching signal is NOT present, then you can eliminate the coil pack as the source of the problem.
OK, this is what you'll do:
- 1
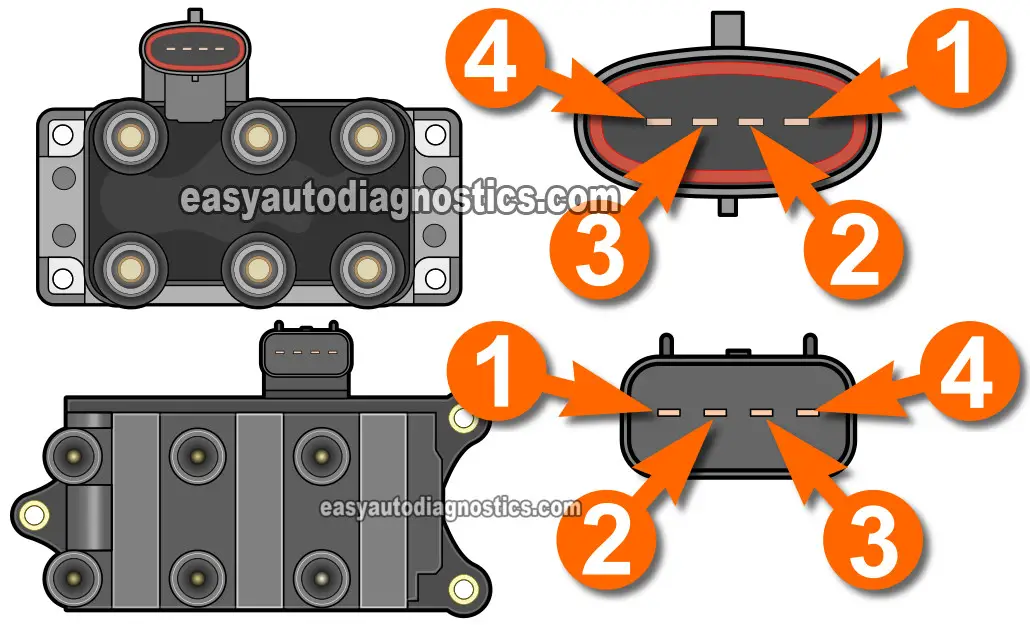
With an appropriate tool, pierce the wire that connects to the male terminal labeled with the number 1 in the illustration above.
This is the wire that feeds the switching signal to the individual ignition coil that fires cylinders 3 and 4. - 2
Connect the metal probe end of your 12 Volt test light to that tool.
NOTE: This test is performed with the Ford coil pack connected to its connector. - 3
Place the alligator clip of the 12 Volt test light on the positive (+) battery terminal.
- 4
Have your assistant crank the engine as you observe the test light.
- 5
The test light should flash ON and OFF rapidly as the engine cranks (and starts).
If all is NOT good, the test light will not flash ON and OFF at all.
Let's take a look at what your test result means:
CASE 1: The test light flashed ON and OFF. This is the correct test result and indicates that the coil pack is bad, replace it.
Here's why: So far you have verified that this particular ignition coil (within the Ford coil pack) is receiving 12 Volts and the switching signal. With both signals present, this ignition coil (within the coil pack) cylinders 3 and 4 has to spark from its two towers. Since it's not, the whole coil pack has to replaced.
CASE 2: The test light DID NOT flash ON and OFF. Then the switching signal is either (1) not being generated by the ignition control module (whether it's in the computer or not) or (2) there's an open-circuit problem in the wire that is not letting the signal reach the coil pack.
With this result, you have eliminated the coil pack itself as the cause of the misfire or the no-spark condition. Why? Because without this switching signal that particular ignition coil will not fire spark from its two towers.
TEST 8: Testing For Spark Directly On The Coil Tower

You're here because you got a no-spark result from two spark plug wires that DO NOT feed spark to paired cylinders.
The next step is to test for spark directly on the ignition coil pack towers that feed those two spark plug wires (that did not fire off spark in TEST 1). You'll test one coil tower at a time.
These are the test steps:
- 1
Remove the spark plug wire that did not fire off spark from the ignition coil pack.
- 2
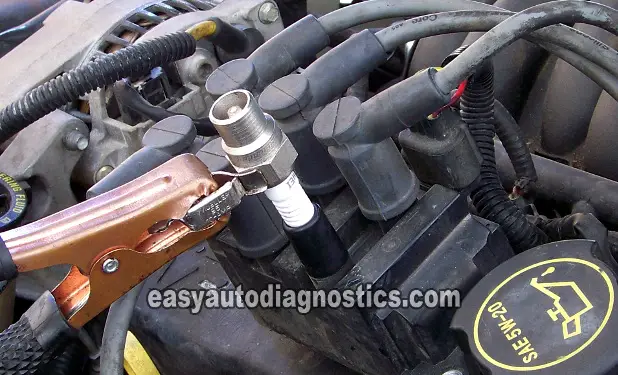
Place the spark tester directly on the ignition coil tower, in place of the spark plug wire you just removed (see photo above).
- 3
Connect the spark tester to the battery negative (-) post with a battery jump start cable.
- 4
Have your helper crank the engine.
CAUTION: The vehicle may or may not start, either way be careful! - 5
You're gonna' get one of two results: Spark or no spark.
- 6
Remove the HEI spark tester and reconnect the spark plug wire.
- 7
Repeat steps 1 thru' 5 (of this same test) on the other coil pack tower whose spark plug cable did not fire off spark.
Let's interpret your test result:
CASE 1: You got spark. This is the correct test result and it confirms that the ignition coil is good. It also condemns the spark plug wire as bad. Replace all of the spark plug wires as a set. Replacing the spark plug wires (as a set) will solve the misfire condition and the misfire diagnostic trouble code (DTC) lighting up the check engine light (CEL) on the instrument cluster.
CASE 2: You got NO spark. This result indicates that the ignition coil is bad. Replacing the ignition coil will solve the misfire condition and the misfire diagnostic trouble code (DTC) lighting up the check engine light (CEL) on the instrument cluster.
