TEST 2: Testing Fan Motor 1 (3.0L)
As you may already know, your Ford Escape (Mazda Tribute) comes equipped with two cooling fan motors held together in one big plastic assembly. In this test section, we'll test fan motor 1 (this is the one that's on the driver side (left side) of the radiator).
Each fan motor's connector has two wires coming out of it. On fan motor 1:
- One wire gets 12 Volts from the High Speed Fan Relay 1.
- This is the gray with red stripe (GRY/RED) wire of the fan motor connector.
- The other wire feeds chassis Ground.
- This is the black (BLK) wire of the fan motor connector.
The most common way to test fan motor 1 (or any cooling fan motor) is to just add 12 Volts to the gray with red stripe (GRY/RED) wire of the fan motor connector with a jumper wire (or a tool like a Power Probe) and then see if the fan comes On or not. If it doesn't come On, then it's fried and needs to be replaced. If it does come On, well then you now know that it's good.
Personally, I've always found this method a pain in the neck since the fan motor wires are really hard to get to in the Ford Escape (or Mazda Tribute).
So, I'll give you a choice of testing the cooling fan motor. You can do it as described above or you add these 12 Volts at the fuse/relay box that's in the engine compartment (and avoid having to muck around with the fan motor connector and its wires).
OK, this is what you'll need to do to test fan motor 1 (driver side fan motor):
- 1
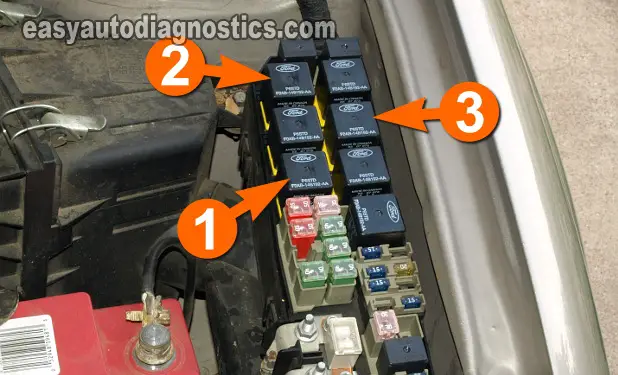
Remove High Speed Fan Relay 1. This is the fan relay labeled with the number 1 in photo 1 of 2 (in the image viewer above).
- 2
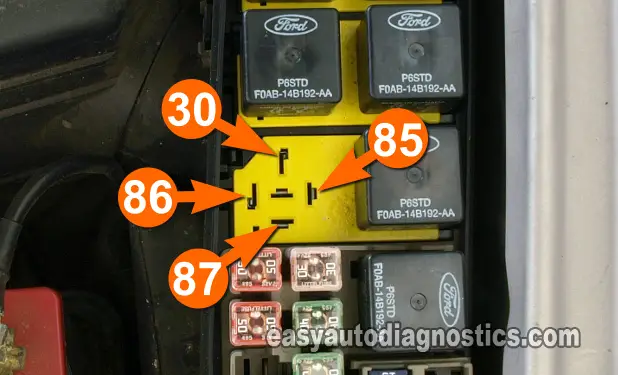
Jumper female terminals 30 and 87 together (shown in photo 2 of 2).
Female terminal 30 is the one that has 12 Volts present (from the fuse labeled with the number 1 in the photos in TEST 1).
Female terminal 87 is the one that connects directly to the gray with red stripe (GRY/RED) wire of the fan motor (and will deliver the 12 Volts).
IMPORTANT: Whatever you use to jumper these two female terminals CAN NOT be thicker that the relay male spade terminals that fit into them or you run the risk of damaging the relay/fuse box.
IMPORTANT: Female terminals 86 and 85 should never be jumpered together! Or the PCM will get damaged. - 3
As soon as you install the jumper wire (there's no need to turn the key to the ON position), fan motor 1 will do one of two things: 1.) It will immediately start or 2.) nothing will happen.
Let's take a look at what your results mean:
CASE 1: The fan motor came ON. This is the correct test result and it let's you know that fan motor 1 is OK.
The next step is to test fan motor 2. Go to: TEST 3: Testing Fan Motor 2 (3.0L).
CASE 2: The fan motor DID NOT come On. This tells you that the fan motor is fried and needs to be replaced.
Before you do replace the fan, you should take your multimeter and make sure that female terminal 30 has 12 Volts. If 12 Volts are present, then you can confidently replace the fan motor. If the 12 Volts are not present, then the Fuse/Relay box has a problem.
Disclosure: As an Amazon Associate, I earn from qualifying purchases. Buying through these links helps support this site at no extra cost to you. Thanks for your support —it really means a lot!
Now, what stinks about having a bad cooling fan motor is that you've got to buy the entire radiator cooling fan motor assembly.
If you run down to your local auto parts store, you can expect to pay around $200 to $220+ (US) and this isn't pocket change we're talking about.
You do have another option, and that's buying it online. It'll save you about $100 (US), if you have the time to wait for it in the mail. If this is the option for you, click on the link of the fan motor and find out more about it.
TEST 3: Testing Fan Motor 2 (3.0L)
Fan motor 2 (which is the fan motor on the passenger side of the radiator) also has two wires coming out of its connector (just like fan motor 1). These two are:
- A red with orange stripe (RED/ORG) wire
- This wire is the one that feeds 12 Volts (from the Low Speed Fan Relay).
- A light blue with black stripe (LT BLU/BLK) wire.
- This wire feeds Ground only when the PCM activates the High Speed Fan Control Relay 2.
Remember back in TEST 2, you could add 12 Volts directly to one of the fan motor's wires and if the fan was good, it would activate. Well, with fan motor 2 you need to add one more step and this is to manually add Ground to it too.
Let me explain: Fan motor 2 doesn't have a direct path to Ground like fan motor 1. Therefore, if you plan to jumper 12 Volts directly to the fan motor connector, you also need to connect a jumper wire to the light blue with black stripe (LT BLU/BLK) wire that connects to the battery negative (-) terminal.
This method, in my opinion again, is a total pain in the neck since the fan motor wires are really hard to get to. But if you feel comfortable with this method, by all means have at it.
In the following test instructions, I'll show you how to make all of your connections at the fuse/relay box.
OK, this is what you'll need to do to test fan motor 2 (passenger side fan motor):
- 1
Remove the Low Speed Fan relay from the relay/fuse box.
This is the fan relay labeled with the number 3 in photo 1 of 3 (in the image viewer above). - 2
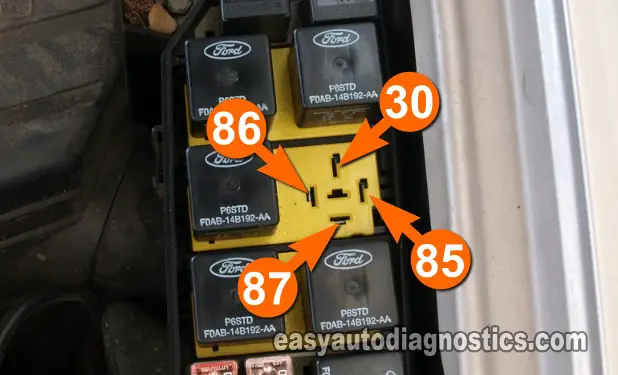
Jumper female terminals 30 and 87 (shown in photo 2 of 3).
Female terminal 30 is the one that has 12 Volts present (from the fuse labeled with the number 2 in the photos in TEST 1).
Female terminal 87 is the one that connects directly to the red with orange stripe (RED/ORG) wire of fan motor 2 (and will deliver the 12 Volts).
IMPORTANT: Whatever you use to jumper these two female terminals CAN NOT be thicker that the relay male spade terminals that fit into them or you run the risk of damaging the relay/fuse box.
IMPORTANT: Female terminals 86 and 85 should never be jumpered together! Or the PCM will get damaged. - 3
Remove the High Speed Fan relay 2 from the relay/fuse box.
This is the fan relay labeled with the number 2 in photo 1 of 3 (in the image viewer above). - 4
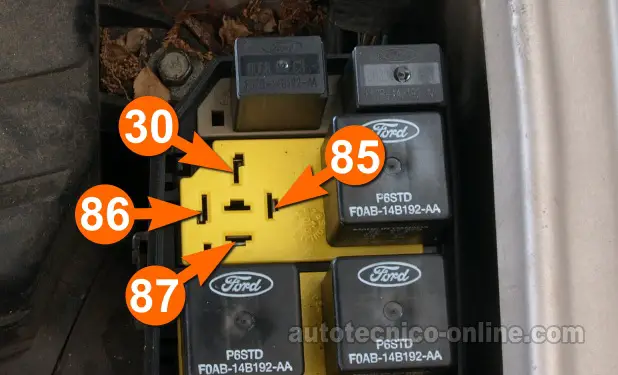
Jumper female terminals 30 and 87 (shown in photo 3 of 3).
Female terminal 30 connects to the light blue with black stripe (LT BLU/BLK) wire of fan motor 2 (which is the Ground circuit).
Female terminal 87 connects to a wire that is bolted to the chassis and provides a full time Ground circuit.
IMPORTANT: Whatever you use to jumper these two female terminals CAN NOT be thicker that the relay male spade terminals that fit into them or you run the risk of damaging the relay/fuse box.
IMPORTANT: Female terminals 86 and 85 should never be jumpered together! - 5
As soon as you install the jumper wire (there's no need to turn the key to the ON position), fan motor 2 will do one of two things: 1.) It will immediately start or 2.) nothing will happen.
Let's take a look at what your results mean:
CASE 1: Fan motor 2 came On. This test result lets you know that fan motor 2 is OK.
The next step is to test fan motor relays (all three in the engine compartment fan/relay box). Go to: TEST 4: Testing The Fan Relay.
CASE 2: Fan motor 2 DID NOT come On. This tells you that the cooling fan motor is fried and needs to be replaced.
Before you do replace the fan, you should take your multimeter and make sure that female terminal 30 (where fan relay labeled with the number 3 connects to) has 12 Volts. If 12 Volts are present, then you can confidently replace the fan motor. If the 12 Volts are not present, then the fuse/relay box has a problem.
Disclosure: As an Amazon Associate, I earn from qualifying purchases. Buying through these links helps support this site at no extra cost to you. Thanks for your support —it really means a lot!
Now, you may already be aware that you can't buy just one fan motor, you've got to buy the whole assembly.
If you run down to your local auto parts store, you can expect to pay around $200 to $220+ (US) and this isn't pocket change we're talking about.
You do have another option, and that's buying it online. It'll save you about $100 (US), but you do have to wait for it in the mail. If this is the option for you, click on the link of the fan motor and find out more about it.


