TEST 2: Testing The DPFE EGR Flow Signal
Now we're gonna' verify that the DPFE Pressure sensor is responding to EGR flow into the intake manifold.
Let's get started:
- With the vacuum pump still connected to the EGR valve.
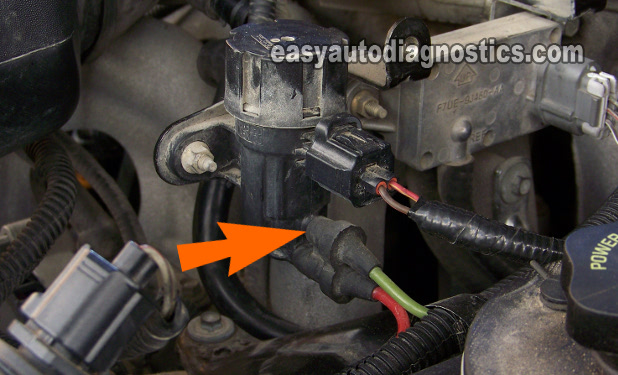
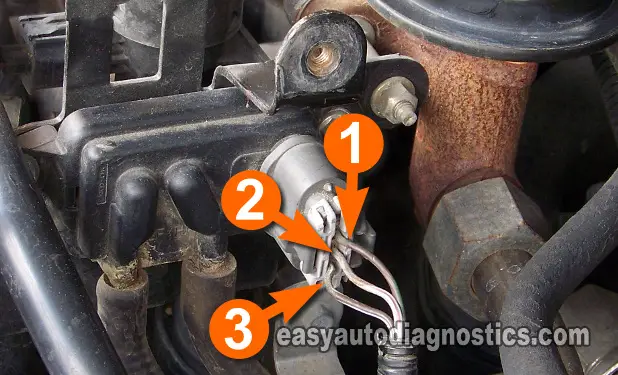
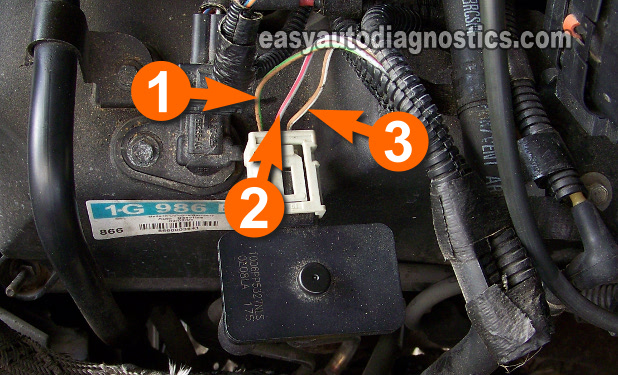
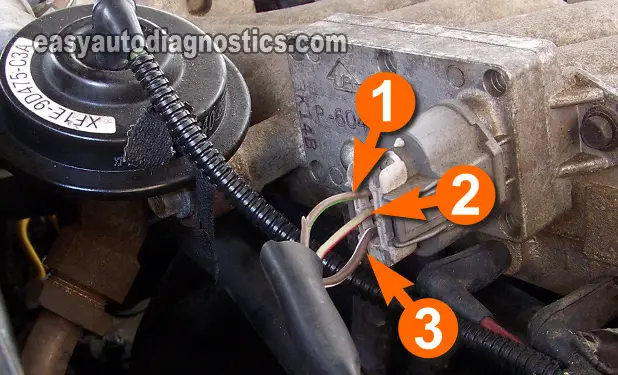
- Attach the red multimeter test lead (using an appropriate tool) to the wire labeled with the number 1 in the image viewer that corresponds to the type of DPFE sensor installed on your vehicle.
- Connect the black multimeter test lead to a good Ground point on the engine or to the battery negative (-) terminal.
- Select Volts DC on your multimeter.
- Have an assistant crank up the car (or truck).
- Once the engine has started, notice what the reading is on your multimeter (it should be a value around 0.9 Volts).
- After taking note of the voltage value on your multimeter, apply vacuum with the vacuum pump.
- As you apply vacuum, the engine should, once again, start to immediately idle very rough and possibly stall.
- Now notice the readings on your multimeter as you apply and release vacuum with your vacuum pump.
Now, if the DPFE sensor is working correctly, you'll notice that the voltage reading on your multimeter will increase (to about 3 Volts DC or as high as 4.5 Volts DC) whenever you apply vacuum with the vacuum pump (and of course the engine will idle rough). The voltage will decrease back to the original value recorded at idle and engine idle will return to normal when you release the vacuum applied by the vacuum pump.
Let's find out what your test results mean:
CASE 1: The voltage reading on the multimeter increased/decreased as you applied/released vacuum. This test result tells you the DPFE sensor is working correctly.
The next step is to verify/check the EGR Valve Vacuum Regulator Solenoid. Go to: TEST 4: Testing The EGR Vacuum Regulator Solenoid (Part 1).
CASE 2: The voltage reading on the multimeter DID NOT increase/decrease as you applied/released vacuum. This confirms the DPFE sensor is bad.
Replacing the DPFE sensor should solve the EGR fault code issue that is lighting up your check engine light (CEL) on your instrument cluster.
CASE 3: NO voltage reading at all was displayed on the multimeter as you applied/released vacuum. The next step is to verify that the DPFE sensor is receiving the 5V Reference voltage from the PCM. Go to: TEST 7: Testing The DPFE 5 V REFERENCE SIGNAL.
TEST 3: Bench Testing The EGR Valve

This test step is done with the EGR valve off of the engine. The EGR valve may be hot, so be careful.
The purpose of this test is to verify that when vacuum is applied to the EGR valve, the EGR valve's pintle actually opens and closes. You'll need to blow compressed air thru the inlet opening of the EGR valve, or if you don't have access to compressed air, you can use the ‘good ole’ lungs by blowing air with your mouth.
- Remove the EGR valve from the engine.
- Connect the vacuum pump once again to the EGR valve using a piece of vacuum hose (see photo above).
- Once the vacuum pump is set up, apply vacuum.
- And apply compressed air to the inlet opening of the EGR valve.
Let's analyze your test result:
CASE 1: You were able to blow compressed air thru' the EGR valve's inlet opening to its outlet side (which is the intake manifold side) when you applied vacuum. This test result tells you the EGR valve's inlet and outlet passages are not blocked with carbon build-up.
The next step is to visually check the EGR inlet orifice on the intake manifold to see that it's not blocked with carbon build-up.
If carbon build-up/blockage exists on the EGR inlet orifice on the intake manifold, clean/remove it. Re-install the EGR valve and re-test starting at TEST 1 again.
CASE 2: You WERE NOT able to blow compressed air thru' the EGR valve's inlet opening to its outlet side (which is the intake manifold side) when you applied vacuum. This test result confirms the EGR valve's inlet and outlet passages are blocked with carbon build-up or the EGR valve is bad.
Visually check it for carbon build-up/blockage and if blockage exists; clean and/or remove the carbon build-up. If no carbon build-up exists, then the EGR valve is bad, replace it.
TEST 4: Testing The EGR Vacuum Regulator Solenoid (Part 1)

The first part of this test is to verify that the EGR Vacuum Regulator Solenoid is getting getting a good supply of engine vacuum from the intake manifold. Depending on the result of this test, the next test is to check to see if the EGR Vacuum Regulator Solenoid is getting power (12 Volts), in TEST 5.
You can use a vacuum gauge if you want, but it isn't necessary since all we need to ascertain is that engine vacuum is reaching the EGR Valve Vacuum Regulator Solenoid. OK, here's the test:
- With the engine off, disconnect the two vacuum hoses that connect to the EGR Valve Vacuum Regulator Solenoid.
- These two vacuum lines can be very hard to take off from the EGR Valve Vacuum Regulator Solenoid's nipples, if they have never been removed before.
- You have to be very careful as you pull on them since you could break the EGR Vacuum Regulator Solenoid in the process.
- Once the vacuum plastic vacuum lines are off, have your helper start the engine.
- One of the two vacuum lines/hoses will have engine vacuum.
- If the vacuum lines are color coded, the line that is green is the one that usually connects to the intake manifold and is the one that feeds vacuum to the EGR Valve Vacuum Regulator Solenoid.
- The other vacuum line is the one that feeds vacuum to the EGR valve once the PCM commands the EGR Valve Vacuum Regulator Solenoid to come on.
- If the vacuum lines are not color coded, no big deal, one of the two vacuum hoses/lines will have engine vacuum.
Let's find out what your test results mean:
CASE 1: Engine vacuum was present after the engine was started and was idling. This test result indicates that the vacuum line is good and delivering the goods to the EGR Vacuum Regulator Solenoid.
The next step is now to test the Power Circuit (12 Volt) of the EGR Valve Vacuum Regulator Solenoid, go to: TEST 5: Testing The EGR Vacuum Regulator Solenoid (Part 2).
CASE 2: Engine vacuum WAS NOT present when the engine after the engine was started and was idling. This lack of vacuum will cause the EGR valve not to function and will light up your check engine light (CEL) with an EGR valve fault code.
Repairing and/or replacing whatever is necessary to get vacuum to the EGR Vacuum Regulator Solenoid (when the engine is idling) should solve your EGR valve issue on your Ford (or Mercury, or Lincoln) car or truck.


