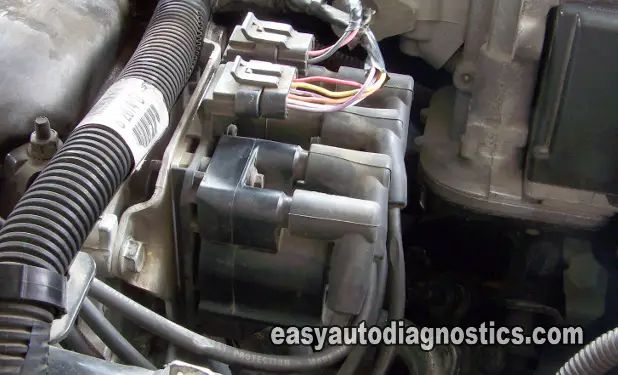
If you've been wondering how you can test your ignition control module (ICM) on your 2.2L Chevy Cavalier or Pontiac Sunfire? Well, you've come to the right place.
Here, you'll find the most straightforward test to check to see if the ignition control module is bad or if the crankshaft position sensor is bad.
If you're wondering what years of Cavalier or Sunfire this info applies to, check the "Applies To:" box on the right column (desktop) or at the bottom (mobile device).
If you need the ignition control module test for the 2.4L Quad 4 engine, go here:
If you need to test the ignition coils sitting on top of the ignition control module, on your 2.2L Cavalier or Sunfire, go here:
To see all of the GM 2.2L 'How To Test' Articles, you can go here: GM 2.2L Main Index Of Articles.
Contents of this tutorial:
- Symptoms Of A Bad Ignition Control Module And CKP Sensor.
- Basic Working Theory.
- Where Do I Start?
- The Circuit Descriptions.
- TEST 1: Testing For 12 Volts.
- TEST 2: Testing The Ground Circuit.
- TEST 3: Testing The CKP Sensor Signal.
- TEST 4: Testing The 7X REFERENCE Signal.
- TEST 5: Testing The 2-3 And 1-4 IC Signal.
![]() You can find this tutorial in Spanish here: Cómo Probar El Módulo De Encendido De Chevrolet y Pontiac 2.2L (at: autotecnico-online.com).
You can find this tutorial in Spanish here: Cómo Probar El Módulo De Encendido De Chevrolet y Pontiac 2.2L (at: autotecnico-online.com).
Symptoms Of A Bad Ignition Control Module And CKP Sensor
The number one complaint (symptom) when the ignition control module or crankshaft position sensor goes bad is the car won't start.
Now, of course a lot of things can cause this exact same problem, so this isn't very helpful. Now, if the no-start is caused by the ignition module or the crankshaft position sensor, usually the ignition coils will not fire any spark at all.
Therefore, the second symptom that leads you on the path of a bad ICM or crank sensor is: no spark at any of the ignition coils.
Of course, when it comes to ignition system failures, this is not an absolute truth.
These two components could display any number of behaviors when they go bad. In view of this, this article will take you step by step thru' 5 different test steps so that you can eliminate a lot of these possibilities.
But the fact remains, that if your Cavalier or Sunfire has spark, this test will not help you. Why? because the tests in this article assume that none of the ignition coil towers are sparking.
Basic Working Theory
Here is a little background information to help you diagnose this no-spark condition. In a nutshell, when the system is working properly, at crank-up and at all engine speeds, the fuel injection computer (ECM Electronic Control Module or PCM Powertrain Control Module) controls both ignition coils thru' the ignition control module. How? Well here (in a nutshell) is the breakdown of what happens:
- When the engine starts to crank, the crankshaft position sensor starts to produce and send its signal to the ignition control module (ICM).
- The ignition control module upon receiving this AC Volts crank signal, converts it into a DC digital signal and sends it to the ECM.
- This digital signal is called the 7X REFERENCE signal.
- The ECM, upon receiving this 7X REFERENCE signal, returns to the ignition module an Ignition Coil Control signal thru' two different circuits. These two signals are usually called Electronic Spark Timing Control Signal A and Electronic Spark Timing Control Signal B in the GM service literature.
- These two Ignition Control (IC) signals contain the data the ignition module needs to know the exact moment to start switching the primary current of the ignition coils ON and OFF.
- Thus the two ignitions coils start to spark away.
As you can see, the CKP sensor signal is critical for the ECM and ignition control module to start sparking the ignition coils at START UP and at all engine speeds.
The CKP sensor is located on the block. This sensor goes thru' the block itself (I'll be either using the full name: crankshaft position sensor or the short form: CKP sensor thru' out the article).
The crankshaft position sensor is a Magnetic Reluctor type sensor and produces an AC signal that can be measured with a multimeter (in AC Volts mode). On an oscilloscope, it produces an analog waveform.
There are several ways to test all of these signals. One is using an oscilloscope and the other is using a multimeter. This article concentrates on using a multimeter capable of reading frequency Hertz (Hz).
If you don't have a digital multimeter that can read Hertz frequency? Click here to see my recommendations: Buying A Digital Multimeter For Automotive Diagnostic Testing.
If you have access to an oscilloscope, I've included photos of what the wave-forms should look like. Whether you use a multimeter or an oscilloscope, you'll be able to successfully diagnose this no-start condition! So, read on my friend.
Where Do I Start?
We'll first check for the basics like battery voltage and engine Ground to the ignition control module (ICM).
Then we'll test the crankshaft position sensor signals, the 7X REFERENCE signal and the ignition coil control signals (from the ECM to the module) in action and from the results you get you'll be able to pinpoint the problem to the ignition control module or the crankshaft position sensor or completely eliminate these as the cause of the no-start condition.
IMPORTANT: All of the tests are ON CAR TESTS, do not remove the coil/module assembly from the vehicle (all of the figures show the coil module assembly off of the car but this is just for illustration purposes only). And lastly, this test only tests for a no-start condition.
The Circuit Descriptions
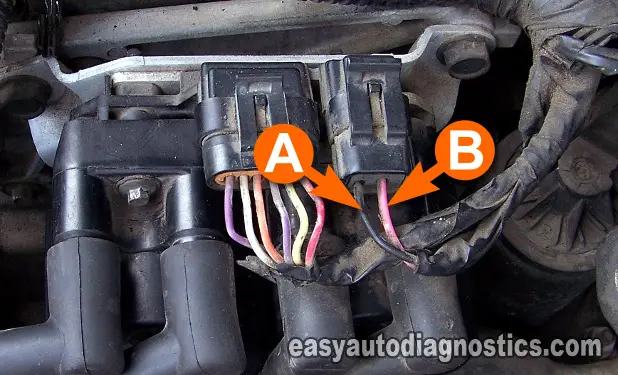
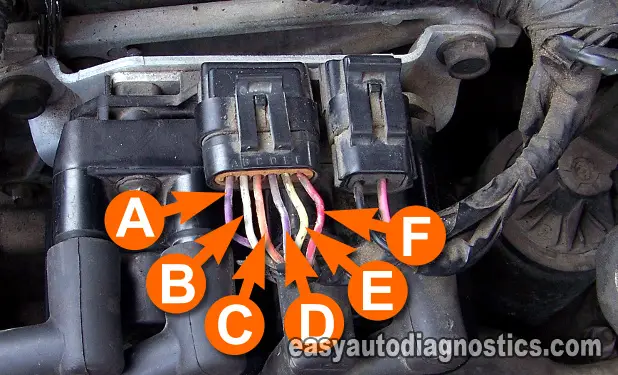
Here are brief descriptions of the circuits that we'll be testing. The module connector will have the same letters on it.
Connector With 6 Wires
- A- PURPLE wire.
- Crankshaft position sensor circuit.
- B- WHITE wire.
- 1-4 Ignition Coil Control Signal (comes from the ECM). The service literature will call this the Ignition Control Signal A.
- C- ORANGE wire.
- 2-3 Ignition Coil Control Signal (comes from the ECM). The service literature will call this the Ignition Control Signal B.
- D- PURPLE with WHITE stripe wire.
- 7X Reference Signal (goes to the ECM).
- E- YELLOW wire.
- Crankshaft position sensor circuit.
- F- RED with BLACK stripe wire.
- Ground circuit for ECM.
Connector With 2 Wires
- A- BLACK (or BLACK with WHITE stripe) wire.
- Engine Ground (for the module).
- B- PINK wire.
- 12 Volts with ignition in the ON position.
You're probably thinking that there are too many wires to test. Don't worry, you'll see just how easy it is to test this module. All right, let's get started!
TEST 1: Testing For 12 Volts

We'll begin by checking that the ignition control module on your Chevy Cavalier (or Pontiac Sunfire) is receiving 12 Volts.
I recommend using a wire piercing probe to accomplish all of the tests in this article (to see an example of this tool, go here: Wire Piercing Probe). Whatever method you use, the key here is to be careful. Remember to use common sense and take all safety precautions.
- 1
Put the multimeter in Volts DC mode.
- 2
Disconnect the ignition control module (ICM) from its 2-wire electrical connector.
- 3
Connect the black multimeter test lead to the battery negative (-) terminal.
- 4
Probe the pink (PNK) wire of the connector with the red multimeter test lead.
- 5
Turn key to the ON position but don't crank or start the engine.
- 6
You should see 10 to 12 Volts on the multimeter.
Let's take a look at what your test results mean:
CASE 1: The multimeter registered 12 Volts. This is the correct test result.
The next step is to go to: TEST 2: Testing The Ground Circuit.
CASE 2: The multimeter DID NOT register 12 Volts. You must find out why you're missing this voltage.
Without this voltage the module will not work. With this result you have eliminated the ignition module and crank sensor as the cause of the no-start condition on your Cavalier (or Sunfire).

