TEST 2: Testing For Spark At The Ignition Coil Tower

In this test, you're gonna' check for spark directly on the ignition coil tower that had one of its two spark plug wires attached to it not fire spark in TEST 1.
With this test, you'll find out if the spark plug wires are bad or if the ignition coil pack is the one that has fried or continue to the next test.
Let's start:
- 1
Remove the spark plug wire (that did not fire off spark in TEST 1) from the ignition coil's tower it's attached to.
- 2
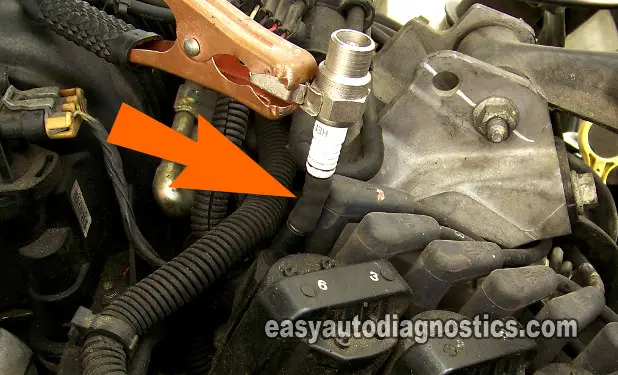
Attach an HEI spark tester to the ignition coil's tower with a small piece of vacuum hose as shown in the photo above.
- 3
Hold the HEI spark tester with a battery jump start cable, as shown in the photo.
- 4
Have your assistant crank the car while you observe the spark tester for spark. The engine is gonna' start, so be careful.
- 5
Once you've observed the spark tester sparking or not, have your assistant turn off the engine.
- 6
This test will give you one of two results: You'll get spark or no spark.
Lets take a look at what your test results mean:
CASE 1: You got spark. This result confirms that the spark plug wire is bad, replace the spark plug wires as a set.
This happens quite a bit, where a spark plug wire (or several) simply stop transmitting spark. This is mainly due to the fact that the spark plug wires are too old.
CASE 2: You got NO spark. This result indicates that the ignition coil is bad if the other tower is sparking. Replacing the ignition coil should solve the misfire condition.
I recommend that you do one more thing and this is to check for spark on the other tower (that belongs to the ignition coil you're testing in this test section).
If you get spark from the other tower, then this result lets you know beyond a shadow of a doubt that the ignition coil is bad.
Here's the reason why: The ignition coil gets only one signal to fire spark from both towers from the ignition control module (this is because both towers belong to the same circuit inside the ignition coil). So, if only one tower is firing off spark, there's something wrong inside the ignition coil itself.
TEST 3: Testing For Spark At The Ignition Coil Tower

In this test, you're gonna' check for spark directly on the ignition coil towers of the two spark plug wires that did not spark in TEST 1.
NOTE: I want to emphasize that both of these two non-sparking spark plug wires connect to the same ignition coil.
This test will tell you if the spark plug wires are bad or if the ignition coil pack itself is fried.
Let's get started:
- 1
Remove one of the spark plug wires (that did not fire off spark in TEST 1) from the ignition coil's tower it's attached to.
- 2
Attach the HEI spark tester to the ignition coil's tower with a small piece of vacuum hose, as shown in the photo above.
- 3
Hold the HEI spark tester with a battery jump start cable, as shown in the photo.
- 4
Have your assistant crank the car while you observe the spark tester for spark. The engine will start, so be careful!
- 5
Once you've observed the spark tester sparking or not, have your assistant turn off the engine.
- 6
Now, repeat steps 1 thru' 5 on the other coil tower. This tower should belong to the same coil.
- 7
This test will give you one of two results: You'll get spark or no spark on each tower of the same ignition coil you're testing.
Let's take a look at what your test results mean:
CASE 1: You got spark from both coil towers. This result confirms that the spark plug wires are bad, replace the spark plug wires as a set. Replacing the spark plug wires should solve the misfire issue that's lighting up the check engine light (CEL) on your instrument cluster.
CASE 2: You got NO spark from both coil towers. The next step is to remove the ignition coil from the ignition control module and test/verify that it's getting power (12 Volts) and the switching signal.
This is a very easy test to do and I'll show you how in TEST 4. Go to: TEST 4: The Power (12 V) Circuit.
CASE 3: You got spark from one but not both coil towers. This result confirms that the ignition coil is bad. Replacing the ignition coil should solve the misfire issue that's lighting up the check engine light (CEL) on your instrument cluster.
Here's the reason why: The ignition control module sends the ignition coil one signal to activate and fire both ignition coil towers. So if you have spark coming out of at least one tower, this tells you that the ignition control module is OK.
Since the ignition module is activating the ignition coil, the ignition coil has to fire off spark from both towers (since both towers belong to the same circuit inside the ignition coil). Since your test result shows only one tower sparking, the ignition coil is bad and needs to be replaced.
TEST 4: The Power (12 V) Circuit

In this test section, we're going to make sure that the ignition coil that did not fire spark from its two towers (in TEST 3) is getting 10 to 12 Volts DC.
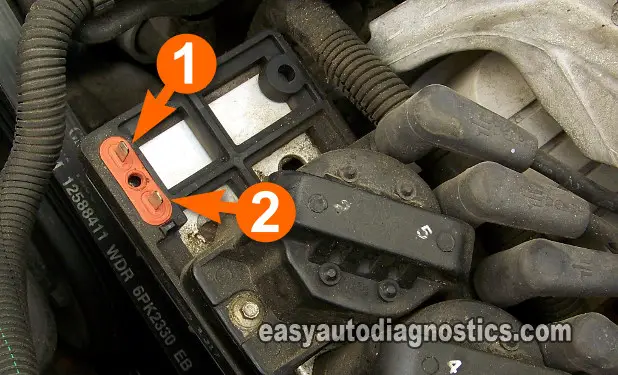
You need to remove the offending ignition coil to be able to access the two terminals that feed it with voltage and the activation signal (as seen in the photo above).
NOTE: You'll notice in the photo above that the ignition coil that feeds spark to cylinder 3 and 6 is removed. Arrow number 1 points to the terminal that feeds the coil with the activation signal and arrow number 2 points to the terminal that feeds 12 Volts. This same pattern (of arrow 1: activation signal and arrow 2: power supply) applies to the other ignition coils' terminals too.
Alright, let's get testing:
- 1
Remove the ignition coil whose towers are not firing spark.
- 2
With the multimeter in Volts DC mode.
Don't have a digital multimeter? Need to buy one? Click here to see my recommendation: Tekpower TP8268 AC/DC Auto/Manual Range Digital Multimeter (Amazon affiliate link). - 3
With the red multimeter test lead, probe the male spade terminal identified by the number 2 in the photo above.
- 4
Connect the black multimeter test lead to a good Ground point or the battery negative (-) terminal.
- 5
Have your assistant turn the key to on but don't crank or start the engine.
- 6
The multimeter should register 10 to 12 Volts.
Let's take a look at what your test results mean:
CASE 1: The multimeter registered 10 to 12 Volts. This test result confirms that the ignition coil is getting power.
The next step is to verify that the ignition control module (ICM) is providing this ignition coil with the switching signal. Go to: TEST 5: The Switching Signal.
CASE 2: The multimeter DID NOT register 10 to 12 Volts. This tells you that the ignition module is not supplying the ignition coil with power. This result also confirms that the ignition control module is defective and needs to be replaced.
NOTE: I recommend that you remove the other ignition coils and see if they're getting 10 to 12 Volts DC. If the other ignition coils are being fed between 10 to 12 Volts DC and this one is not, then you can confidently say the ignition module is bad. But, if you get a small voltage reading from all of them, there's a good chance that the ignition module has a Ground issue.
This is especially true if your ignition control module (ICM) does not have a dedicated Ground wire on the letter K terminal of the ICM connector. For a little more info on this issue, take a look at B. Jones' feedback about his no-start problem due to the ignition module not getting a good Ground due to aluminum oxide (rust) on the module's case here: Real Life Case Study #1 (Thank you Bill for you feedback!).
