TEST 4: Spark Test At Ignition Coil Tower

So far in all your testing, you've gotten a no-spark result on everything (you have tested).
This lack of spark could be caused by a bad ignition coil high tension wire.
You can indirectly determine if the ignition coil high tension wire is bad by checking for spark directly at the ignition coil tower.
If you get spark (at the ignition coil tower), you can conclude that the ignition coil high tension wire is faulty and is the cause of the no-spark test results you got in TEST 1 and TEST 3.
If you DO NOT get spark, then the next step is to see if the ignition coil is getting 10 to 12 Volts in TEST 5.
These are the test steps:
- 1
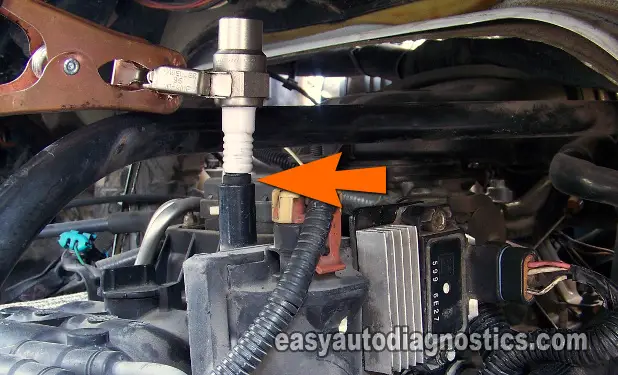
Remove the spark plug wire that's attached to the ignition coil's tower (as shown in the photo above).
- 2
Now, connect the HEI spark tester to the coil's tower with a small piece of vacuum hose (this is important!, look at the photo to see how I've done it).
- 3
Ground the HEI spark tester with a battery jump start cable (the other end of which is Grounded to the engine or battery negative (-) post).
- 4
Have your helper crank the engine while you observe the spark tester.
- 5
You're gonna' get one of the 2 results: (1) Spark or (2) No Spark.
Let's your spark test result below:
CASE 1: You got spark. This test result tells you that the spark plug wire that feeds the distributor cap spark is bad and the ignition coil is good.
Replace the spark plug wire by replacing all of the spark plug wires.
Here's why: As the spark plug wire ages, its normal spark resistance increases to the point where it cannot conduct spark to the spark plug. This will result in either a misfire or lack of power or an engine non-start condition. Spark plug wires don't last forever, especially after-market ones (average life is 3 to 4 years).
CASE 2: You got NO spark. Then further testing is required to see if the problem is due to a bad ignition control module (ICM), bad pick up coil or something else.
For your next test, go to: TEST 5: Testing The Ignition Coil For 12 Volts.
TEST 5: Testing The Ignition Coil For 12 Volts

Up to this point, your diagnostic tests have confirmed the following:
- All spark plug wires are not sparking (TEST 1).
- The ignition coil high tension wire is not sparking (TEST 3).
- The ignition coil tower is not sparking (TEST 4).
In this test, you'll verify that both the ignition coil and the ignition control module (ICM) are getting power (12 volts) since they both get that voltage through the same circuit.
If the ignition coil has power, the next step is to make sure it's getting an enable (activation) signal from the ignition control module.
These are the test steps:
- 1
Place the multimeter in Volts DC mode.
Don't have a digital multimeter? Need to buy one? Click here to see my recommendations: Buying A Digital Multimeter For Automotive Diagnostic Testing. - 2
Disconnect the ignition coil from its electrical connector.
- 3
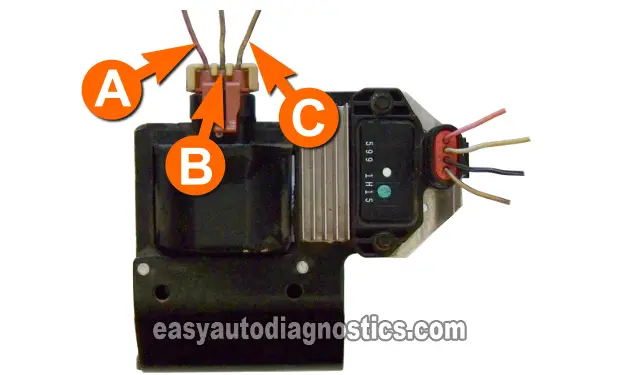
With the red multimeter test lead, probe the wire identified with the letter A (see photo above).
This should be the pink (PNK) wire of the ignition coil connector. - 4
Connect the black multimeter test lead to the battery negative (-) terminal.
- 5
Turn the key ON with the engine OFF.
- 6
You should see 10 to 12 Volts on the multimeter.
Let's take a look at what your test results mean:
CASE 1: Your multimeter displayed 10 to 12 Volts. This is the correct test result and it lets you know that power is being supplied to the ignition coil and ignition module.
The next step is to check whether the ignition coil is supplied with the switching signal that comes from the ignition control module (ICM). Go to: TEST 6: Verifying The Ignition Coil's Switching Signal.
CASE 2: Your multimeter DID NOT display 10 to 12 Volts. Without this voltage, neither the ignition control module (ICM) nor the ignition coil will function.
You must find out why you're missing this voltage. Resolving this power issue should solve your 'no-spark, no-start' problem.
TEST 6: Verifying The Ignition Coil's Switching Signal

In order for the ignition coil to start sparking, it needs a switching signal from the ignition control module.
You and I can easily confirm that this signal is sent to the ignition coil with an LED light. You can see an example of this tool here: The LED Light Test Tool And How To Make One.
You'll need to use a suitable tool to pierce the wire so you can attach the LED's black lead to the wire to be tested below.
IMPORTANT: This test is performed with the ignition coil and ignition control module connected to their respective connectors.
These are the test steps:
- 1
Connect the black wire of the LED to the wire identified with the letter C of the ignition coil's connector (see photo above).
NOTE: The ignition coil and the ICM must remain connected to their electrical connectors for this test to work. - 2
Connect red lead of LED to the battery positive (+) terminal. It is important that it be connected at the battery positive (+) terminal.
- 3
Have an assistant crank the engine.
- 4
The LED test tool should blink ON and OFF as the engine is being cranked.
NOTE: Don't worry about what the LED light is doing before or after your helper cranks the engine. The only results you want to interpret are the results obtained when cranking the engine.
Let's examine your test result:
CASE 1: The LED flashed ON and OFF. This is the correct test result and it confirms that the ignition coil is getting its activation signal.
You can conclude that the ignition coil is bad and needs to be replaced, if you have:
- Confirmed that none of the spark plug wires are sparking (TEST 1).
- Confirmed that the ignition coil tower is not sparking (TEST 3 and TEST 4).
- Confirmed that the ignition coil and ICM are getting power (TEST 5).
- Confirmed that the ignition coil IS NOT getting its Switching signal.
This test result also allows you to correctly conclude that the ignition control module (ICM) and pickup coil are OK. Replacing the ignition coil will resolve your "no-spark, no-start" condition.
CASE 2: The LED DID NOT flash ON and OFF. Recheck all your connections and repeat the test. If there are still no pulses of light on the test LED, go to: TEST 7: Testing The Triggering Signal From PCM.
