Page 2 of 2
Relay Bench Test
OK, it's time to get our hands dirty and bench test the relay.
You'll need a power source to activate the relay (during the test) and this power source will be your vehicle's Battery.
As mentioned in the previous page, you'll need three very important things:
- A Multimeter (analog or digital).
- Two jumper wires with alligator clips on the ends.
- Maybe a helper.
Alright, here are the test steps:
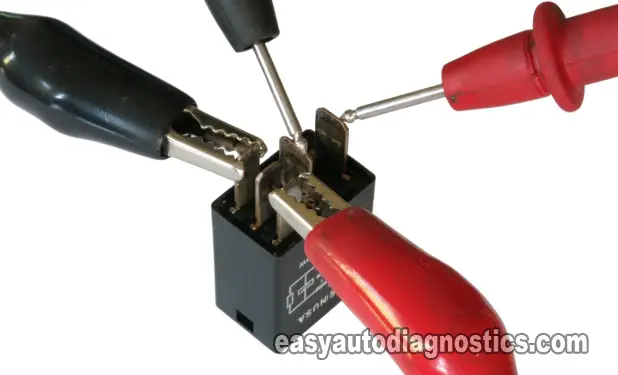
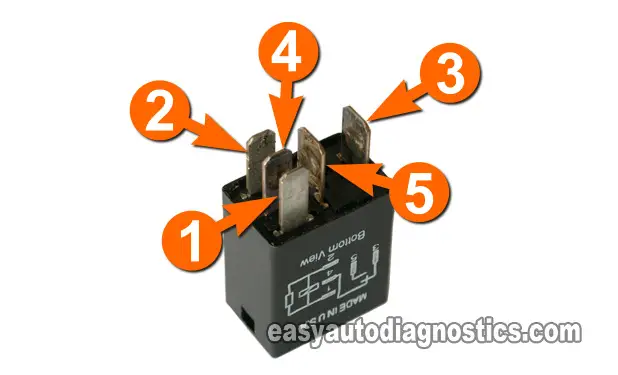
- Connect terminal 2 of the relay to the battery's Ground Terminal with a Jumper Wire.
- You can use the photo of the relay with all of the connections, since the photos show the actual test.
- If you don't have such a jumper wire (with alligator clips), you can run down to your local Radio Shack (even Walmart) and buy some alligator clips and make your own jumper wire.
- Connect male spade terminal 1 to the battery's positive (+) terminal. This will energize and activate the relay.
- It's normal to hear a small clicking from the relay when this connection is made.
- With your multimeter in Ohms mode, measure the resistance across the relay's terminals 3 and 5 with the multimeter leads (as seen in the photo).
- It doesn't matter which color lead goes where, since the polarity does not matter for this test.
- You may need a helper for this operation, unless your multimeter leads have alligator clips on the end of the leads.
- Your multimeter should show continuity. If it doesn't show continuity, recheck all your connections and retest.
- Remove and reconnect the jumper wire to terminal 1 several times, as you eye-ball the multimeter.
- When the jumper wire IS NOT connected to power, the multimeter should show NO CONTINUITY.
- When the jumper wire is connected to power, the multimeter should show continuity.
OK, let's take a look at what your test results mean:
CASE 1: Your multimeter showed continuity. This tells you that the relay is OK and not the cause of the problem.
CASE 2: Your Multimeter DID NOT show continuity. This tells you that the relay is bad and needs to be replaced.

If this info saved the day, buy me a beer!


