On Car Ignition Control Module Test

After having eliminated all of the components mentioned on the previous page, I now needed to test the ignition control module on this Volvo 740 GLE.
My search for the module turned it up next to the air filter assembly box and bolted to the left inner fender.
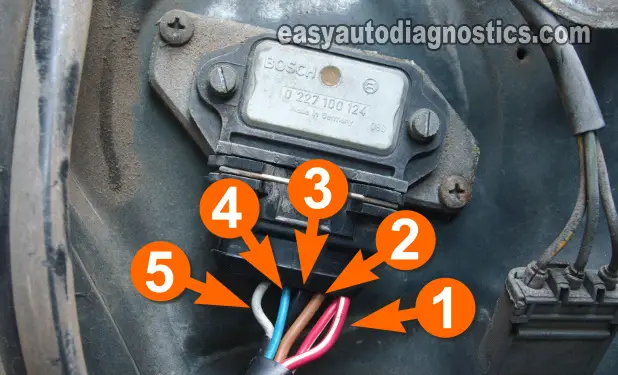
As you can see in the photo on the left. The ignition control module has 7 slots in the connector. Two of those seven are empty.
Also the connector has the numbers 1 thru' 7 molded onto to it.
Circuit Descriptions
I got me a wiring diagram and these were the circuit descriptions:
- Number 1 - Output circuit for the ignition coil's Switching signal.
- Number 2 - Ground.
- Number 3 - Shielding/Ground.
- Number 4 - 12 V power source circuit.
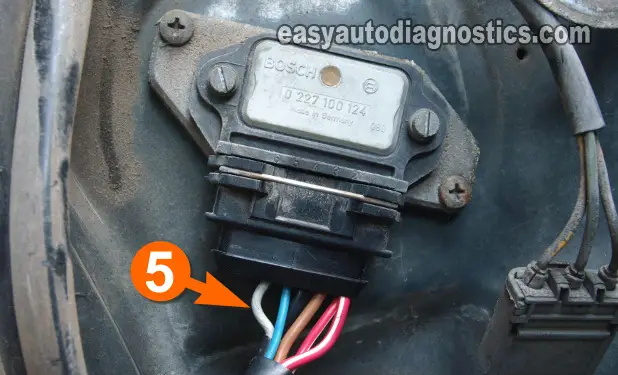
- Number 5 - Input circuit for the Triggering signal.
- Number 6 - Empty.
- Number 7 - Empty.
Verifying Power, Ground, And The Triggering Signal

The very first thing that has to be done is to verify power and Ground to the module and both were present. More specifically. I used my multimeter and probed those specific circuits with the module disconnected.
The next step was to check and verify that the ignition control module was receiving the Triggering signal.
As I looked at the wiring diagram I could see that the module's Triggering signal came from an ignition computer called the Ignition System Control Unit. The presence of this signal is verified at the ignition control module's connector.
This signal can be tested with an oscilloscope or a multimeter that has a Hertz frequency function. The easiest and fastest thing for me, is using the multimeter and later, if I have time, I scope the signal to save the waveform to my library of waveforms.
Testing The Triggering Signal
OK, I hooked up the RED multimeter's lead to a wire piercing probe and attached it to the gray wire (circuit number 5). The black lead of the multimeter I attached to a good Ground spot. I performed the test with the ignition module connected to its connector.
I had my bud crank up the engine one more time and the result: the signal was indeed present. The Ignition Control Unit was triggering the ignition control module. The Hertz frequency signal registered on the multimeter was 7 - 8 Hertz (this is the average Hz value for the Trigger signal for almost all of the vehicles on the road when cranking the engine).
Having obtained the Triggering signal at this point in my testing pretty much clinched it that the module was bad.
Tying Up Loose Ends
Just to tie up any loose ends. I tested the number 1 circuit (of the ignition module's connector) for the presence of the Switching signal (that goes out to the ignition coil). Why? Well, the module could indeed be working and creating this Switching signal. But there may be an open-circuit problem in the circuit causing the signal not to reach the ignition coil.
After testing and not finding the Switching signal, I now could condemn the ignition control module as defective and the cause of the NO-START. Why? Because by the nature of its intended purpose, if the ignition control module is receiving 12 Volts, Ground, and the Triggering signal, then it HAS to produce the Switching signal for the ignition coil.
Remember, the Triggering signal tells the module the exact time to send this Switching signal to the coil. And it's this Switching signal that causes the ignition coil to start sparking.
The above applies to all of the vehicles on the road. And thus, the importance of knowing 'working theory' becomes even more clear because whether it's a Chevrolet, or a Mazda, or a Ford, or whatever, you should be able to diagnose its ignition system with such info.
On this Volvo 740, the ignition control module was replaced and the problem was solved.
