TEST 2: Making Sure The Ignition Coil Is Getting Power

In this section, we're gonna' make sure that the ignition coil is getting 10 to 12 Volts, since without them, it's not gonna' spark.
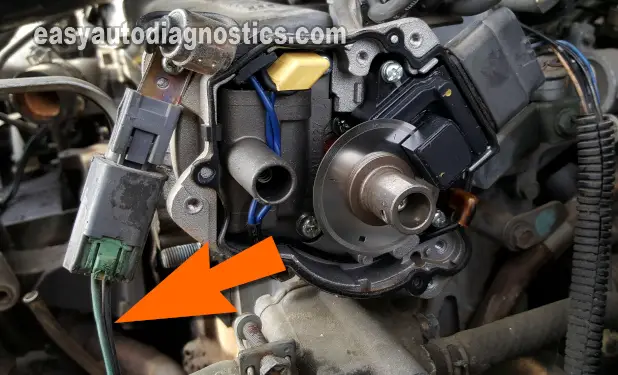
The wire that delivers these 12 Volts to the ignition coil is the black with red stripe (BLK/RED) wire of the distributor's 2-wire connector. In the photo above, the arrow is pointing to the ignition coil's power wire.
Alright, these are the test steps:
- 1
Place your multimeter in Volts DC mode.
- 2
Disconnect the distributor from its 2-wire electrical connector.
- 3
With the red multimeter test lead, probe the BLK/RED wire of the distributor's 2-wire connector.
- 4
Next, connect the black multimeter test lead directly to the battery negative (-) terminal.
- 5
Now, turn the key on (you don't have to crank the engine) and notice the multimeter's voltage reading.
- 6
Your multimeter should display 10 to 12 Volts DC.
Let's take a look at what your test result means:
CASE 1: Your multimeter registered 10 to 12 Volts. This is the correct test result and it confirms that the ignition coil is getting power.
The next step is check that the ignition coil is getting an activation signal from the power transistor. For this test go to: TEST 3: Making Sure The Ignition Coil Is Getting A Switching Signal.
CASE 2: Your multimeter DID NOT register 10 to 12 Volts. Recheck your multimeter connections and retest.
If you still don't see 12 Volts, then this result eliminates the ignition coil as bad since without power it's not gonna' work.
Although it's beyond the scope of this article to troubleshoot this missing voltage, finding the cause of these missing 12 Volts will solve the 'no-spark no-start' of your 2.4L Nissan Altima.
TEST 3: Making Sure The Ignition Coil Is Getting A Switching Signal

As you might already be aware, the ignition coil on your 2.4L Altima gets a switching signal from the power transistor. It's this Switching signal that activates the ignition coil to spark away.
This Switching signal can be very easily and accurately tested using a simple automotive LED light. If you need to see what this LED light looks like, you can see it here: Abe's LED Light Tool.
NOTE: The distributor must remain connected to its electrical connector for this test to work.
OK, now for this test, this is what you need to do:
- 1
Remove the plastic dust cap that is underneath the distributor rotor.
To be a little more specific: This is the plastic protective cap that protects all of the wires and the power transistor inside the distributor and that can be removed by first removing the distributor rotor and then the two little screws that hold it in place.
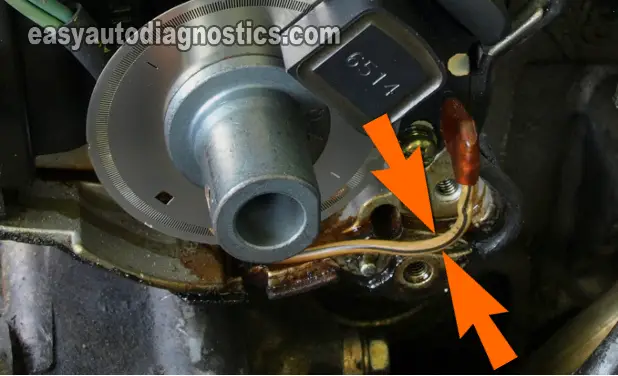
NOTE: You do not have to remove the distributor to remove this cap and when you're done, your distributor should resemble the one in the photo above. - 2
Connect the black lead of the LED to the wire the orange arrows are pointing to using an appropriate tool (like a wire piercing probe).
- 3
Next, connect the red lead of the LED light to the battery positive (+) terminal.
- 4
When you have everything set up, have your helper crank the engine as you observe the LED light.
- 5
The LED light should blink ON and OFF the whole time your helper is cranking the engine.
Let's analyze your test result:
CASE 1: The LED light blinked ON and OFF. This is the correct test result and lets you know that the ignition coil is getting its activation signal (which comes from the power transistor).
You can conclude that the ignition coil is bad and needs to be replaced if you have:
- Confirmed that the ignition coil's tower is not sparking.
- Confirmed that the ignition coil is getting 10 to 12 Volts DC.
- Confirmed that the ignition coil is getting its activation signal.
Here's why: In TEST 1, you verified that there's no spark coming out of the ignition coil's tower. In this step, you confirmed that the coil is getting its activation signal from the power transistor and it has to spark since it's not, you can confidently conclude the ignition coil is bad.
CASE 2: The LED light DID NOT blink ON and OFF. This result tells you that the ignition coil is not the cause of the no-spark no-start condition. Without this Switching signal, the ignition coil will not spark.
The next step is to test the power transistor, since it's the power transistor that supplies this Switching signal.
This tutorial will help you test the power transistor: How To Test The Igniter 2.4L Nissan Altima (1997-2001).
Why The HEI Spark Tester?
If you have read any of my ignition system test tutorials, you'll notice that I'm always writing the article around the HEI spark tester. Why? Well for several reasons and they are:
- 1
The HEI spark tester is accurate and this will save you money by ensuring your diagnostic reaches the right conclusion and thus keeping you from replacing good parts.
How? Well, no other spark tester stress tests the ignition coil or the spark plug wire (high tension wire) like the HEI spark tester. The stress test that the HEI spark tester puts the ignition coil under, produces a spark or a no-spark test result you can take to the bank. - 2
The HEI spark tester does not cost an arm and a leg. It usually retails for around 20 US dollars (don't have an HEI spark tester? Need to buy one? You can buy it here: OTC 6589 Electronic Ignition Spark Tester).
- 3
You don't have to interpret the color of the spark on the HEI spark tester. On some spark testers, it's suggested that you have to interpret the color of the spark (which is total BS in the first place since the color of the spark has nothing to do with anything).
If the HEI spark tester sparks, the spark is present and strong enough. If it doesn't spark, then you have a bonafide no-spark result you can trust. - 4
In the long years I've spent working as a diagnostic automotive technician, I have used a lot of different tools to test for spark and from personal experience I know it works and I can therefore recommend it to you.

If this info saved the day, buy me a beer!


