TEST 3: Making Sure The Voltage Regulator Is Getting Power

For our last test, we're gonna check that the alternator's voltage regulator is getting power.
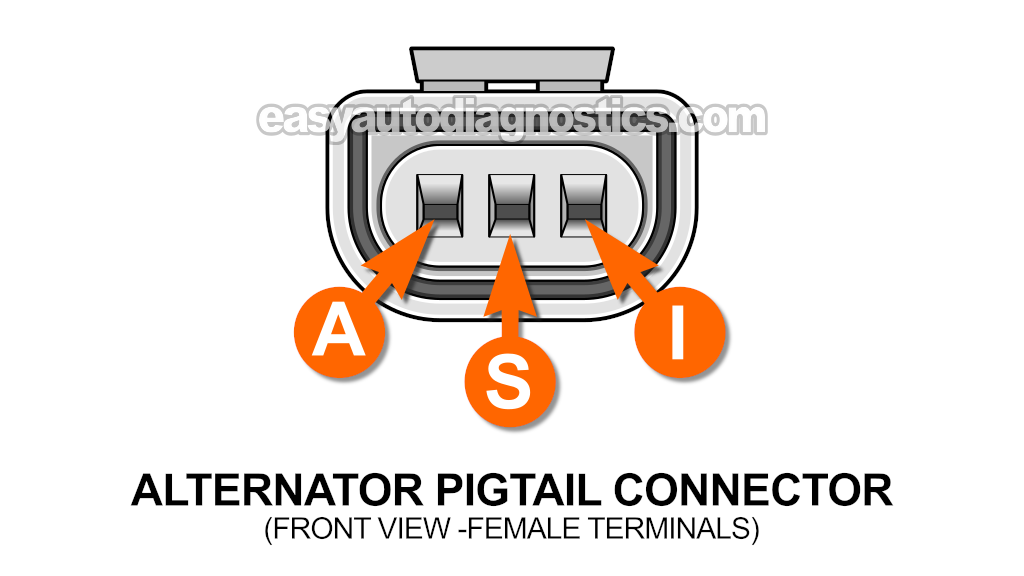
The voltage regulator is located on the rear of the alternator itself and it has a 3-wire connector.
The wire that delivers power to the voltage regulator is the orange with light blue stripe (ORG/LT BLU) wire of its 3-wire connector.
The ORG/LT BLU wire get its power from a fuse. Here are the specifics:
- 1997-1998 pickups: 20 amp inline mini-fuse (located near the alternator).
- 1999-2003 pickups: Fuse 11 (in engine compartment fuse box).
This is what you need to do:
- 1
Reconnect the negative (-) battery cable to the battery's negative (-) post,.
- 2
Disconnect the 3-wire pigtail connector from the alternator.
This 3-wire connector connects to the alternator's voltage regulator. - 3
Connect the black multimeter test lead to the battery negative (-) terminal.
IMPORTANT: The multimeter test lead must connect to a clean spot on the battery's negative (-) terminal. - 4
Connect the red multimeter test lead to the female terminal labeled with the letter A of the alternator's 3-wire pigtail connector (see the illustration above).
NOTE: Terminal A should connect to an ORG/LT BLU wire. - 6
Your multimeter should register 10 to 12 Volts DC.
NOTE: Power is present at all times, no need to turn the key to the ON position.
Let's interpret your test result:
CASE 1: 10 to 12 Volts are present. This means that the alternator's voltage regulator is getting power.
You can now conclude that the alternator is fried and needs to be replaced only if the following are true:
- You confirmed that the alternator is not charging the battery (TEST 1).
- You confirmed that the alternator's output circuit has continuity (TEST 2).
- In this test, you have confirmed that the alternator's in line fuse is not blown.
CASE 2: The indicated voltage is not present. This tells you that the voltage regulator is not getting power.
Without these 12 Volts, the voltage regulator will not activate the alternator to start charging the battery.
Your next step is to check the fuse that protects this circuit, replace if blown, and retest.
On the 1999-2003 pickups, you need to check fuse 11 of the engine compartment fuse box.
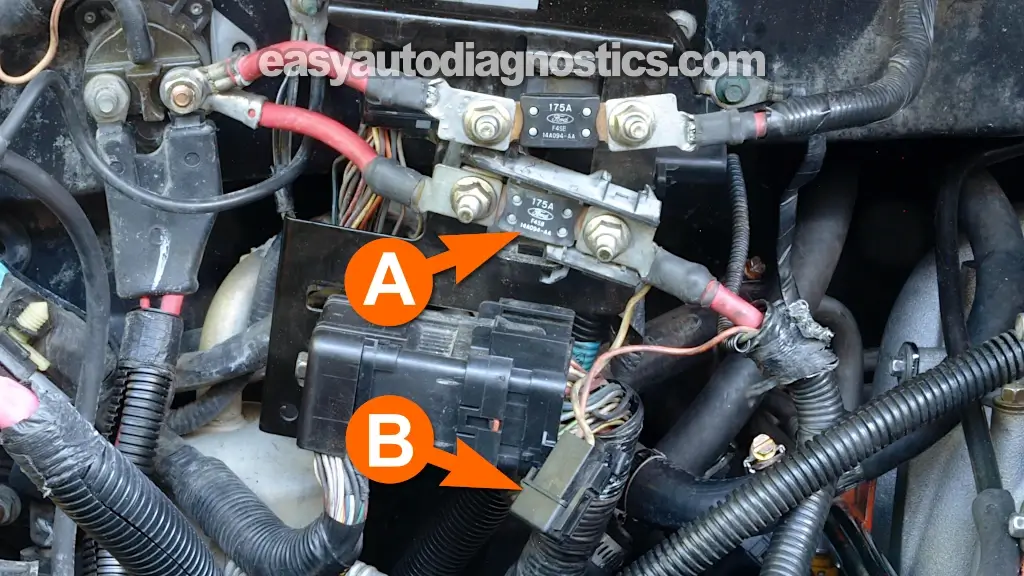
On the 1997-1998 pickups, you can see the location of the alternator's inline fuse here: Location Of The Alternator 175 Amp Mega-Fuse (1997-1998 Pickups).
Location Of The Alternator 175 Amp Mega-Fuse (1997-1998 Pickups)

The arrow with the letter A points to the 175 Amp mega fuse that protects the alternators battery output circuit. It's located next to the starter motor relay.
The arrow with the letter B identifies the inline alternator fuse.
More 4.6L Ford Test Articles
If this tutorial was helpful, check out the other Ford 4.6L tutorials that I've written. You can find them all here: Ford 4.6L, 5.4L Index Of Articles.
Here's a small sample of the tutorials you'll find in the index:
- How To Clean The Ford MAF Sensor (Ford 4.2L, 4.6L, 5.4L).
- How To Test The Fuel Injectors (1997-2002 4.6L F150).
- How To Test The Ford EGR Valve EGR Vacuum Solenoid, DPFE Sensor.
- How To Test The Ford MAF Sensor (4.2L, 4.6L, 5.4L).
- How To Test The 4.6L, 5.4L Ford Throttle Position Sensor (TPS).

If this info saved the day, buy me a beer!

