TEST 2: Testing For Spark At The Distributor Cap

If you've reached this point it's because one or two spark plug wires did not fire off spark in TEST 1.
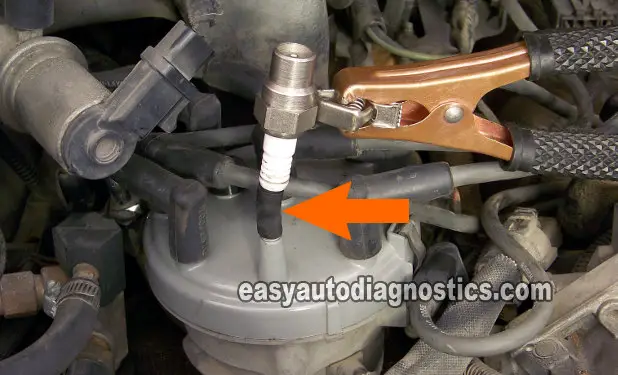
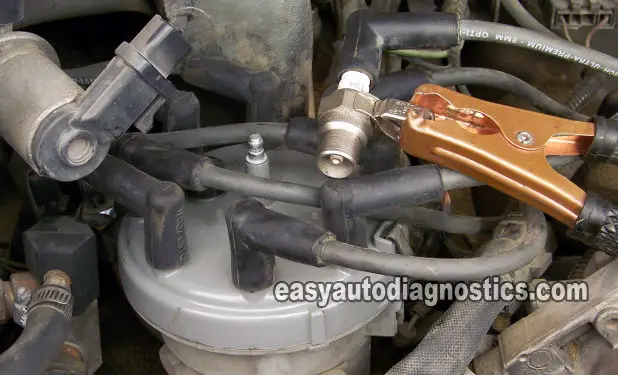
In this test section, we're now going to remove the spark plug wire that did not fire off spark and place the HEI spark tester on that wires distributor cap tower (see photo above).
This test will let us know if the spark plug wire is bad or if the distributor cap is bad (and the cause behind the failed test in TEST 1).
As you can see in the photo above, I'm using a small piece of vacuum hose to securely attach to HEI spark tester to the cap's tower.
OK, this is what you'll need to do:
- 1
Remove the spark plug wire that did not spark from its tower on the distributor cap.
- 2
Connect the spark tester directly on the tower with a piece of vacuum hose (see photo above).
- 3
Ground the spark tester to the battery negative (-) terminal with battery jump-start cable.
- 4
Have your assistant crank the engine while you observe the spark tester.
- 5
You're gonna' get one of two results: (1) Spark or (2) No Spark.
- 6
Repeat this test with the others that did not fire off spark (if applicable).
Let's analyze each of these results below:
CASE 1: You got spark. Then the spark plug wire is bad, replace them all. This is probably as far as you may need to go since your Ford car (or truck, or mini-van, or van) will probably start or solve your misfire problem after replacing these parts.
Here's why: As the spark plug wire ages, its normal resistance to spark increases to the point that the wire can not and does not transmit the spark to the spark plug. This will either cause a misfire, or a lack of power, or a no-start condition. spark plug wires don't last forever, especially after-market ones (average life-span is 3 to 4 years).
CASE 2: You got NO spark. Then the distributor cap is bad. Replace the distributor cap and distributor rotor as a set. This should solve your misfire problem.
Here's why: As the distributor cap ages, the terminals that transmit the spark to the spark plug wires corrode. This corrosion increases the resistance to spark and over time (as more corrosion is created) this same corrosion stops the spark from passing thru' to the spark plug wires.
TEST 3: Testing For Spark At The Ignition Coil (Part 1)

OK, with this test you're gonna' find out if the spark plug wire that feeds the spark from the ignition coil to the distributor is bad or not (this is a two part test, with part two done in TEST 4).
This is a very common problem/cause of a no-start, where the spark plug wire that connects the ignition coil to the distributor cap goes bad and stops transmitting spark. The end result is a no-start condition.
This is what you'll need to do:
- 1
Remove the spark plug wire that is attached to the center of the distributor cap.
NOTE: The other end of this spark plug wire must remain attached to the ignition coil (this is important!, look at the photo to see how I've done it). - 2
Attach the HEI spark tester to the high tension wire wire (as shown in the photo).
- 3
Ground the HEI spark tester to the battery negative (-) terminal with a battery jump start cable.
- 4
Ask your helper to crank the engine while you watch the spark tester.
- 5
You're gonna' get one of the 2 results: (1) Spark or (2) No Spark.
Let's analyze your test result in more detail below:
CASE 1: You got spark. This result confirms that spark is being delivered to the distributor but that the distributor cap is unable to distribute the spark to the spark plug wires.
Also, this test confirms that the ignition coil is GOOD. Replace the distributor cap and rotor as a set and retest (or crank up the vehicle). This should solve your no-start condition.
CASE 2: You got NO spark. Then further testing is required to see if the problem is due to a bad ignition control module (ICM), bad ignition coil, bad pick up coil or something else.
Don't worry, with help of this step-by-step tutorial, we'll find out exactly what's wrong. Right now, the next step is to check for spark directly on the ignition coil. Go to: TEST 4: Testing The Ignition Coil (Part 2).
