TEST 4: Testing The Ignition Coil (Part 2)

If you've reached this point, you've confirmed the following:
- That the engine in your Ford vehicle cranks but does not start.
- That none of the eight spark plug wires are firing off spark (TEST 1).
- That the ignition coil's high tension wire is not firing off spark(TEST 3).
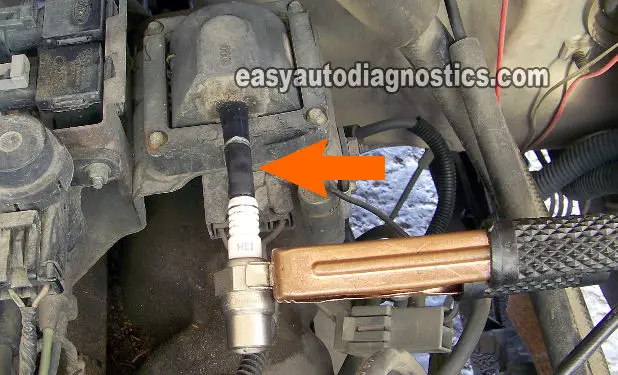
Now, you're gonna' test for spark directly on the ignition coil's tower (with the spark plug wire removed).
If you get spark (when you crank the engine), then you have confirmed beyond a shadow of a doubt that the spark plug wire (high tension wire) that connects the ignition coil do the distributor cap is bad.
This is what you'll need to do:
- 1
Remove the spark plug wire that's attached to the ignition coil's tower.
- 2
Now, connect the HEI spark tester to the coil's tower with a small piece of vacuum hose (this is important!, look at the photo to see how I've done it).
- 3
Ground the HEI spark tester to the battery negative (-) terminal with a battery jump start cable.
- 4
Have your helper crank the engine while you observe the spark tester.
- 5
You're gonna' get one of the 2 results: (1) Spark or (2) No Spark.
Let's take a look at what your test result means:
CASE 1: You got spark. This is the correct test result and it lets you know that the spark plug wire that feeds the distributor cap spark is bad and the ignition coil is GOOD. Replace the spark plug wire by replacing all of the spark plug wires.
Here's why: As the spark plug wire ages, its normal resistance to spark increases to the point that the wire can not and does not transmit the spark to the spark plug. This will either cause a misfire, or a lack of power, or a no-start condition. Spark plug wires don't last forever, especially after-market ones (average life-span is 3 to 4 years).
CASE 2: You got NO spark. Then further testing is required to see if the problem is due to a bad ignition control module (ICM), bad pick up coil or something else. We're gonna' find out with the rest of the tests, go to: TEST 5: Testing The Ignition Coil For 12 Volts.
TEST 5: Testing The Ignition Coil For 12 Volts

For this test you can use a multimeter or a test light. Also, altho' you're testing the ignition coil for 12 Volts, you're indirectly testing the ignition control module (ICM) and the PIP (Profile Ignition Pickup) sensor for 12 Volts also since the same power circuit feeds them all.
The procedure I recommend to use (to accomplish all of the tests below) is to use a test probe that pierces thru' the wire's insulation (to see what this tool looks like, go here: Wire Piercing Probe). I don't recommend inserting anything into the front of the female terminal. Whatever method you use, the key here is not to damage the female terminal or the wire. Again, be careful. Use common sense and take all necessary safety precautions.
These are the test steps:
- 1
Place the multimeter in Volts DC mode.
- 2
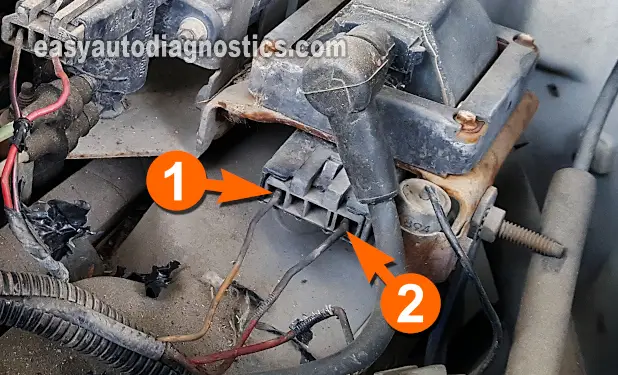
Disconnect the ignition coil from its electrical connector.
- 3
With the red multimeter test lead, probe the wire identified with the number 2 in the photo above.
This should be the RED/LT GRN wire of the ignition coil connector. - 4
Connect the black multimeter test lead to the battery negative (-) terminal.
- 5
Turn the key ON with the engine OFF.
- 6
You should see 10 to 12 Volts on the multimeter.
Let's analyze your test result:
CASE 1: You got 10 to 12 Volts. All is good in the neighborhood since this test result indicates that the ignition coil is being fed with power (10 to 12 Volts DC).
The next step is to check to see if the ignition coil is receiving the switching signal from the ignition module. Go to: TEST 6: Verifying The Ignition Coil's Switching Signal.
CASE 2: You DID NOT get 10 to 12 Volts. You must find out why you're missing this voltage. Without this voltage the ignition control module nor the ignition coil will work. Resolving this power issue should solve your no-start condition.
