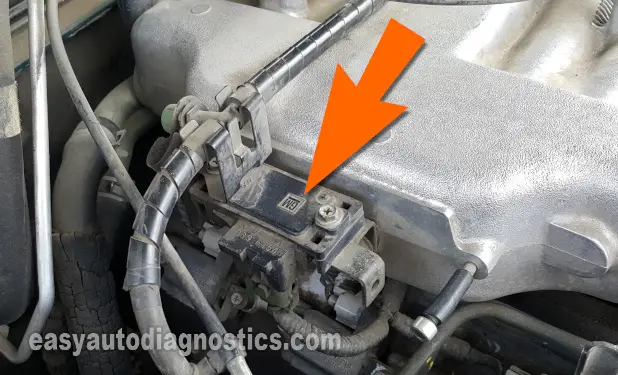
This tutorial will show how to test the manifold absolute pressure (MAP) sensor (and DTC P0106, P0107, P0108, P01107) on your Isuzu Amigo, Rodeo, Trooper or Honda Passport (1988-1997) with step-by-step testing instructions.
You'll be able to definitely say, "The MAP sensor is bad" or "The MAP sensor is OK, and not the cause of the MAP code or issue". All you'll need is a multimeter, since a scan tool isn't required for the test.
Contents of this tutorial:
![]() You can find this tutorial in Spanish here: Cómo Probar El Sensor MAP (1992-1997 3.2L V6 Isuzu Rodeo y Trooper) (at: autotecnico-online.com).
You can find this tutorial in Spanish here: Cómo Probar El Sensor MAP (1992-1997 3.2L V6 Isuzu Rodeo y Trooper) (at: autotecnico-online.com).
Important Tips And Suggestions
TIP 1: When testing for presence of Ground (in the MAP sensor's Ground wire), you've got to be careful not to short the wire to power (battery 12 Volts) or you'll fry the fuel injection computer.
TIP 2: You'll notice that the tests are done with a vacuum pump. If you don't have one, and you live in the States, you can run down to AutoZone or O'Reilly Auto Parts and rent one (it's free -deposit required tho' to make sure you take it back). If this option is not available to you, you can also use the good ole' lungs.
TIP 3: A scan tool is a must-have tool for any trouble code troubleshooting, but the way I've designed this test, you don't need one. What you do need is a multimeter, which can either be an analog one or a digital one.
Symptoms Of A Bad MAP Sensor
You'll have the check engine light on, for sure, on your instrument cluster and one of several of the following symptoms:
- TPS diagnostic trouble codes P0106, P0107, P0108, P01107 stored in the vehicle's computer's memory and lighting up the check engine light.
- Really bad gas mileage. You know that it's not the price of gasoline that has you thinking that your Isuzu pickup or SUV is costing you more at the pump.
- No power and/or hesitation as you accelerate the vehicle.
- Rough idle.
- Hard start (engine takes a long time to start).
How Does The MAP Sensor Work?
The manifold absolute pressure sensor's job is to measure the intake manifold's vacuum and then transmit this info the fuel injection computer (also known as the PCM= Powertrain Control Module). In a nutshell, this is how the MAP sensor works:
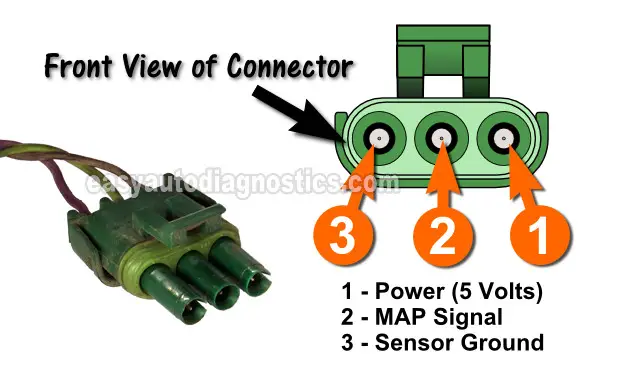
- When you turn the key to the ON position and then start the engine, the MAP sensor gets power thru' the wire labeled with the number 1. This power is in the form of 5 Volts.
- Ground is provided to the MAP sensor by the fuel injection computer thru' the circuit labeled with the number 3.
- With the engine running, the pistons downward travel creates a vacuum in the intake manifold. Now, since the MAP sensor is connected to the intake manifold, this vacuum also acts on the innards of the MAP sensor.
- So then, no matter what the amount of vacuum inside the intake manifold due to different engine RPMs, the MAP sensor is able to always measure these changes and send this info to the fuel injection computer thru' the wire labeled with the number 2.
- The fuel injection computer uses this info (that the MAP sensor provides) to control fuel injection, ignition advance and host of other things to keep your engine running smoothly on your Isuzu vehicle.
Where To Buy The MAP Sensor And Save
The following links will help you comparison shop for known automotive brand MAP sensors:
Disclosure: As an Amazon Associate, I earn from qualifying purchases. Buying through these links helps support this site at no extra cost to you. Thanks for your support —it really means a lot!
Not sure if the MAP sensor fits your vehicle? Don't worry. Once you get to the site, they'll make sure it fits by asking you the specifics of your vehicle. If it doesn't fit, they'll find you the right MAP sensor.
TEST 1: Checking The MAP Signal

This first test will have you measuring the MAP signal right off the bat.
Depending on the result of this test, you'll continue on the next round of tests (there are two more) or you'll stop here.
Since the signal that the MAP sensor outputs is in Volts DC, your multimeter's dial should be set to Volts DC.
Also, the entire test is done with the with the key on but with the engine off and with the MAP sensor connected to its electrical connector.
NOTE: The MAP sensor must remain connected to its electrical connector for this test to work. You'll need to use a back probe or a wire-piercing probe to check for the MAP voltage signal in the wire. You can see an example of this tool here: Wire Piercing Probe.
OK, to get this show on the road, this is what you need to do:
- 1
Remove the MAP sensor from the intake manifold. It may be necessary to unplug the sensor from its connector. If you do, be sure and reconnect it after removal.
- 2
Connect your vacuum pump to the MAP sensor's vacuum inlet (using a vacuum hose).
- 3
Set your multimeter's selector to Volts DC mode.
- 4
Connect the red multimeter test lead, with the appropriate tool, to the wire that connects to the terminal labeled with number 2 (see the illustration above).
NOTE: The MAP sensor must be connected to its electrical connector to read the MAP voltage signal. - 5
Ground the black multimeter test lead directly on the battery negative (-) terminal.
- 6
Power up the MAP sensor by turning the key ON (but engine OFF).
- 7
The multimeter should read about 4.7 Volts DC without any vacuum being applied to the MAP sensor.
- 8
Now, apply vacuum to the MAP sensor with the vacuum pump (or your mouth). You should see the voltage decrease as you apply vacuum:
1.) 0 in. Hg = 4.7 Volts.
2.) 5 in. Hg = 3.9 Volts.
3.) 10 in. Hg = 3.0 Volts.
4.) 20 in. Hg = 1.1 Volts.
When you release the vacuum, the voltage should return to 4.7 Volts.
OK, let's take a look at what your vacuum pump test results mean:
CASE 1: The multimeter registered the indicated voltages as you applied vacuum. This tells you that the MAP sensor is working like it should and is not the cause of the problem or the diagnostic trouble code.
Now, if the computer or scan tool still keep reading a MAP sensor code, take a look at the section: The MAP Sensor Code Won't Go Away for more info.
CASE 2: The multimeter registered voltage, but it did not increase or decrease as you applied vacuum. This usually means that the MAP sensor is fried.
To be absolutely sure, I suggest confirming that the MAP sensor has power and Ground. If both are present, the MAP sensor is bad. To test for power, go to: TEST 2: Checking The MAP Sensor's Power Circuit.
CASE 3: The multimeter registered 0 Volts. This usually means that the MAP sensor is fried.
To be absolutely sure, I suggest confirming that the MAP sensor has power and Ground. If both are present, the MAP sensor is bad. To test for power, go to: TEST 2: Checking The MAP Sensor's Power Circuit.


