TEST 4: Triggering Signal Test

So far your tests have confirmed that the ignition coil is getting plenty of juice (10 to 12 Volts) and that its Ground circuit is OK. The next step is to verify that the PCM is feeding it a Triggering signal.
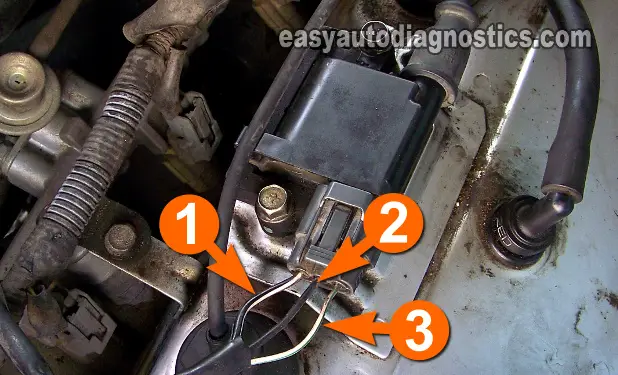
The Triggering signal is what tells the transistor (ignition module) within the ignition coil when to activate it and get it to start sparking away. For this test you'll need a multimeter that can read Hertz (Hz) frequency.
Let's get testing:
- 1
Put the multimeter in Hertz (Hz) mode.
- 2
Probe the circuit labeled with the number 3 (see photo the above) with the black multimeter test lead (using an appropriate tool to pierce the wire).
- 3
Connect the red multimeter test lead to the battery positive (+) terminal.
- 4
You should see fluctuating values between 10 to 14 Hertz as the engine cranks (higher if it starts) on your multimeter.
Let's examine your test result:
CASE 1: The multimeter registered a fluctuating 10 to 14 Hertz (Hz) as the engine cranked. This test result confirms the Triggering signal is present. This result indicates that the Coil-On-Plug ignition coil on your vehicle is bad and needs to be replaced.
CASE 2: The multimeter DID NOT register a fluctuating 10 to 14 Hertz (Hz) as the engine cranked. Re-check all of your connections and repeat the test again.
If still no Hertz readings, then this results eliminates the ignition coil as the source of the no-spark condition/misfire, since without the Triggering signal the ignition coil will not work.
Now the next step is to test the crankshaft position sensor, but only if both coils are not sparking on any of their spark plug wires and boots. Go to: TEST 7: Making Sure The Crankshaft Position Sensor Is Getting Power.
TEST 5: Testing For Spark At The Ignition Coil Spark Plug Wire Tower

IMPORTANT: Proceed with this test only if you have been directed here by CASE 2 of TEST 1.
In this test, you're gonna' test for spark directly on the ignition coil tower that feeds spark to the spark plug wire.
IMPORTANT: The ignition coil has to be in its place and bolted to the valve cover for this test.
These are the test steps:
- 1
Remove the spark plug wire that did not fire off spark from its ignition coil tower.
- 2
Place the spark tester directly on the ignition coil in place of the spark plug wire you just removed (see photo above).
- 3
Ground the spark tester with a battery jump start cable directly on the battery negative (-) terminal.
- 4
Have your assistant crank the engine. The engine may start, so be careful.
- 5
You're gonna' get one of two results: spark or no spark.
Let's examine your test result:
CASE 1: You got spark. This is the correct test result and lets you know that the ignition coil is good and that the spark plug wire is bad. Replace both spark plug wires.
CASE 2: You got NO spark. This test result lets you know that the ignition coil is bad.
Replacing the ignition coil will solve the misfire condition and the misfire code lighting up the check engine light (CEL) on the instrument cluster.
TEST 6: Making Sure The Crankshaft Position Sensor Is Getting Power

When the crankshaft position sensor goes bad on your Mitsubishi vehicle, the car will experience a 'no-spark no-start' condition. To be a little more specific, the ignition coils will not spark on any of their spark plug wires or boots. Also, the PCM will not create and feed a Triggering signal to them.
Testing the crank sensor is very easy and in the following three test steps, you'll find out if it's bad or not.
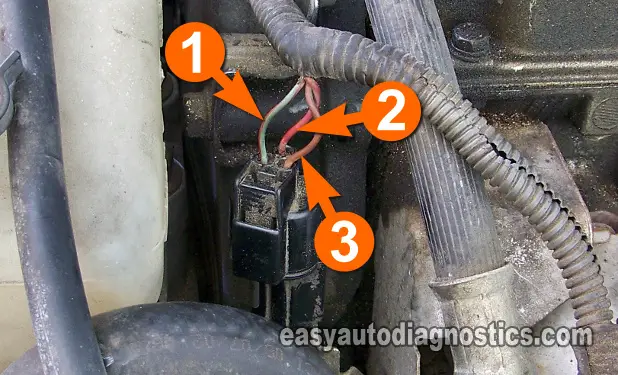
The very first thing that has to done is to make sure the crank sensor is getting power, which in this case is 12 Volts. Now, the connector that you see in the photo above is located need the right/front corner of the valve cover and sandwiched between the exhaust manifold and the coolant reservoir bottle.
These are the test steps:
- 1
Place your multimeter in Volts DC mode.
- 2
Connect the red lead of the multimeter, with an appropriate tool, to the wire identified with the number 2 in the photo. This should be a red wire.
- 3
Ground the black lead of the multimeter directly on the battery's negative (-) terminal.
- 4
Have your assistant turn the key on without cranking the engine.
- 5
Your multimeter should register 12 Volts.
Let's examine your test result:
CASE 1: The multimeter showed 10 to 12 Volts. This is the correct test result and confirms that the CKP sensor is getting power.
The next step is to make sure its Ground circuit is OK too, go to: TEST 8: Making Sure The Crankshaft Position Sensor Is Getting Ground.
CASE 2: The multimeter DID NOT show 10 to 12 Volts. This indicates that the CKP sensor is not getting power. Without 10 to 12 Volts, the CKP will not work and your Mitsubishi vehicle will crank but not start. Repairing the cause of this missing voltage should solve your vehicle's 'no-spark no-start' condition.
