TEST 7: Making Sure The Crankshaft Position Sensor Is Getting Ground

Testing the Ground circuit of the crankshaft position sensor follows pretty much the same path as the above power test although with some slight changes, here are the steps:
- 1
Place your multimeter in Volts DC mode.
- 2
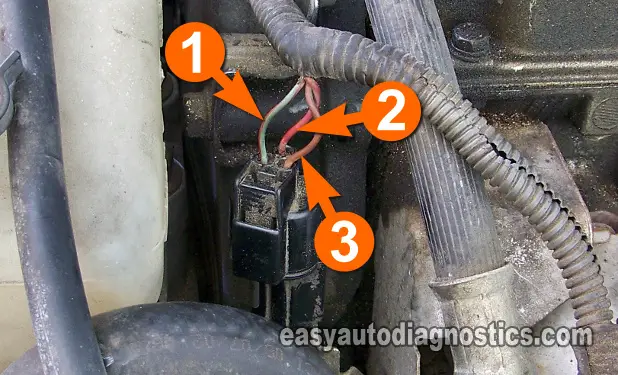
Connect the black lead of the multimeter, with an appropriate tool, to the wire identified with the number 3 in the photo.
This should be a brown wire. - 3
Connect the red lead directly on the battery's positive (+) terminal.
- 4
Your multimeter should register 10 to 12 Volts with or without the key in the ON position.
Let's examine your test result:
CASE 1: The multimeter showed 10 to 12 Volts. This is the correct test result and confirms that the CKP sensor is getting Ground.
The next step is check that the crank sensor is creating a crankshaft position signal, go to: TEST 8: Crankshaft Position Sensor Signal Test.
CASE 2: The multimeter DID NOT show 10 to 12 Volts. This indicates that the CKP sensor doesn't have a good path to Ground.
Without a path to Ground, the CKP will not work and your Mitsubishi vehicle will crank but not start. Repairing the cause of this missing Ground should solve your vehicle's 'no-spark no-start' condition.
TEST 8: Crankshaft Position Sensor Signal Test

This test will require that you crank the engine by hand. You will need to use a 1/2 in. drive ratchet wrench and a long 1/2 in. drive extension to turn the crankshaft pulley by hand.
IMPORTANT: Both ignition coils MUST be disconnected from their electrical connectors before and during this test!
- 1
Disconnect both ignition coil connectors. This is important!
- 2
Place your multimeter in Volts DC mode.
- 3
Connect the re lead of the multimeter, with an appropriate tool, to the wire identified with the number 1 in the photo. This should be a GREEN with red stripe wire.
- 4
Connect the black lead directly on the battery's negative (-) terminal or a good Ground point on the engine.
- 5
Turn the key to the ON position.
- 6
With an appropriate tool, turn the crankshaft pulley by hand.
Do not crank the engine with the key from inside of the vehicle. - 7
Your multimeter will register an ON/OFF voltage signal as you crank the engine by hand.
'ON' will register 5 Volts on the multimeter and 'OFF' will register 0.1 Volts.
Let's examine your test result:
CASE 1: The multimeter registered the ON/OFF voltage values the whole time you hand cranked the engine. This is the correct test result and lets you know that the crankshaft position sensor is working and is not the cause of your 'no-spark no-start' condition.
CASE 2: The multimeter DID NOT register the ON/OFF voltage values. This test result confirms the crankshaft position sensor is bad and needs to be replaced.
Replacing the crank sensor will solve your 'no-spark no-start' condition on your 2.4L (SOHC) Mitsubishi vehicle (or 2.4L (SOHC) Chrysler Sebring or Dodge Stratus).
Misfire Due To Carbon Tracks

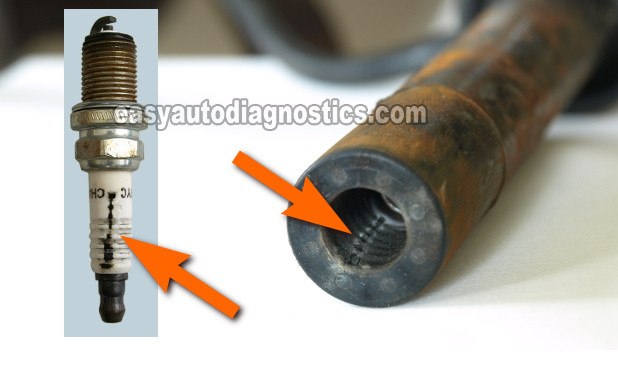
So, you got spark from all of the spark plug boots and ignition coil boots, but you're still experiencing a misfire condition then it could be carbon tracks that have developed on the inside of the high tension wires and ignition coil boots that are diverting the spark to Ground.
Carbon tracks inside the spark plug boot (whether the boot belongs to one of the two spark plug wires or the ignition coil itself) are common occurrences in this type of ignition system. Not only that, but a leaking valve cover gasket will inundate the spark plug tubes with engine oil. This will cause a misfire too.
What does a carbon track look like? Take a look at the photos of the photo above and you'll see what one looks like inside the boot and on the spark plug.
If you do find traces/evidence of a carbon track, you've got to replace both the spark plug and the spark plug wire or ignition coil that has the corresponding carbon track on it. Carbon tracks can not be cleaned or removed.
Besides carbon tracks, here are a couple of other things that can cause a misfire condition on your Mitsubishi car (or Chrysler Sebring or Dodge Stratus):
- Oil leaking into the spark plug wells (tubes).
- This is a very common problem on these 2.4L (SOHC) engines, and this is easily confirmed when you pull out the spark plug wire or the ignition coil and their boots are soaked in oil.
- Anything that is oil soaked should be replaced. Cleaning the boots and spark plugs in some sort of solvent (like carburetor cleaner) sometimes helps, but 90% of the time it doesn't.
- Bad fuel injector.
- A bad fuel injector will cause a misfire code (P0300, O0301, P0302, P0303, P0304) to light up the check engine light on your instrument cluster but not a specific fuel injector code (go figure).
- One way that I've found out to be about 90% effective, to test a bad fuel injector, is to test the resistance of all four with the multimeter in OHMs mode. The Ohms value should nearly be identical for all four fuel injectors. The value that varies by a big margin is the one that's bad and needs replacement.
- Low engine cylinder compression.
- This is one of the most overlooked problems/causes of a misfire condition and/or rough idle. Just one cylinder with lower compression than the rest, will cause a misfire that will have you replacing component after component and never solving the problem.
- You'll need to use an engine compression tester to test all four cylinders.
- The compression reading of each cylinder should be nearly identical to each other. If it's not, then anything beyond 10% of the rest of the readings is bad and indicates that that cylinder has a mechanical problem and is the cause of the misfire and/or rough idle your Mitsubishi vehicle is experiencing.
- Here's an example: Let's say that the engine compression tester registered for cylinders #1 -180 PSI, #2 -175 PSI, and #3 -185 PSI, and cylinder #4 registered only 90 PSI. Doing the math,
- We add the three highest compression readings and divide by 3 to get the average (540÷3=180).
- Then we multiply 180 by 10% (180x.10=18).
- The last step now is to subtract 18 from 180 and 162 PSI (180-18=162) is the lowest possible reading your engine can have in any one engine cylinder without causing a misfire.
- Broken timing belt.
- A broken timing belt will not cause a rough idle or misfire condition but a no-start condition. The fastest way to check for this is to remove the top plastic timing belt cover and having a helper crank the engine while you observe to see if the cam gear rotates when the engine cranks. If the cam gear does not rotate, you have a broken timing belt on your hands.

If this info saved the day, buy me a beer!

