TEST 4: Ignition Coil Spark Test

The very first thing that you have to do, when testing the ignition coil, is to see if it's firing off spark directly on the ignition coil's tower with a spark tester.
Now, you won't be testing the resistance of the ignition coil in the following 3 tests, mainly because this type of test (the resistance test) is a complete waste of time and life.
Testing the ignition coil on the car and in action (while cranking the engine) is the only guaranteed way to know if it's good or bad.
These are the test steps:
- 1
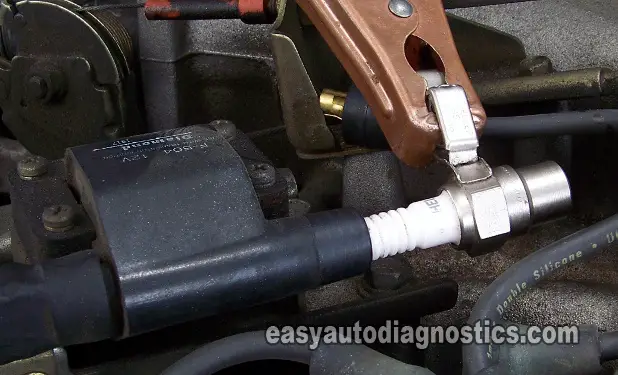
Remove the spark plug wire that's attached to the ignition coil's tower (as shown in the photo).
- 2
Place the spark tester in the ignition coil's tower as shown in the photo above.
- 3
Connect the HEI spark tester to the battery negative (-) terminal with a battery jump start cable.
- 4
Have your helper to crank the engine once again while you eye-ball the spark tester.
- 5
The spark tester should spark as your helper cranks the engine.
Let's analyze your spark test result:
CASE 1: You got spark. This is the correct test result and confirms that the ignition coil is producing spark.
You can conclude that the spark plug wire that feeds the distributor cap spark is bad and the ignition coil is GOOD. Replace the spark plug wire by replacing all of the spark plug wires.
Here's why: As the spark plug wire ages, its normal resistance to spark increases to the point that the wire can not and does not transmit the spark to the spark plug. This will either cause a misfire, or a lack of power, or a no-start condition. Spark plug wires don't last forever, especially after-market ones (average life-span is 3 to 4 years).
CASE 2: You got NO spark. The next step is to verify that the ignition coil is getting power (10 to 12 Volts), go to: TEST 5: Making Sure The Ignition Coil Is Getting Power.
TEST 5: Making Sure The Ignition Coil Is Getting Power

OK, so far, the ignition coil did not spark, so the next step is to make sure that it is getting power.
Power comes in the form of 10 to 12 Volts DC and this test will show you how to check for this.
Let's get testing:
- 1
Place your multimeter in Volts DC mode.
- 2
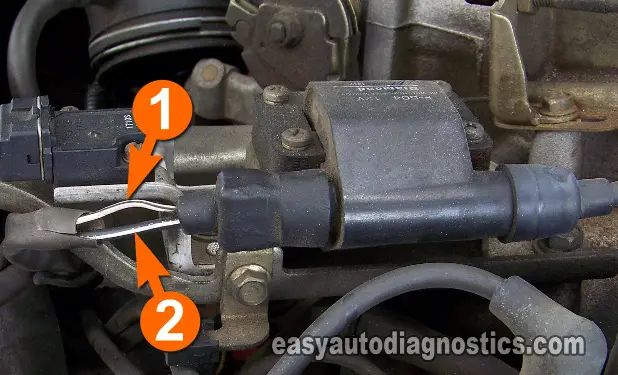
Probe the wire labeled with the number 2 in the photo with the red multimeter test lead.
- 3
Connect the black multimeter test lead to the battery negative (-) terminal.
- 4
Have your helper turn the key to the ON position.
- 5
Your multimeter should register 10 to 12 Volts DC.
Let's interpret your test result:
CASE 1: The multimeter registered 10 to 12 Volts. This is the correct test result.
So far so good, the next step is to see if the ignition coil is receiving the switching signal from the ignition module. Go to the next test: TEST 6: Verifying The Ignition Coil's Switching Signal.
CASE 2: The multimeter DID NOT register 10 to 12 Volts. Without this voltage the ignition coil will NOT work.
Your next step is to find out why this voltage is missing. Resolving this power issue should solve your no-start condition. The most likely causes will be a bad relay or a blown fuse.
TEST 6: Verifying The Ignition Coil's Switching Signal

So far, your tests have confirmed that:
- The 6 spark plug wires are not sparking (TEST 1).
- The ignition coil's high tension wire is not sparking (TEST 3).
- The ignition coil's tower is not sparking (TEST 4).
- The ignition coil is receiving 10 to 12 Volts (TEST 5).
The next step is to make sure that the ignition coil is getting an activation signal from the power transistor (the power transistor is the ignition control module in this ignition system).
The wire we're gonna' test is the one labeled with the number 1, in the photo above, and is the one that feeds the switching signal (from the power transistor) to the ignition coil.
You can use a test light or an LED light. This test is performed with the engine being cranked, so be careful and take all necessary safety precautions.
The following test steps assume that you're using an LED light to test for the switching signal.
These are the test steps:
- 1
Disconnect the ignition coil from its connector.
- 2
Connect the black lead of the LED light to the terminal that connects to the wire identified with the number 1 in the photo.
- 3
Connect the red lead of the LED to the terminal that connects to the wire identified with the number 2 in the photo.
- 4
When everything is set up, have an assistant crank the engine.
- 5
The LED light should flash ON and OFF the whole time that the engine is cranking (although the LED light may not completely turn OFF).
Let's interpret your test result:
CASE 1: The LED light flashed ON and OFF. This is the correct test result and lets you know that the ignition coil's activation signal is present in the wire.
You can conclude that the ignition coil is bad (and needs to be replaced) if you have:
- Confirmed that none of the 6 spark plug wires are firing spark (TEST 1).
- Confirmed that the ignition coil's high tension wire is not firing spark (TEST 3).
- Confirmed that the ignition coil's tower is not firing spark (TEST 4).
- Confirmed that the ignition coil is receiving 12 Volts (TEST 5).
- Confirmed that the ignition coil is receiving an activation signal (triggering signal).
This also means that the power transistor and crankshaft position sensor (within the distributor) are good. Replacing the ignition coil will solve your 'no-spark no-start' condition on your Mitsubishi (or Dodge) vehicle.
CASE 2: The LED light DID NOT flash ON and OFF. Re-check all of your connections and retry the test again.
If the LED light still does not flash ON and OFF, then you can conclude that the ignition coil's triggering signal is not present.
This means that the power transistor is not activating the ignition coil. The next step is to start testing the power transistor's Ground and triggering signal circuits, go to: TEST 8: Making Sure The Power Transistor Is Getting Ground.

