TEST 13: Testing The CMP Signal

Testing the presence of the camshaft position signal is also done using an LED light and follows the same test steps you performed in TEST 12:
These are the test steps:
- 1
Connect the distributor to its electrical connector.
- 2
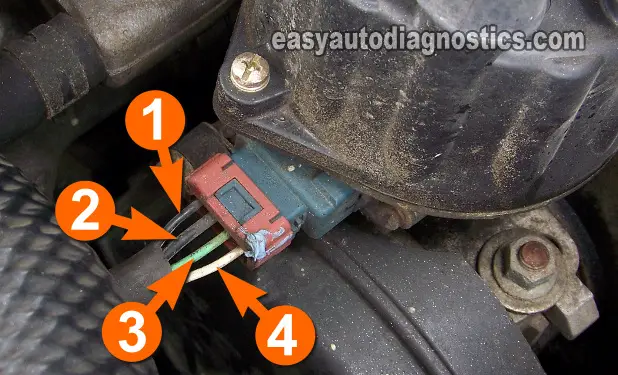
Connect the black lead of the LED to the wire identified with the number 4 in the photo.
NOTE: the distributor must remain connected to its electrical connector for this test, so you will need to either back-probe this wire or use a wire-piercing probe on it (to see an example of a wire-piercing probe, go here: Wire Piercing Probe). - 3
Connect the red lead of the LED to the battery positive (+) terminal.
- 4
The LED may come ON and stay ON.
- 5
When all the connections are secure and all is ready, have your helper crank the engine.
- 6
The LED light should flash ON and OFF the whole time that your helper is cranking the engine.
Let's interpret your test result:
CASE 1: The LED light flashed ON and OFF the whole time the engine was cranking. This is the correct test result and confirms that the camshaft sensor part of the crank/cam sensor assembly is creating and sending a CMP signal to the fuel injection computer.
You can conclude that the cause of your engine's no-start problem is a bad power transistor if you have:
- Confirmed that none of the 6 spark plug wires are firing spark (TEST 1).
- Confirmed that the ignition coil's high tension wire is not firing spark (TEST 3).
- Confirmed that that the ignition coil's tower is not firing spark (TEST 4).
- Confirmed that the ignition coil is receiving 12 Volts (TEST 5).
- Confirmed that the ignition coil IS NOT receiving an activation signal (TEST 6).
- Confirmed that the power transistor is getting Ground (TEST 8).
- Confirmed that the power transistor is receiving an activation signal from the fuel injection computer (TEST 9).
- Confirmed that the CKP/CMP sensor assembly is getting power and Ground (TEST 10 and TEST 11).
- Confirmed that the CKP/CMP sensor assembly is producing a CKP signal and a CMP signal (TEST 12 and TEST 13).
CASE 2: The LED light DID NOT flash ON and OFF the whole time the engine was cranking. Then the camshaft position sensor is bad and is the cause of the NO SPARK and CRANKS BUT DOES NOT START condition.
Replace the crankshaft/camshaft position sensor assembly in the distributor.
Other Common Causes Of A Misfire

So you've done all of the spark tests and the test results confirm that the misfire is not due to a lack of spark. Well, here are a couple of other common causes and testing tips/suggestions that may inspire your next round of tests:
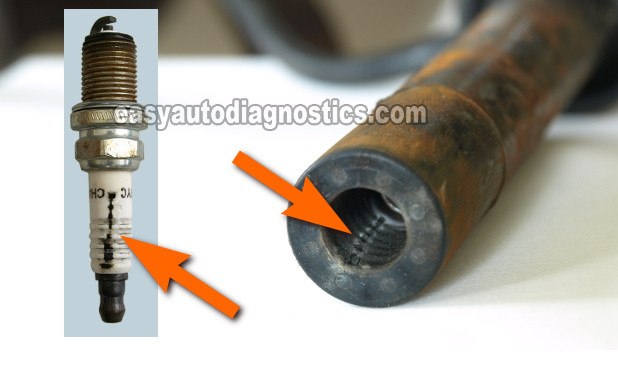
- The valve cover gaskets are leaking oil onto the spark plugs and soaking them and the spark plug wire boots with oil.
- Over time, this oil will cause a misfire as the oil cooks and turns into carbon tracks.
- The photo above shows you what a carbon track looks like on the inside of the spark plug wire boot and on the ceramic insulator of the spark plug.
- Engine compression test.
- One of the most overlooked diagnostic tests, to find the root cause of a misfire, is performing a compression test on all six cylinders of your Mitsubishi or Dodge SUV or pick up.
- You'll need an engine compression tester of course.
- The engine compression readings between cylinders should not vary more 15%.
- Broken spark plugs.
- This usually happens at tune-up time, if you have dropped one on the floor.
- You power washed the engine (this is something that should never be done on any vehicle).
- A bad fuel injector.

If this info saved the day, buy me a beer!


